Photographers run out of storage space very quickly. Here are the steps they should take to prepare an external drive for photo editing use on a Mac.
External drives come formatted in a way that is not best for photo editing use. I have advice on how it is photographers who use a Mac should prepare an external drive to take the best care of your images and catalogs. You can see that advice in the video, quick steps, and explained steps below.
Quick Steps
WARNING: DO NOT do this process on a drive you are already using. This process will erase all of the data on the drive.
- Launch the Disk Utility App
- Plug the external drive into your Mac
- Choose the external drive
- If the format is ExFat, hit the Erase button
- Change Format to MacOS Extended (Journaled)
- Append year-month-day to Name
- Hit Erase
- Look for “Operation successful”
- Hit Done
- Close the Disk Utility App
Explained Steps
For those who want to know more about the how and why an external drive needs to be prepared for use in photo editing on a Mac.
Step 1: Launch Disk Utility App
Apple has an application that comes with every Mac computer called “Disk Utility App” that photographers should use to prepare an external drive for photo editing use. Fastest way to launch the app is to:
- Press Command-space (hold the cmd button on the keyboard and press the spacebar). This will bring up a search bar
- Type in “Disk” and Disk Utility should be a result at the top of the list
- Hit the enter button or click on the Disk Utility app
You should see a window that looks a little like this:
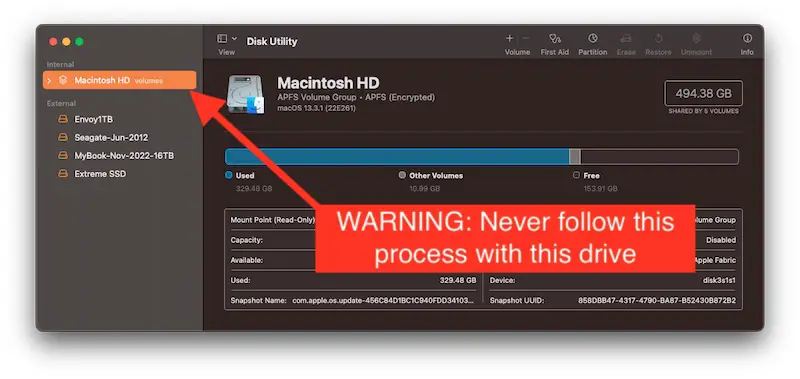
WARNING: Never follow the rest of the process with the “Macintosh HD” drive selected. Doing so will mean a disastrous loss of data and make your Mac stop working. You will have to reinstall MacOS and lose all of the programs you have installed along with documents or other data you have saved there.
Step 2: Plugin the external drive
Though connecting an external drive is pretty simple, there is a little bit to walk through here. Photographers frequently ask me how they should connect their external drive to their Mac to get the most performance in their photo editing. Here in early 2023 there are 3 primary ways photographers can connect their external drive.
- Thunderbolt / USB 3.2 Gen 2
- USB 3.0
- Network Attached Storage (NAS)
Some photographers may not know what these connection types are. Don’t worry, it doesn’t really matter which you use! I have done more than 50 hours of testing with all of these connection types and the results showed that Lightroom Classic doesn’t use any more than 45MB/s (megabytes per second). All of these connection types support more than that, so it really doesn’t matter which you use.
The other question I get is if photographers can use a USB/Thunderbolt hub or dock. The answer is yes, but it needs to be a good one. Cheap hubs/docks are likely to become a bottleneck and not provide the data rate you need. Here are a couple of options that I have personally tested and can validate provides the data rate needed.
- Twelve South StayGo | USB-C Hub for Type C ($100)
- Cable Creation USB C Hub 4K 60Hz, 7 in 1 USB C Hub Multiport Adapter ($40)
- OWC Thunderbolt Dock ($250 – worth it)
Step 3: Choose The New Drive In Disk Utility
As you can tell from the warnings in Step 1 above, it is critical you make sure you choose the new external drive you are preparing for use. Failure to do so and choosing a drive that already has data on it will mean the loss of ALL that data.
How do you know which is the new drive? Manufacturers usually name the drive the same as the model of the drive. The screenshots I am using came from my preparing a SanDisk Extreme Portable SSD drive. Straight out of the box SanDisk named the drive “Extreme SSD”. You can also know which it is by looking at the drives listed on the left side of the Disk Utility application BEFORE you plug the drive into your Mac, then watching what drive comes up new after you plug it in.
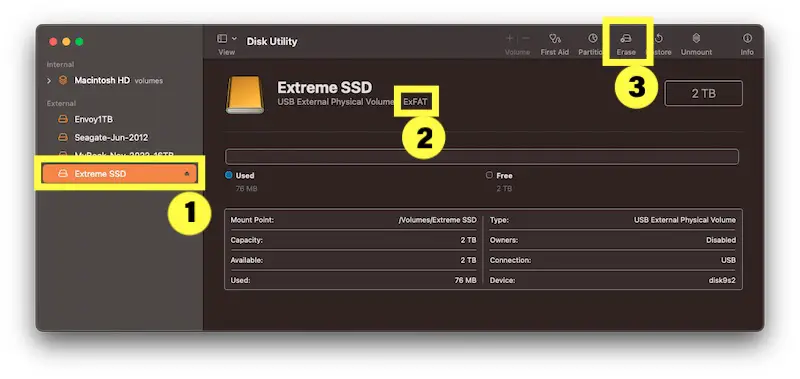
Photographers should now do this:
- Choose the external drive you want to prepare for photo editing use.
- Look at the format of the drive. In most cases the drive manufacturer will format an external drive in the ExFAT format. Unfortunately, this format is not the very best option for photographers using external drives in photo editing. Look at Step 5 for an explanation.
- This is explained in Step 4 below
Step 4: If ExFAT, Click the Erase Button
If under the drive name (number 2 in the screenshot above) you see “ExFAT”, photographers should change the format. This is done by clicking the Erase button (number 3 in the screenshot above).
NOTE: Even after clicking on the Erase button nothing will happen to the drive. Still, you should validate you have the drive you want to prepare for photo editing use is selected on the left before hitting the Erase button.
Step 5: Change Format to MacOS Extended (Journaled)
To this point in the process nothing has happened to the drive. After clicking on the Erase button you should see something similar to this:
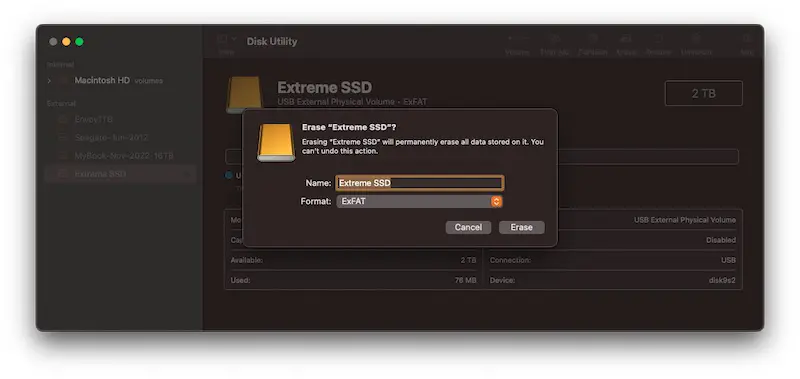
You can see that the Format is set to ExFAT right now. Photographers should click on the Format dropdown to change the format of the drive:
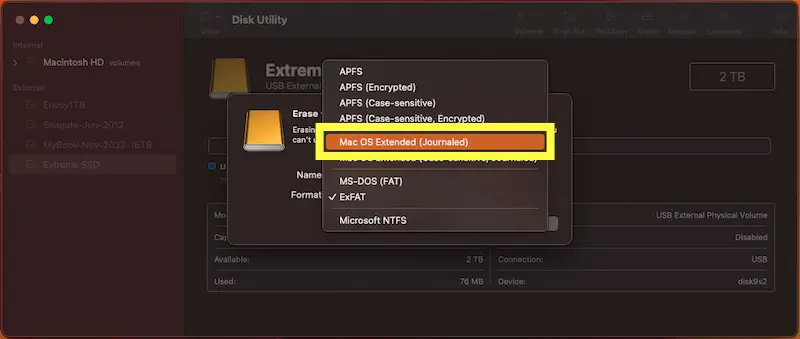
Photographers should now choose “Mac OS Extended (Journaled)” for the format. If you are curious as to why, read the next couple of sections.
Why Not NTFS or FAT For an External Drive?
This is an easy answer. FAT doesn’t support large storage sizes and your external drive is very likely to be too big to support that format. NTFS is the best choice for Windows, but if you choose that here your Mac won’t be able to save any files to the drive without special software.
If you really need to use the same external drive on both Mac and Windows you only have two options. You can leave the drive formatted ExFAT (adding a little more risk that files won’t be saved correctly to the drive) or you can buy software that will enable saving to the drive.
If you want to buy the software that enables a computer to use a drive format not natively supported, I recommend that photographers format the drive to have full (and journaled) support on the computer they will use the most then buy the software that enables the format on the other computer.
If you will primarily use the drive with a Mac and occasionally with Windows, then format Mac OS Extended (Journaled) and buy software to enable reading and writing to the drive for Windows. If it is the opposite, then format the drive NTFS (do it from Windows) and buy software to enable writing on Mac.
Incidentally, I have tested software for both directions and highly recommend the products from Paragon:
- NTFS For Mac
- HFS+ For Windows (Mac OS Extended)
- APFS For Windows
Why Not ExFat For an External Drive?
If ExFAT is not the best format for external drives used for photo editing, why did it come that way from the manufacturer? Bottom line is support costs.
The ExFAT format is a universal format. Both Mac and Windows can read and write (save) data to a drive formatted with ExFAT. Meaning you could plug in a drive formatted ExFAT into a Mac computer, save data to it, then take that same drive and plug it in a Windows computer and save more data to it. No restrictions. It just works.
Sounds ideal then doesn’t it. Universal format that can be ready on basically any computer (Linux can read/write to it as well). So why isn’t it the best format? I won’t go into the full technical details, but it has to do with something called journaling. To simplify it, ExFAT is more prone to issues when saving files to the drive so that you lose the data.
Yikes! Now before you get overly concerned, saving files to an ExFAT formatted drive does not guarantee issues. I have used ExFAT formatted drives in my photo editing without issue. It is just more likely to have a problem compared with the file format I recommend – Mac OS Extended (Journaled).
Why Not APFS For an External Drive?
APFS is the second best choice on the list. APFS is a much newer drive format than Mac OS Extended. It is also specifically designed to work with internal SSD drives. APFS can certainly be used as a format for an external drive, but it isn’t designed for external drives and has had problems in the past when used with external drives.
There are some limitations with how an external drive can be used with a Mac when APFS is chosen. Time Machine being the primary limitation. As of early 2023, you can’t use an external drive formatted as APFS with Time Machine.
Step 6: Append year-month-day to Name
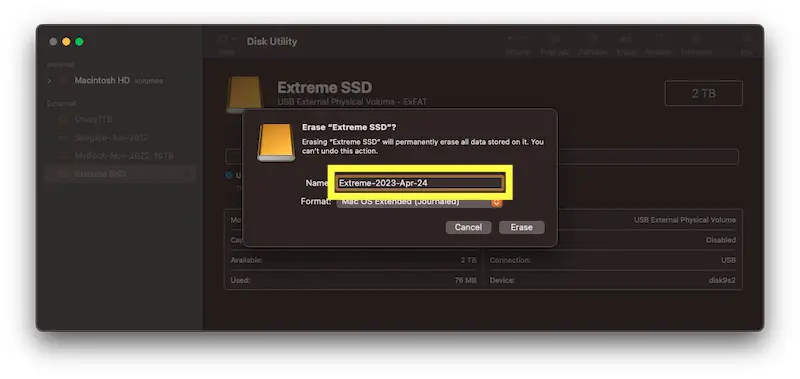
With Mac OS Extended selected as the format, you can now choose a name for this external drive that will help you to identify it in the future. You can decide on the naming convention, but my advice is to append the year-month-day to the name. Example for my drive is “Extreme-2023-Apr-24”.
Here is the reason for my recommendation on the name. No matter what kind of drive you have it is a ticking time bomb. It isn’t a question of if it will fail, only when. Doesn’t matter the brand nor the type (SSD vs mechanical). The moment you start using it the drive is working towards failing (sitting for long periods of time isn’t good for them either).
There is a reason drives have short warranties, most commonly about 3 years. After a drive has been in use for 3 years the chances it is going to go belly up shoot up significantly. Doesn’t mean that on the 3 year anniversary of when you started using the drive it will stop working. I have had drives go for 5 years and as long as 7 years before giving up.
My photo editing data is so important to me I don’t take the risk of a drive failure and I proactively replace a drive after 3 years of use. Putting the data in the name of the drive helps me to see when that 3 years is up. I will see that drive name constantly as I am doing photo editing and it becomes really easy to see when it is time.
Don’t mistake this proactive replacement of drives for being a solution where you don’t have to worry about backups. Check out Help With Drive Space and Backups for Photographers and Ultimate Guide to Backup for Photographers for my advice for backup. Drives tend to live the 3 years, but they definitely can have an unexpected failure at any point. If it happens before 3 years you may be able to get a new drive from the warranty, but you still lose all the data that was on the drive.
Step 7: Hit Erase
After you have chosen the correct drive in the Disk Utility app, validated it is formatted ExFAT, changed the format to Mac OS External (Journaled), and chosen a name to help you identify the drive – you are ready to hit the Erase button.
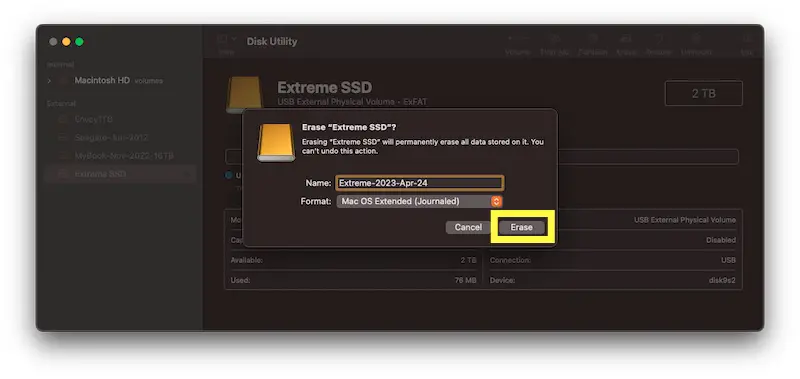
WARNING: This will erase all of the data on the dive chosen in the Disk Utility application. It isn’t impossible to recover data after hitting this button, but it is difficult. You don’t want to do this incorrectly. Make sure you have the correct external drive selected.
Step 8: Look for “Operation successful”
After clicking the Erase button in Step 7, a high level format is done that shouldn’t take very long. To see that everything worked you should look for a message at the top of the window that popped up after clicking Erase that says “Erase process is complete”.
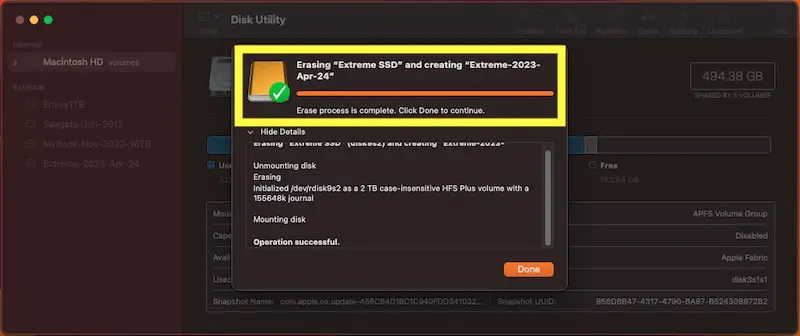
You can further validate success by looking for “Operation successful” at the bottom of the window.
Step 9: Click Done
Click the Done button to close the Erase window in the Disk Utility application.
Step 10: Close the Disk Utility application
Close the Disk Utility application. Your external drive is now prepared for photo editing use on a Mac.

Comments
Hi Jeff,
Firstly I really enjoy all your podcasts and glad to see you’re back in the saddle. I can only imagine the time and energy involved so kudos, keep up the excellent work!
I just finished your latest podcast regarding printing on your own. Very informative, thank you. I was a little surprised you didn’t mention dye-sublimation printing at all. I was hoping to hear the pros and cons of inkjet vs dye-sub. I’ve never researched it myself but would love to know your thoughts about it. I’m pretty sure it’s a very popular option for photographers.
I’ve owned Canon photo ink jet printers in the past but simply got too frustrated with dried ink and even worse dried print heads, like you mentioned. I’ve since purchased a DNP RXHS1 and the prints are truly amazing.
Maybe food for thought on a follow up podcast? Lol
All the best!
Rocco
Great article! 👏 I really appreciate the way you explained this topic—it shows not only expertise but also a clear effort to make it easy for readers to understand. What stood out to me most is how practical your insights are, which makes the piece very relatable. As someone who works a lot with different industries and categories, I can say your perspective feels very authentic. At https://meinestadtkleinanzeigen.de/top-link-building-agenturen-in-deutschland/ we run a directory platform in Germany that connects people and businesses across many categories, and it’s always refreshing to see content that adds real value like this. Looking forward to reading more of your work—keep it up! 🚀