What Does the New Enhance Details Feature of Lightroom Do?
The Enhance Details feature in Lightroom and Photoshop uses artificial intelligence to interpret the color information in a raw file from a camera and provide better fine detail. It can be used on the raw photos you already have on your hard drive and Adobe says you can get as much as 30% more fine detail for some photos.
If I told you that I wrote a computer program that in some cases could take the photos you have already shot and have sitting on your hard drive and in some cases make your photo 30% sharper, would you want to try it out? Especially if I could tell you which kinds of photos this new program of mine works best with so that you could decide to give it a try if you have a photo that may benefit. That is how I want you think of this Enhance Details feature Adobe has added to Lightroom and my goal is that by the end of this episode you will know when to give this new feature a try.
This topic is perfect for Photo Taco because to really understand what you can expect out of the Enhance Details you need to understand a little about how it is your digital camera turns light into a digital file on the memory card. I am going to walk through some of that in this episode. How that works is not the point of this episode so it won’t be a fully detailed discussion and I am going to over simplify things a bit.
Adobe’s Description of Enhance Details
Here is what Adobe said about the new Enhance Details feature in Josh Haftel’s blog post:
“In this release, we’re introducing an all-new Sensei-powered feature, Enhance Details. Harnessing the power of machine learning and computational photography, Enhance Details can now be found in Adobe Camera Raw, Lightroom Classic CC, and Lightroom CC for Mac and Windows, and takes a brand new approach to demosaicing raw photos. Demosaicing is an integral process to raw processing and works at the pixel level, converting the information captured by a camera into something that looks like the photos we all expect to see.
The new Enhance Details algorithm enables you to increase the resolution of both Bayer and X-Trans based photos by up to 30%. Enhance Details works on any raw file apart from files converted to a linear raw file, HDR or Panorama merged files (though you can apply Enhance Details to the ingredient files first and then merge), smart proxies, lossy compressed DNGs, or DNGs saved with 1.1 compatibility. Applying Enhance Details to your photos can greatly improve fine detail rendering, improve the reproduction of fine colors, and resolve issues that some customers reported with their Fujifilm X-Trans based cameras.”
-Josh Haftel
Keys From Adobe’s Description
Let me boil down the key things to take away from Adobe’s description:
- Enhance Details requires a raw file. After we run through how it is your camera turns light into a digital file on a memory card it should make sense why this is the case, but you can’t run Enhance Details on a JPEG. The feature can only be used on a raw file. It also won’t work on any “processed” raw file, like if you camera does some kind of panorama or HDR processing with output to a raw-like format like DNG or TIF. I has to be a single still shot raw file.
- Up to 30% more fine detail. You can expect that if you use the Enhance Details feature on one of your photos that the results can have up to 30% more fine details. OK, but what does fine details mean? Again, I think this will all make pretty good sense after we go through the simplified way that your camera turns light into a digital file. The point would be you might get up to 30% more fine detail using the Enhanced Details
- Availability. The feature is available in Lightroom Classic CC, Lightroom CC (on the desktop), and in Photoshop through Adobe Camera Raw.
- Works best on X-Trans Raw Files. The Enhanced Details feature has the most chance of producing better fine details from a raw file that uses the X-Trans color filter array on the sensor than it does on those that use the far more widely used Bayer color filter array. Many Fuji cameras use the X-Trans filter, so if you are a Fuji X shooter this is something you may want to consider trying out more often than those who shoot pretty much anything else.
Some of you who know more about the technical side of things may be thinking that this is Adobe finally trying to make their software work better with X-Trans raw files and I think that is 100% true. This has kind of been a long-standing issue with Adobe’s Camera Raw engine and Fuji X-Trans raw files in particular where there have been color bleed issues (color not staying where it should be in the fine details of a photo) and some muddiness/painterly/wormy sort of look in the fine details where it just isn’t sharp. Adobe kind of started to correct their raw conversion engine to address these issues with X-Trans raw files back with the release of Lightroom CC 2015.1 where they said in the release notes that they:
Reduced “color blur” artifacts when processing Fujifilm XTrans raw images – In collaboration with Fujifilm, we are still investigating methods to improve fine detail rendering and overall edge definition
I believe this is absolutely an attempt from Adobe to take the next step of doing a better job with X-Trans raw files, though it can also help with some specific types of Bayer raw files which we will get into.
Light to File and Demosaicing
To really understand what this Enhance Details feature is doing and when it is a photography might want to give it a try, we need to walk through the basics of how it is your camera converts light into a digital file on your memory card. In particular, a process the raw data has to go through an all digital cameras called demosaicing. I know that word sounds complicated, but I think I can help make it pretty simple.
Photons to Electrical Charge
To start off with let’s oversimplify what it is the sensor in your camera is doing. The main job of the sensor in your camera is to gather light while the shutter and aperture are open and turn that light into an electrical charge. Light is made up of particles called photons and the sensor has millions of tiny buckets that catch those photons that are often called pixels. Hence the term megapixels. These pixels of the sensor may also be called photosites.
The more photons that hit a photosite, the more electrical charge gets produced. This makes it fairly easy for a sensor to determine the luminance or the relative brightness/darkness of a single pixel in the image that is produced. Lots of photons hitting a specific photosite means a high electrical charge and a bright pixel. Very few photons hit that bucket, dark pixel. This is also the reason there is noise in the darker pixels, but that is another episode and we aren’t going to go there.
Color Filter Arrays
Photons hitting the sensor to produce an electrical charge will give us the luminance (brightness and darkness) information from the scene but it doesn’t give us any color information. The images would be grayscale if all we used was this luminance information to create photos. Obviously we have color photos, and this happens because of something called a color filter array that is put in front of nearly (there are some other techniques today for adding color to digital cameras) every digital camera sensor.
Bayer Filter
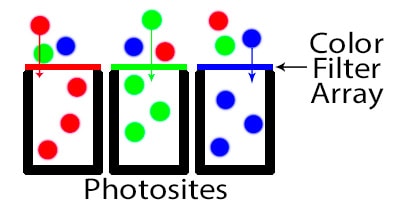
The most common type of color filter array in our digital cameras today is called the Bayer filter, named after its inventory, Bryce Bayer. In 1976 Bayer patented his color filter array that is in nearly every camera we use today. This filter sits in front of the sensor and blocks all of the light except for one color, making it so that all of the photons that make it through the filter to a bucket we know are a specific color. We need to render all of the colors we can see, so he researched and created a pattern in his filter that blocked out all but the red, green, and blue light for specific photosites.
Bayer grouped 4 photosites together and created a color filter array that would only allow green light to come through the filter for two of the photosites, red on one of the photosites, and blue on the last photosite. This pattern is then repeated across the entire sensor. The sensor gets twice as much information about green than it does red and blue, something done on purpose because Bayer’s research told him this would best mimic the physiology of the human eye and most closely mimic the colors we see.
X-Trans Filter
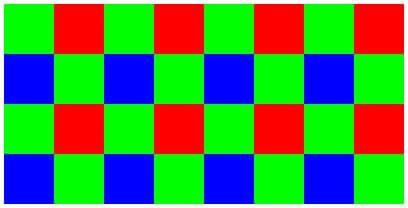
Fuji X-series cameras don’t use the Bayer color filter array. Instead they use something called an X-Trans filter. Exactly same concept, a color filter array placed over the sensor so that we can get color information in addition to luminance information from the sensor. Like Bayer, X-Trans still filters for red, green, and blue. It also uses more green than red and blue, and groups four photosite together.
The difference is in how these color filters for the group of four photosites is repeated across the sensor. With Bayer the same pattern of filtered colors is applied to all of the groups of four photosites but with X-Trans you have a few different patterns of color filtering that are alternated every other group of four photosites.
Demosaicing – Color Guessing
Whether you are shooting with a camera that has a Bayer filter (most of you) or an X-Trans filter (Fuji X shooters), we are now ready to talk about demosaicing.
We have brightness and darkness information and the color filter array means we have some color information, but how do we go from there to having an image that has far more colors than just red, green and blue? At some point in the process of creating an image we have to process the data from the sensor and make a guess as to what the color of every pixel should be. We don’t have perfect color information but we can make a pretty good guess based on the color information of the surrounding pixels. This process of guessing the color of a pixel is called demosaicing.
I am not going to dive into the details of this color guessing process because there are lots of different ways to do it and it doesn’t really matter for the Enhance Details function. In the case of shooting JPEGs with your camera, your camera is doing the demosaic process and guessing on the colors to put in that JPEG file on your memory card. If you shoot raw then the software on your computer that you use to read that raw file is doing the demosaic process. In the case of Lightroom and Photoshop it is being done by Adobe Camera Raw. There are plenty of other raw processors that also do this demosaic process like Capture One, On1 Raw, Luminar, etc. All of them have the same job to do in demosaicing and guessing the color of every pixel.
Enhance Details Feature
Now that we have laid down the groundwork here and oversimplified how your camera turns light into a digital file on that memory card, we are ready to talk about what this new Enhance Details feature does. We have to narrow the discussion now down to just Adobe software since this is a feature in Lightroom and Photoshop by means of Adobe Camera Raw.
Adobe Camera Raw has been around for many years and it has been demosaicing files for as long as it has been around. I can’t say the demosaicing process built into Adobe Camera Raw hasn’t changed over the years, I don’t know if it has or not. The big thing that is happening here is that Adobe is utilizing the machine learning technology they have been working on for a while now to do a better job with demosaicing where the guessing about the pixels is going to be different photo by photo.
I am confident that if a human took on the task of manually doing this demosaic process that our cognitive abilities would produce a much better final image. It is just completely impractical to think we could even attempt to do that. We need to have millions of pixels demosaiced on thousands of photos in a very short period of time, which means we have created algorithms to solve this problem. Really it is pretty amazing to me that they are doing such a good job.
What Adobe is trying to do here is to move the needle a little bit from a fairly unintelligent algorithm based process to one where we add a little bit of cognitive abilities to the process and in some cases MIGHT get as much as 30% better fine detail because it is making a little smarter guess.
When To Use Enhanced Details?
Did you catch the back pedalling I was doing in that last paragraph? In some cases… MIGHT… 30% better…guesses. Nothing very rock solid there, and rightfully so. For most of you, especially those shooting a camera with a Bayer color filter array, I would guess on most photos you will have a hard time telling the difference between the “dumb” version of the demosaic process vs. this new Enhanced Details demosaicing process.
I have done my own testing with my Canon cameras that use a Bayer color filter array and I couldn’t find one where I felt like the fine details in the photo were tremendously different. There were a couple where I did think I got a touch more sharpness in the fine details of the image, but it wasn’t earth shattering to be sure.

Before moving on here, let’s quickly define “fine details”. The example Adobe offered was an image that had traffic light in the background. We are talking about a traffic light that even at 400% still looks pretty small. It was an image that came from a camera that used an X-Trans filter and the normal demosaic process in Adobe Camera Raw did a pretty poor job of rendering a round red circle in the traffic light and using Enhanced Details did a much better job. So fine details here means parts of the image where you have to really pixel peep to see a difference.
Another good example would be the eyelashes of a person in a full body portrait. Those details are pretty small and that is an area where it would be more likely that this new Enhanced Details feature might do a better job of producing individual eyelashes.
I don’t think this feature is baked enough to say we want to run every photo we take through it. That is backed up by the way Adobe has implemented the feature and not swapping out this process for what is still being done by default in Adobe Camera Raw. Enhanced Details is something to try on the very best of the images you have created just to see if buy chance it happens to improve that specific photo. Those 5 star photos, the images for your high value clients, the personal project images. An image where you want to do everything you can to get the very best result and are willing to take a little bit more time getting there. For those images it is worth checking out what Enhance Details will do with it.
Direction Is the Exciting Thing!
I can promise you that this new Enhanced Details feature is not going to change your world. Even you Fuji X shooters out there who probably don’t use Adobe software anyway. It’s the direction from Adobe here that gets me excited. I love that they are trying to apply the machine learning technology to various areas of their software.
Clearly the technology is at the infant stage but the engineers are going to learn a lot over the next few years and I am excited to see where this goes. I think that we are going to benefit from new machine learning powered tools that will better help us to realize our creative vision of our photography and I think that is really encouraging!
Episode Resources:
- https://theblog.adobe.com/february-lightroom-releases/
- https://theblog.adobe.com/enhance-details/
- Cambridge Color Digital Camera Sensors: https://www.cambridgeincolour.com/tutorials/camera-sensors.htm
- Definitions of photosite: http://www.photokonnexion.com/definition-photosite/
- Wikipedia Bayer Filter: https://en.wikipedia.org/wiki/Bayer_filter
- Wikipedia Fuji Film X-Trans Sensor: https://en.wikipedia.org/wiki/Fujifilm_X-Trans_sensor
- Alternative to Adobe Camera Raw for Fuji X cameras: https://www.iridientdigital.com/
- Worm Artifacts in Adobe Camera Raw conversion of Fuji X cameras: https://blog.thomasfitzgeraldphotography.com/blog/2018/8/about-those-worm-artifacts-and-fuji-x-trans
Reminders
- Photo Taco Facebook group, ask to join and write “Jeff Harmon” as the name of the host.
- Follow the show on Instagram @phototacopodast or Jeff’s personal account @harmonjeff
- Follow the show on Twitter @phototaco or Jeff’s personal account @harmon_jeff
- Send email suggestions on show topics to phototacopodcast@gmail.com
- Check out the other podcasts on the Master Photography Network over at masterphotographypodcast.com
Podcast: Download (Duration: 57:43 — 39.6MB) | Embed
Subscribe: Spotify | TuneIn | RSS
Comments
Thanks, I am a fuji xt2 shooter… and have used ACR for a couple of years to process the raw files. Recently, I’ve loooked at Capture 1 and actually downloaded Silkypix ?…. but I am quite facile with ACR. I wish the new Adobe enhanced detail outcomes were more encouraraging.
PS am about to buy the new iMac and am trying to use your recommedations, but think the new specs are slightly different.
Mel Stone
PS I want to have a screaming machine, but do I have to worry about ‘thermal throttling” with, I believe, the highest graphics card
@Mel,
I am working on an article to provide guidance on the iMac updates in early 2019. I think the Core i9 option is much better in the desktop than in the laptop, far better ways to deal with the heat and avoid thermal throttling. If you can afford it then I think the Core i9 option would be very good, though not as large a difference in Lr/Ps between that and the i7. If you need to save some money, the i7 will be great and I would invest in memory (RAM) and more SSD storage before I would go to the i9. Keep an eye out for my guide on all the options coming soon.
Hey Jeff, just wanted to say I really liked this episode. I am very interested in how “big cameras” will keep up with phones in relation to post-processing with AI. Thanks!
jpg files enhanced……..
View a jpg through Bridge. Double click and it opens in RAW. Enhance all you want but in my fooling around with it the file sizes become a mystery. The file sizes change a lot but the pixel dimensions don’t, etc. My understanding was that it would be a tool to “enhance” a heavily cropped photo so as to print it at a respectable size.
@Mark,
This article was about the enhance details feature that allowed Lightroom Classic better handle the raw data from Fuji cameras. Very different from the super resolution feature Adobe just added to Camera Raw here in March 2021. I will be creating an article on the super resolution feature soon.