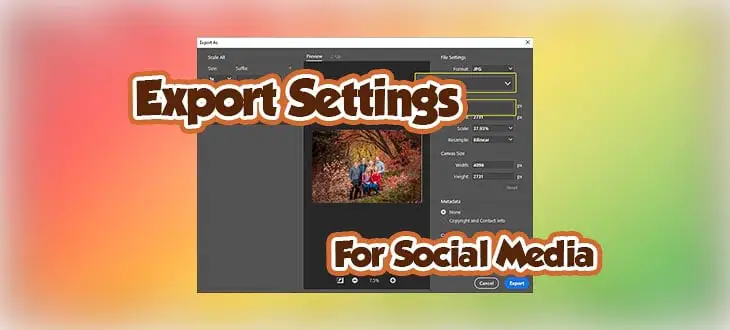
What Dimensions and Quality Should Photographers Use When Posting To Social Media?
Nearly a constant debate online, I constantly get questions on the pixel dimensions, quality setting, and DPI that photographers should use when exporting out of Lightroom and Photoshop for posting the image on social media. The answer may change over time as the social networks make constant changes to how they deal with photos, but after more than 80 hours of real-world research here is the answer.
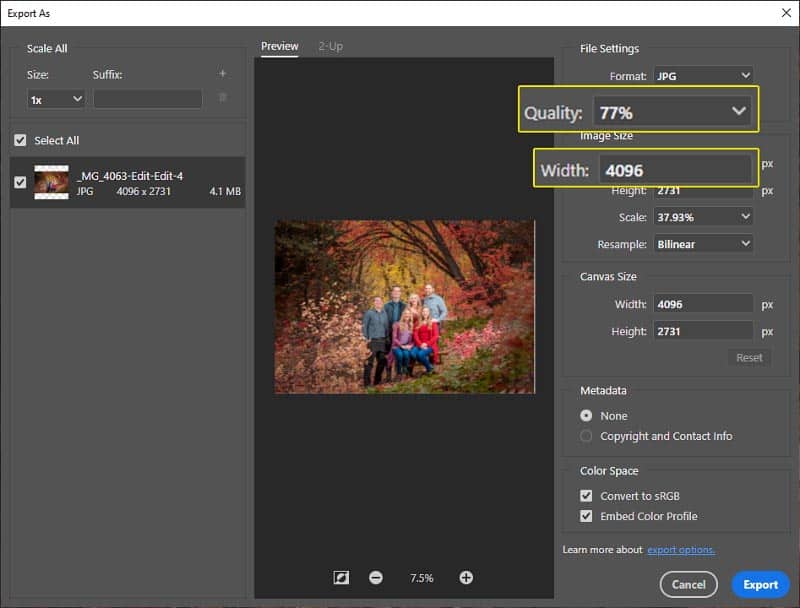
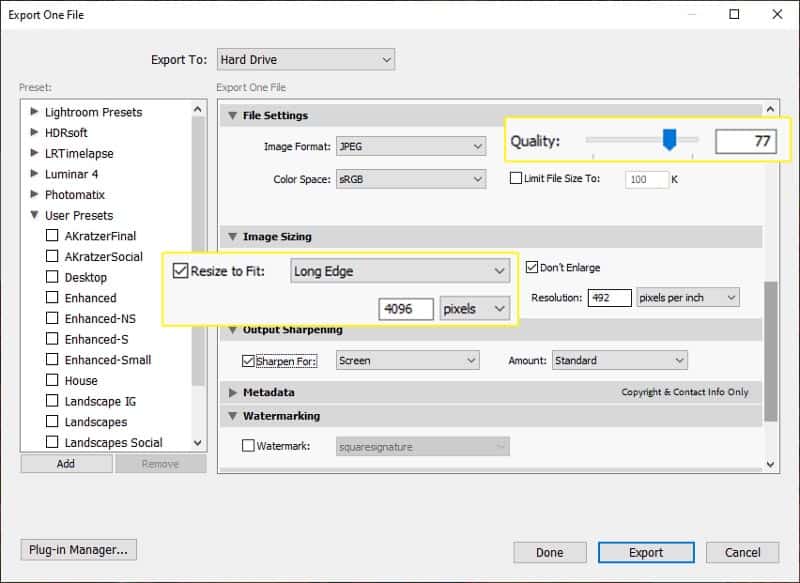
Photographers who want to have their images shown at the highest possible quality on all social media networks should export their images to JPEG format with the longest edge at 4096 pixels and quality set to 77%. Don’t worry about DPI.
Simple as that. I have tested this extensively and this ensures the very best representation of your image on Facebook, Instagram, and Twitter. All of these services will further compress your image (regardless of the dimensions and quality – more on that below). Facebook and Instagram will also downsize the image to a smaller resolution.
If you want to customize your export a little more, here are the results I got posting real images to all three services for what it was they did to the image no matter how many more pixels the original image contained. No matter how much larger the longest edge was, this is the maximum number of pixels that will be on the long edge from these services.
| Service | Original Longest Edge | Resized Longest Edge |
|---|---|---|
| 5120 pixels | 1920 pixels | |
| 5120 pixels | 1080 pixels | |
| 5120 pixels | 4096 pixels |
Why 4096 Pixels Longest Edge?
My advice for a few years now has been using 2048 pixels on the long edge for sharing to social media. Not bad advice here in 2021, but if you are posting images to Twitter that isn’t going to result in the highest possible quality.
It may be pretty obvious after seeing the table above. After doing real-world testing and posting hundreds of images through the Facebook, Instagram, and Twitter, I have found that the highest pixel dimension allowed comes from Twitter. Twitter will not retain the longest edge size if the image you post is 4096 pixels on the longest edge.
Therefore, to get the most quality in your post, if you are posting that image to all three services you should export with the longest edge set to 4096 pixels. Facebook and Instagram will resize the image to 1920 and 1080 pixels on the long edge respectively, but they will take in that 4096 long edge image just fine and you’ll get a good result.
However, if your destinations are limited to Facebook and Instagram, save yourself some disk space and bandwidth by using a longest edge pixel dimension of 1920 (or maybe 2048 for a little extra detail) instead of 4096.
Why Quality of 77%?
The quality number is almost irrelevant as far as the services go because all of them are going to put your image through their compression engine no matter what you do (more on that below). This is purely about saving you disk space and bandwidth. Still, since your image is bound for a makeover in the compression engines of these services, you want to give it the best you can.
A quality setting of 77% when exporting a JPEG from Lightroom Classic turns out to be kind of magical. I want to refresh the testing since this information is a bit dated, but check out An Analysis of Lightroom JPEG Export Quality Settings from Jeffrey Friedl and JPEG Compression Levels in Photoshop and Lightroom from my friends over at Photography Life for the nitty gritty details. You can also check out Ps JPEG Exports for a podcast on the topic.
It turns out that quality of 77% in Lightroom Classic is the best trade off between file size and image quality for most photos. Now that is a generality, which is always dangerous. Of course there will be exceptions to that general statement, but in general a quality level higher than 77% for most images means you are wasting file size without gaining a lot in image quality. Lower than 77% and with many images you may begin to sacrifice image quality that is not worth the smaller file size.
JPEG compression works differently based on what is in the image. If you see banding in an image (lines in a sky) then bump the quality to 85% in Lightroom Classic (80% in Photoshop). If you are worried about not giving the image every ounce of quality, go ahead and use 100% for quality, though the testing data below shows there is a disadvantage at this high level. So long as your longest edge is 4096 pixels as recommended, the image at 100% quality should be small enough to upload to all three services. Just know that you are wasting time, disk space, and bandwidth with the quality level over 77% when posting to social platforms. Not a massive deal with a couple of images here and there, but if you share frequently then this can really add up – especially of your ISP has you restricted with data caps.
So far we have talked only about Lightroom Classic, what about Photoshop? It used to be that Photoshop had an entirely different scale for quality when saving a JPEG. It had a scale of 1-12 and setting that value to 10 in Photoshop was equivalent to using 77% through 84% in Lightroom Classic (no difference in LrC between 77%-84%, changes at 85%). The newer Export As function in Photoshop has a Quality scale similar to LrC for exporting JPEGs with values from 1-100%. However, in the small amount of testing I have done, 77% in LrC doesn’t produce images the same size as 77% in Photoshop (Ps files are larger).
This post isn’t about the differences between LrC and Photoshop JPEG compression, so we are going to assume they are equivalent enough for the purposes of this testing. Note that all of my testing here was with images exported out of Photoshop. I did a little testing to make sure there wasn’t a significant difference with images exported out of Lightroom Classic and none of the behaviors outlined here changed.
What About DPI?
Very likely to be the first question any photographer is going to ask when they see this information is why they shouldn’t worry about DPI. DPI is constantly misunderstood by nearly every photographer and most editors/producers/media folks. There are constant arguments about DPI and if you want to really dig into it check out DPI With Don Komarechka to learn more. The bottom line is that when you are specifying the pixel dimensions as exporting an image, DPI has ABSOLUTELY NO EFFECT.
I know, you don’t believe me. So fine, put 492 in DPI as you export. Why 492? It’s my favorite number. Just ask my kids. I use that number whenever they ask me to guess one. That’s bigger than the 300 DPI you probably came to his article expecting to use to get the very best image quality, so go ahead and do that. It just doesn’t matter when you are specifying pixel dimensions like we are doing here but if it makes you feel better put whatever you want in there.
Is 4096 Pixels Too Much Quality?
Some of you reading this may have thought about this and wondered if you really should use 4096 on the long edge. 4096 pixels on the long edge is a lot. With a standard 3:2 aspect ratio that most cameras use, you would end up with an image that is 4096×2732 and those pixel dimensions could be printed at 13″x9″ at 300 DPI (which does matter here because we are talking about inches with printing!).
As mentioned above, Facebook and Instagram are both going to resize your image to be smaller than 4096 pixels on the long edge so not really as much to worry about there. However, Twitter will keep your image sized at 4096 pixels on the longest edge and you should really decide if you want to release an image with that many pixels out to the world.
Yes, Twitter will compress the image (if quality is above 80% – details below), lowering the quality some, but if you don’t want an image of yours shared online to be printed as big as 13×19 you should do some watermarking and/or export a smaller resolution like 2048 on the longest edge.
How Can I Make Sure My Image Isn’t Further Compressed?
Like me, you have probably seen it said that if you export your image with certain pixel dimensions and quality settings that it won’t get compressed when it gets to Facebook, Instagram, or Twitter. After all the real-world testing I did I can assure you that there is NOTHING a photographer can do to have these services not do more processing on the uploaded image.
Yep, that’s right. It doesn’t matter if you export your image to not be larger than the max pixel dimensions the service supports or if you use a certain level of quality as you export. No matter what you do as you export your photos from Lightroom, Photoshop, or any other editing tool these services are going to re-process your image (Twitter does with quality set to 81% or higher).
Let me repeat that again. No matter what you do Facebook, Instagram, and Twitter are all going to send EVERY image you upload through their compression engine. Seriously, I did some real-world, highly technical testing (read on below) and I can guarantee you that no matter what you do to your photo before uploading it to any of these services they are all going to give it a compression makeover. Or as I like to call it, you image will ALWAYS go through the the image destroyer engine (Twitter isn’t actually too bad!).
Real-World Testing Setup
I know few of you reading this are going to believe my claims. You may have tried something yourself where you sized your image to the largest dimensions a service supports, brought the quality down to a certain level, uploaded the image and then when you download it you put it in Photoshop on two different layers with the upper layer in difference mode. Photoshop proved the image is identical. I know, I did the same thing, and thought that same thing. Then I dug in deeper, and deeper, and deeper.
Here is the process I used to test things.
- Export JPEG from raw file at 5120×3415 dimensions with 100% quality
- Post that exported image to the service
- Download the image from the post at the largest supported resolution (challenging)
- Make a new post using the image that was just downloaded from the service
- Repeat 3-5 until the image has been put through the service 1,000 times.
Key to understanding this test is that I didn’t want to posting the original image 1,000 times. Posting the original image 1,000 times would only prove that the service dealt with that image the same way every time it is posted, which everyone expects. I wanted to see what happened when I took the image the came out of the service from one post and put it through the service again, then save that image and put it through again, and on, and on.
Testing Details and Challenges
I wanted to create the most comprehensive guide for social media image posting available and I knew that meant I had to post a lot of images. Based on the other guides I had seen over the years I knew I needed to go past the 10 or even 100 posts. I set my target for 1,000 posts just so that it would be the best test that anyone had done. Now I had to figure out how to make that happen.
API Approach
I knew there was no way I was going to manually do this 1,000 post/save image loop manually. That would be mind numbing work that would take me weeks in my spare time. Plus, I am a developer, so I always turn to creating applications that can do my work for me. The obvious thing to try first was to develop an application that would use the APIs from these social media services to do my posting/saving of images.
I cracked open Visual Studio Code (my new favorite IDE, which I can’t believe I am saying) and started with Facebook. Facebook offers something they call the Graph API. You have to get some application developer credentials and then you can build an app for free. I was quickly up and running, able to invoke various APIs to retrieve data from an individual account, but ran into a problem almost immediately. Facebook doesn’t allow applications to make a post to the feed of a personal Facebook account via their APIs. Only to a page owned by a business account.
☹<sad trombone plays here>
I had to go to plan B for Facebook. How about Instagram? Well, Instagram is owned and operated by Facebook, and the story was the same there. No API access to post to individual accounts, only business. Had to go to plan B for Instagram as well. How about Twitter? Yes! Twitter provides an actual API.
Rate Limiting
I wrote a quick application that used the Twitter APIs and automated my post/save image loop. It was working great, but then I ran into rate limiting. As a self-defense mechanism every online service protects the health of the service by limiting how frequently posts can be submitted or feeds refreshed. Post faster than allowed and you are account is marked as bad in the system and not allowed to do anything for a bit.
These rate limits are high enough that a real human user isn’t likely to every run into them but I had an application capable of posting and saving images at much higher rates than a human and I exceeded that limit almost immediately. Time to look up what the limits are for Twitter.
There is some documentation on the rate limits for using the APIs, but another defense mechanism to protect the service from abuse is not making it perfectly clear exactly how frequently you can make calls to their APIs. It took several days of experimentation but by trial and error on pacing my API calls (and service outages) to Twitter I was able to get my image through the service 1,000 times!
Plus, I now have an application that can do that, so I can re-run the test anytime I want to check things at any point in the future.
Plan B – Browser Automation
Twitter was solved, but I really wanted to test Facebook and Instagram here too since they are really the primary targets for photographers wanting to share their images on social media. I didn’t want to go through the hassle of getting business accounts setup, but manual was still not an option, so time for plan B – browser automation.
I have done a fair amount of work with browser automation in my development work as well, using frameworks like Selenium and CSS selectors to drive a real Chrome/Firefox/Edge/Safari browser. API was the approach I wanted, but this was the next best thing.
As I started into it, it quickly became obvious that Facebook has worked very hard to make it tough to utilize browser automation with their website. The same goes for Instagram, where they really discourage making posts from a desktop computer at all. I am confident that if I REALLY needed to make this work I could overcome the tricky things Facebook has done to deter this kind of thing, but it wasn’t worth the effort knowing that there was a plan C.
Plan C – Mouse/Keyboard Recording
For Facebook and Instagram testing I turned to my final option for automating my testing and get an image through the services 1,000 times. Plan C was mouse/keyboard recording. A far more brittle solution than API or browser automation would have been, but I was pretty sure I could make it work pretty easily and the point of this was not to create the most elegant and polished automation solution.
I ended up using a tool called MacroRecorder and got it to do what I needed in very short order. I figured out how I could set things up to make buttons, files, and menus be in predictable places on the screen and then recorded the mouse and keyboard movements to use them. Not entirely trivial to make things repeatable like this, but I had things cooking in short order.
Excellent, now I could playback the recording for a couple of hours and get the images through the testing process 1,000 times. Well, almost. Ran into that rate limiting problem again, as expected. These recorded mouse/keyboard movements could be played over and over much faster than a human is capable of doing, so Facebook and Instagram both sent very nice messages to me in the browser about not being able to post for a little while.
The solution was the same as with the Twitter API. Just had to pace the testing to be slow enough that I wouldn’t trigger the rate police from blocking my account. Nothing officially stated in documentation about what that rate limit is here either, but after a little bit of trial and error I found the pace that worked.
It took a few days of waiting for things to finish thanks to the rate limiting, but I got my images that went through the social media machines 1,000 times. Time to take a look at them!
Testing Results
I was pretty excited at this point. I couldn’t wait to see what that image that came out of the 1,000th post to each service looked like and how it compared to the original. Before looking at the images my guess was that for all three services that 1,000th image was going to be a fuzzy mess with compression being applied every time the image went through each service.
Unable to contain myself, as each of my tests above completed, I jumped at the chance to check out that 1,000th image that came out of each service. I was surprised at how good that 1,000th image looked at first glance in an application on the computer that doesn’t allow me to edit the photo (Preview on Mac and IrFanView on PC – yes I used both Mac and PC in my testing).
Take look for yourself at just how similar the two were from each service (click on the image to get a full-sized version).
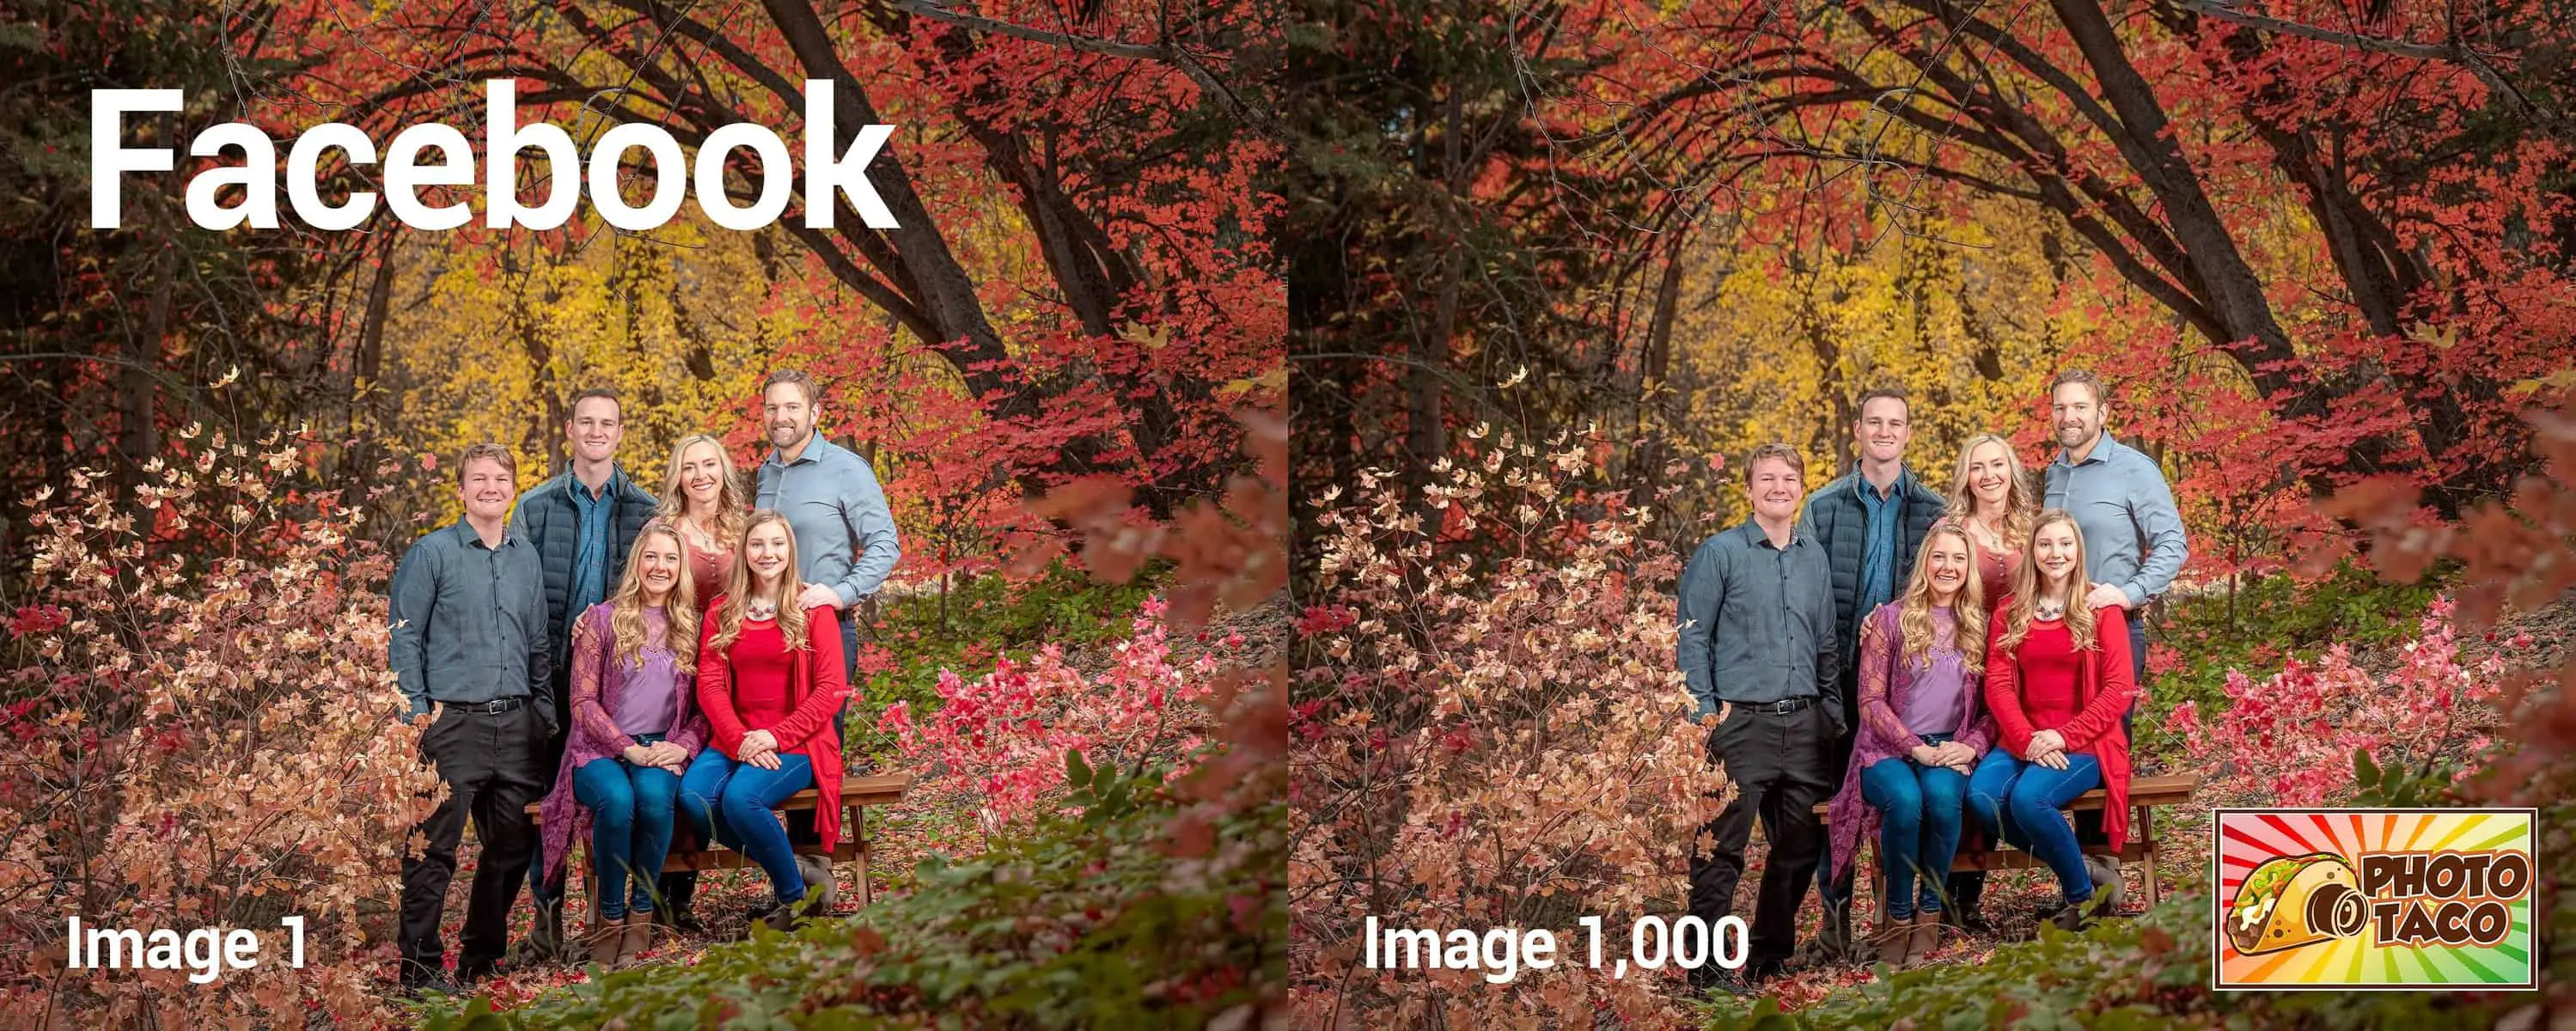
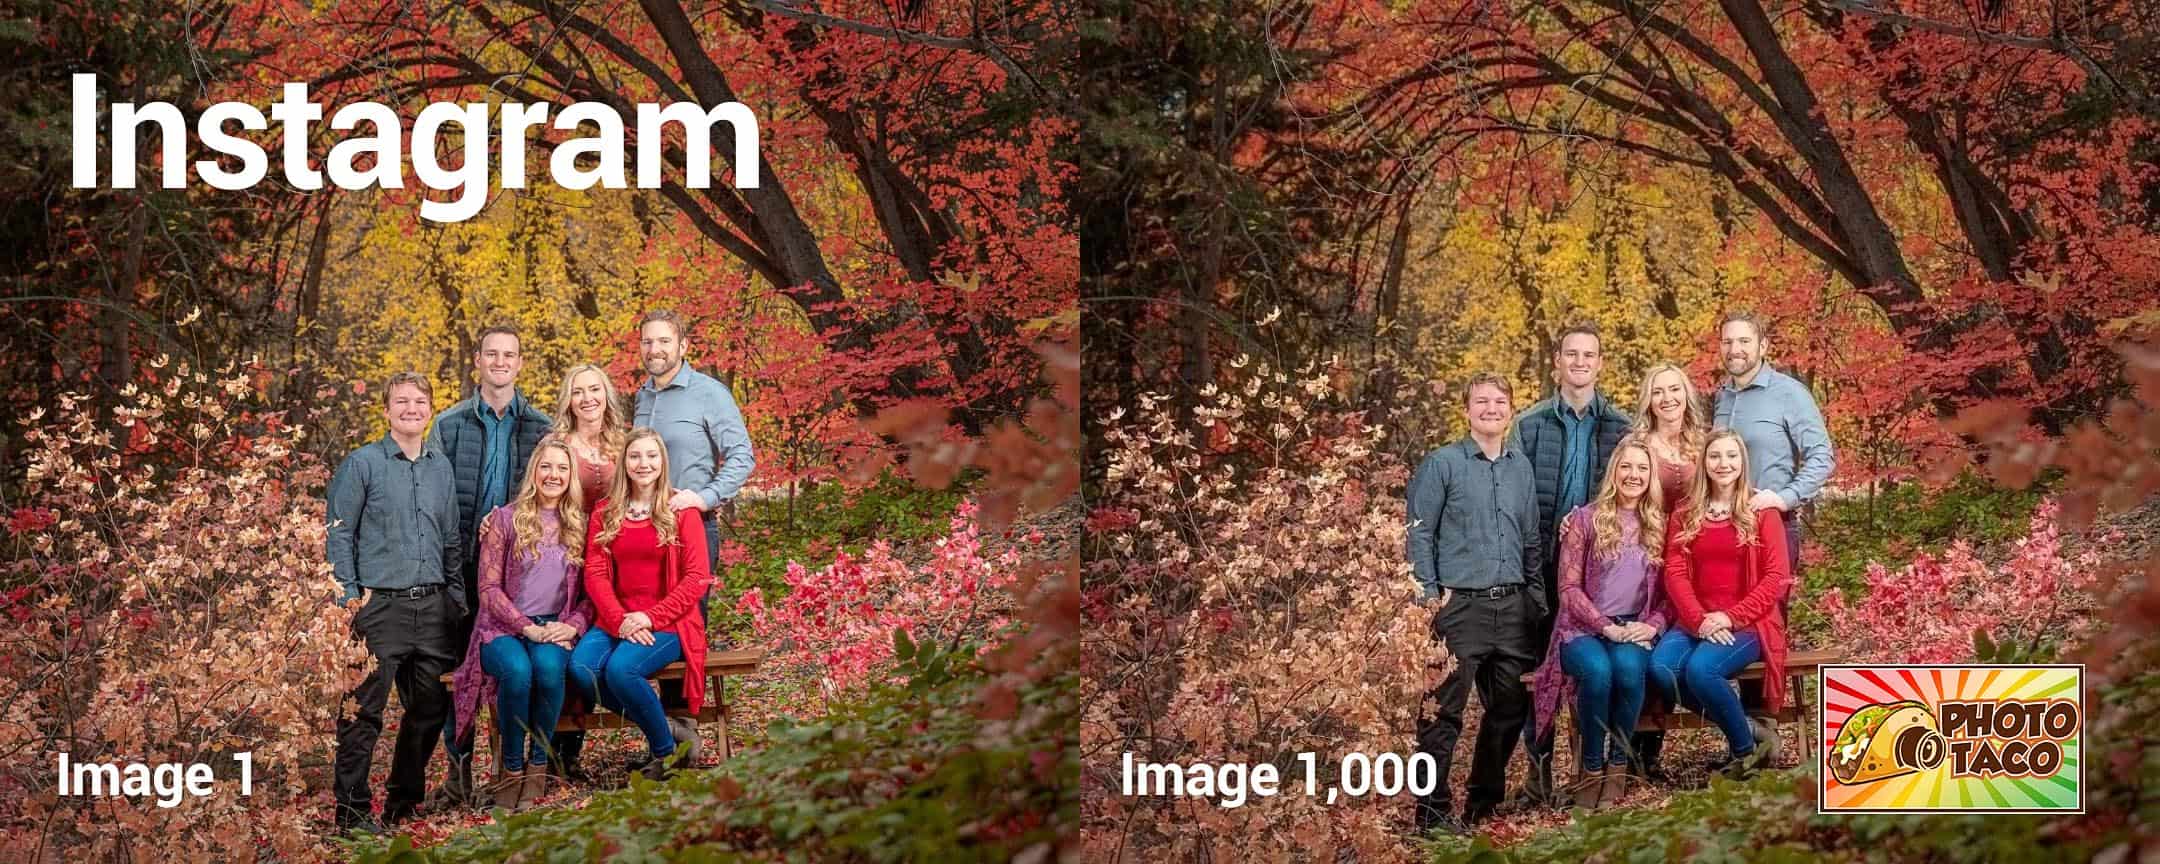
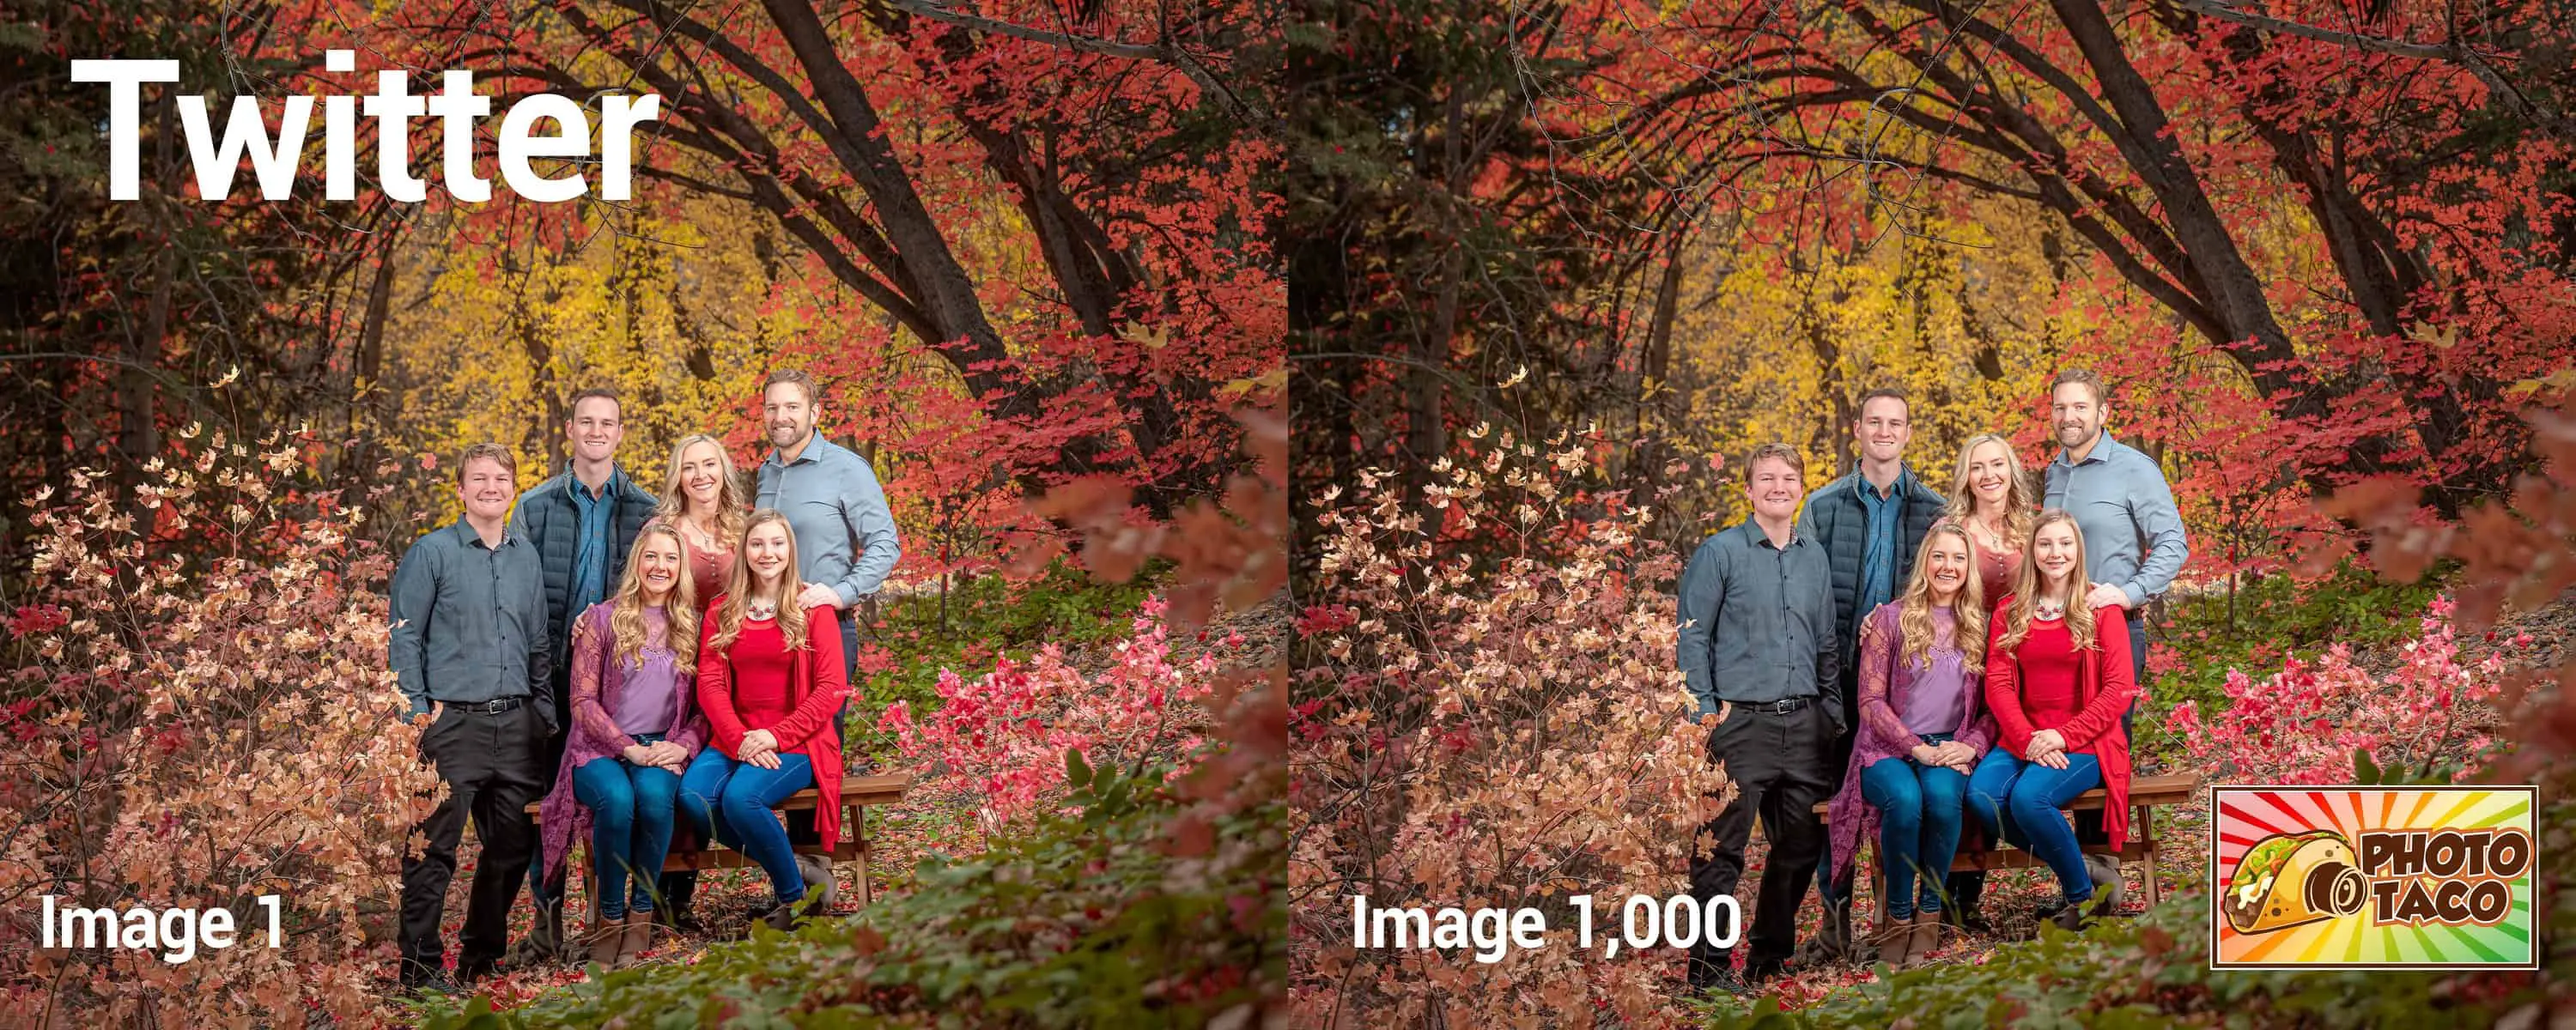
I was shocked that my hypothesis going into the test was completely wrong. After 1,000 rounds of submitting a service through these social media platforms I didn’t end up with a fuzzy mess of an image. Sure, it isn’t as good as the original, and there was even some detail lost between the image that came out of the first post visually compared with the image that came out of the 1,000th post. But I didn’t get a fuzzy mess. So what’s going on here?
File Size Difference
With a massive visual difference, let’s go a little deeper comparing these images by their file size. It is easy to see that images are different based on their file size so here is the data about how the file sizes changed from upload 1, 2, and 1,000 for all three services.
| Service | Original | Upload 1 | Upload 2 | Upload 1,000 |
|---|---|---|---|---|
| 3,262 KB | 673 KB | 670 KB | 662 KB | |
| 3,262 KB | 228 KB | 224 KB | 217 KB | |
| 3,262 KB | 3,052 KB | 3,052 KB | 3,052 KB |
From this test alone you can tell that Facebook and Instagram are both compressing the images more every time they are uploaded. Interesting that it looks like Twitter handles things a little differently. Can’t really draw many conclusions on this yet with just this data, so lets dig deeper.
Photoshop Layer Difference
The 1,000th image didn’t look very different visually and the file size data told me a little about what I wanted to know, but I was confident that Photoshop was going to reveal just how different these images are. I couldn’t compare the original image to the 1,000th image because the original image was larger than everything that came out from posting to each service (though I did test that later, read on to see that). I was sure that when I compared the 1st image to the 1,000th image in Photoshop I would see just how much that photo changed.
I opened both photos as layers in Photoshop with the 1st image on the bottom layer and the 1,000th image on the top layer. Then I changed the top layer mode to “Difference”, which shows you the pixels that are different between the two layers.
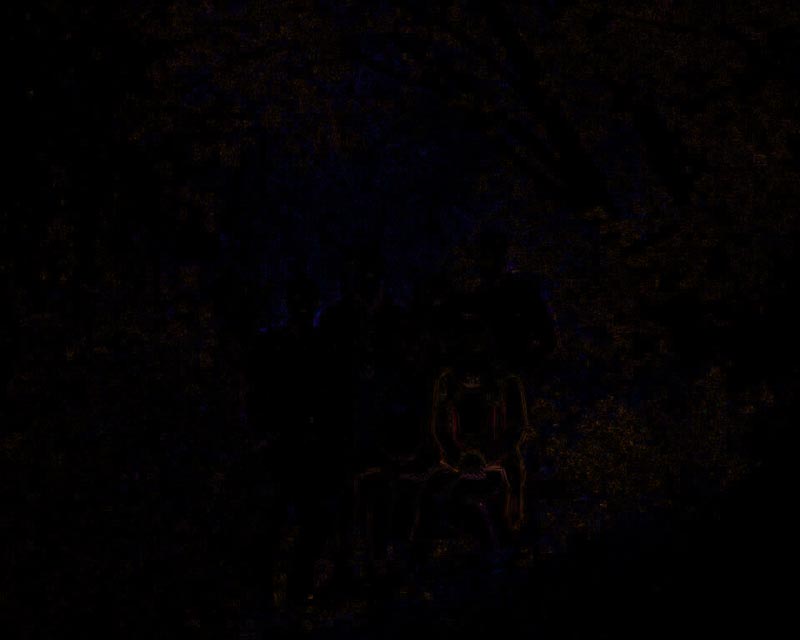
Hmm. I sized this image down to keep the article fast here, but trust me that there isn’t much to see with just the two layers with the one on top in difference mode. Some faint blue and red dots, but not the massive difference I was expecting. After looking into things I discovered that in order to actually visualize the difference between the two images you have to add a Threshold adjustment layer over the top of the two layers and set the Threshold value to 1.
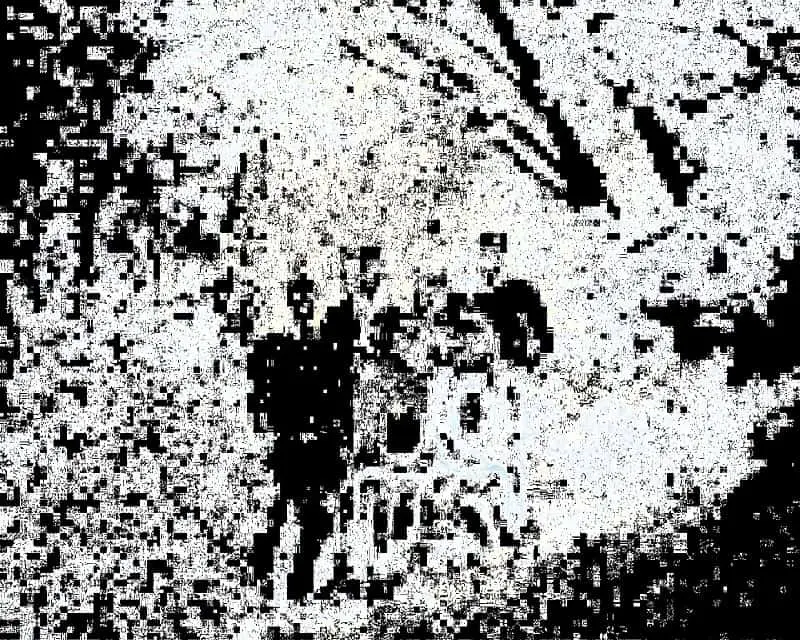
Ahh, there we go. The image was altered significantly between the image I got back from Facebook differenced with the image I got back from Facebook after uploading/downloading 1,000 times. That is the significant difference I was expecting.
What does this tell us? There is a big difference at a technical level between the first image Facebook gave back to me and the 1,000th image Facebook gave back to me. Here is the takeaway. If photographers had any hope of bypassing the Facebook compression engine by using a specific pixel size and quality level, the difference here needed to be very small to none. Even taking an image that came out of the Facebook compression engine, which should mean you have one that meets their standards, and posting that resulted in more compression. This proves that it simply doesn’t matter what pixel dimensions or compression (quality) value you choose as you export your photos, Facebook will run the image through the compression program 100% of the time!
In fact, just to further illustrate the point, here is the difference between the image Facebook gave to me after the first upload and the image I got taking that image and uploading it again (upload 2).
If you compare the upload 1-2 difference to the upload-1-1,000 image you can see that there are fewer changes between uploads 1 and 2 than 1 and 1,000. Almost exactly what I expected. I was sure going into this experiment that it didn’t matter how you exported your photo it was going to be compressed on upload to a social media service, but I also expected that the image that came out of that 1,000th post was going to be seriously devoid of detail.
The other problem I have with this test is that it is entirely visual. It is really hard to quantify just how much difference there is between these images. I could use the file size difference to quantify the percentage difference, but I wanted something more scientific and mathematically driven. I found exactly that as you will see below. First though, let me show you the difference images for Instagram and Twitter. Let’s start with Instagram.
Instagram has a similar story to Facebook, as expected. There are differences between upload 1 and upload 2. There are more differences between upload 1 and upload 1,000. No matter what you do to your image prior to uploading it to Instagram, it is going through the compression engine. What about Twitter? Curious to see how things go there because the file size was exactly the same between upload 1 and upload 1,000.

Yep, this shows that there is really no difference between the image I got out of upload 1 to Twitter and the image I got uploading that image and downloading it again. What about the difference between upload 1 and 1,000?

Different from Facebook and Instagram, the evidence thus far is saying that photographers might be able to avoid the Twitter compression engine by exporting their images with specific pixel dimensions and a certain quality level. The image that came out of upload 1 shows no difference to the image that came out after putting it through Twitter upload process 1,000. Interesting. What does a more mathematical analysis say?
ImageMagick Difference
The visual difference is informative and probably enough to convict Facebook and Instagram of complete image destruction, but what about Twitter and how could I quantify just how much image quality is being taken away from images as they are uploaded to each service?
After some research I discovered I could lean on the backs of smarter people who know both math and image manipulation better than I do and satisfy my need for cold, hard data. It turns out there is a fantastic application library called ImageMagick that among a lot of other things can compare two images mathematically and quantify the difference. Man do I love data, so when I found this I knew I had to do this with all 3,000 images I got out of these social media services.
ImageMagick has a compare command that has 12 different types of mathematical comparisons, called metrics, and after trying them all I decided that there were only 3 that I liked for the purpose of my testing: AE, PSNR, and MAE. You can read about each if you like, but here is the basic description of each
- AE: absolute error count, number of different pixels
- PSNR: peak signal to noise ratio
- MAE: mean absolute error (normalized), average channel error distance
I don’t think the mathematical explanation of these is truly important here, though feel free to dig into that if you are so inclined, the information is there. What I cared about was using this library to gather these three metrics for all of the images I got out of these online services.
The library can give me this data, but it didn’t seem to have any way to feed 1,000 images through things or create an output file that would give me the data I needed. So I whipped up a shell script that would invoke the library over and over and over, write the data out to a CSV file, and save some difference images for each metric. Not only would I end up with some numbers to share, the library generated a different kind of visual difference than I got out of Photoshop. A few minutes later, I had some results.
Here are the three ImageMagick differences between upload 1 and upload 2 for Facebook


A different sort of look over how Photoshop illustrated the difference, and from the visuals it was still really hard for me to draw any conclusions. All three metrics show that there is a pretty significant difference between the image that came out of upload 1 and the image from upload 2. But here is where the raw numbers help. Take a look at this.
| Images | AE | PSNR | MAE |
|---|---|---|---|
| 1,2 | 1.56E+06 | 45.7532 | 167.656 (0.00255826) |
| 2,3 | 1.33E+06 | 47.7036 | 124.874 (0.00190545) |
| 3,4 | 1.01E+06 | 49.7327 | 85.8148 (0.00130945) |
| 4,5 | 784515 | 51.6022 | 60.9459 (0.000929975) |
| 5,6 | 611501 | 53.126 | 45.0659 (0.000687662) |
| 6,7 | 484708 | 54.4395 | 34.4411 (0.000525538) |
| 7,8 | 365508 | 55.9125 | 25.2907 (0.000385911) |
| 8,9 | 268055 | 57.4139 | 18.2166 (0.000277968) |
| 9,10 | 203932 | 58.7394 | 13.6898 (0.000208894) |
| 10,11 | 151551 | 60.1341 | 10.0362 (0.000153143) |
| 11,12 | 111610 | 61.4976 | 7.3753 (0.00011254) |
| 12,13 | 78262 | 63.1337 | 5.11688 (7.80786e-05) |
| 13,14 | 56351 | 64.463 | 3.70211 (5.64906e-05) |
| 14,15 | 39633 | 66.0538 | 2.60088 (3.96869e-05) |
| 15,16 | 28655 | 67.518 | 1.87013 (2.85363e-05) |
| 16,17 | 21309 | 68.6249 | 1.40871 (2.14955e-05) |
| 17,18 | 16393 | 69.8966 | 1.08094 (1.6494e-05) |
| 18,19 | 13040 | 71.0683 | 0.844289 (1.2883e-05) |
| 19,20 | 8243 | 73.1594 | 0.531178 (8.10526e-06) |
| 20,21 | 5944 | 74.2418 | 0.391518 (5.97419e-06) |
| 21,22 | 4453 | 75.7982 | 0.289538 (4.41807e-06) |
| 22,23 | 2523 | 78.0797 | 0.169067 (2.57979e-06) |
| 23,24 | 2627 | 78.2826 | 0.168515 (2.57138e-06) |
| 24,25 | 1631 | 80.341 | 0.105376 (1.60794e-06) |
| 25,26 | 946 | 82.7773 | 0.0614551 (9.37744e-07) |
| 26,27 | 484 | 86.1157 | 0.0310033 (4.7308e-07) |
| 27,28 | 36 | 97.3487 | 0.00307711 (4.69536e-08) |
| 28,29 | 0 | inf | 0 (0) |
Three different metrics telling the same story here. Image 1 that came out of a post to Facebook is very different compared with Image 2. If it was possible to set the quality setting so that Facebook would not compress the images then posting Image 1 back through Facebook should have resulted in the pixels being exactly the same. Instead, judging by the PSNR number, which is roughly how similar the two images are, they are only about 45% the same.
In fact, only after taking the image from one post and submitting it in the next post 29 different times did I finally get to the point where the 28th and 29th times I posted the image through Facebook were they the same! I didn’t expect them to ever be the same, which is why I wanted to test this putting an image through the service 1,000 times. The numbers don’t lie though, after 29 posts the Facebook compression engine finally yielded no change to the image.
Predictably, Instagram was similar to Facebook, only with Instagram it took 37 rounds of the post/download circle before images 36 and 37 were finally exactly the same. You know what was different? Twitter. With Twitter image 1 and image 2 were identical, which again tells me that there is a chance you could choose a pixel dimension and quality level that may mean your photo would bypass the Twitter compression engine. It also means another test.
Quality Level Test
Armed with some actual data, I could now do some testing with various pixel dimensions and quality levels to see if a photographer doing this on their own could bypass the compression engines behind Facebook, Instagram, and Twitter. First up, Facebook.
From the first post/download/post test I learned that the largest image Facebook will allow is 1920 pixels on the longest edge. It seems to maintain your aspect ratio (allow whatever pixel dimension you want on the shorter edge) but if you upload an image that has the longest edge bigger than 1920 pixels it will downsize it to 1920 pixels. I also learned that even if I took that downsized image and posted it to Facebook it was going to be compressed again up until I posted/downloaded/posted the image 29 times. What if I resized the image to meet the 1920 pixels longest edge myself and played with different quality levels?
I also had the data for Facebook telling me that the 28th and 29 images were both exactly 664 KB (679,936 bytes), which gave me a pretty good target to aim for. I figured that the only chance I had of not getting my image compressed when posting to Facebook was to have it be 1920 pixels on the long edge and under 664 KB. I went into Photoshop and resized my image with different quality levels and found that the closest I could get to that 664KB without going over was 41%. If I set quality to 42% I went over the number, but at 41% I ended up with an image that was 648 KB (663,552 bytes) – a tiny bit larger than Ps had estimated but under the target.
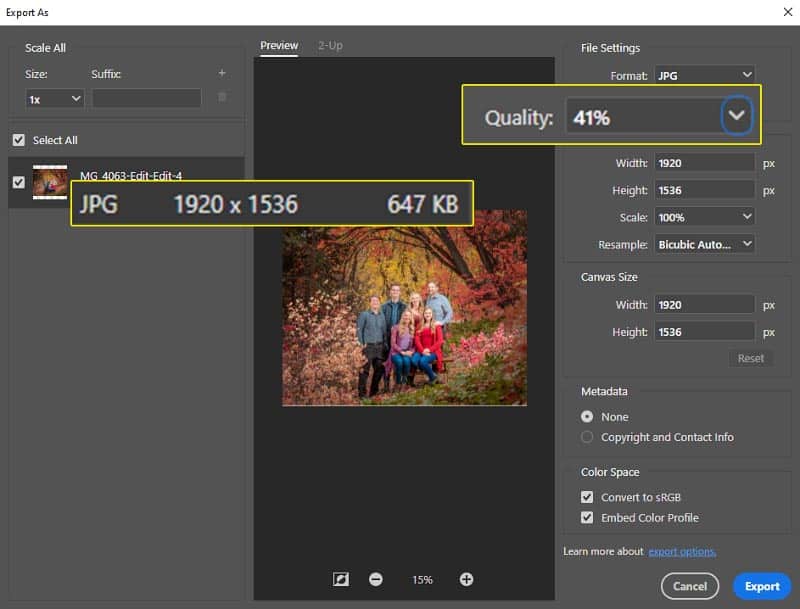
I posted this very specially crafted image to Facebook, then downloaded the image from the post. The interesting thing is that Facebook increased the size of the image from the 647KB to 716KB! What? The engine Facebook has processing these image posts just increased the size of the image?
Surprised by that, I had to test a number of different quality settings with the pixel dimensions at 1920×1537 to see what would happen.
| Original “Quality” | Original File Size (KB) | Post File Size (KB) | % Smaller |
|---|---|---|---|
| 100% | 3568 | 608 | 83% |
| 95% | 2980 | 608 | 80% |
| 93% | 2775 | 608 | 78% |
| 92% | 2652 | 608 | 77% |
| 91% | 2642 | 608 | 77% |
| 90% | 2532 | 608 | 76% |
| 80% | 1812 | 608 | 66% |
| 77% | 1652 | 611 | 63% |
| 75% | 1576 | 613 | 61% |
| 73% | 1488 | 610 | 59% |
| 72% | 1444 | 608 | 58% |
| 71% | 1412 | 1104 | 22% |
| 70% | 1376 | 1092 | 21% |
| 60% | 1080 | 1024 | 5% |
| 50% | 800 | 771 | 4% |
| 48% | 768 | 765 | 0% |
| 47% | 757 | 761 | -1% |
| 45% | 708 | 746 | -5% |
| 41% | 647 | 716 | -11% |
| 40% | 636 | 709 | -11% |
So many things to take note of here. First off, there was no post to Facebook where the image was not altered. Based purely on the file size, setting the quality level to 48% in Photoshop looks closest to the result of the compression engine Facebook uses with uploaded images. Still, it doesn’t matter what a photographer does in preparing an image for posting to Facebook, the image is going through their compression engine, which is simply not the same as what is in photo editing tools like Photoshop and Lightroom.
For this specific image the largest file size, which should equate to the highest quality, that came out of the Facebook compression engine was with the JPEG quality set to 71%. I tested this with other images and this quality number doesn’t stay at 71% for all images as you would expect, but it is always in the 70-80% range. Even though you may get a larger final image after posting using a different quality setting I still recommend using 77% as a really good balance between quality and file size.
I was confused by the fact that at 48% quality and below the Facebook compression engine delivers a file that is larger than what it was provided. That seems to indicate that not only is Facebook downsampling images with their compression engine, they are also upsampling images that are below a certain quality level and those images.
I took a closer look at this based on the data here, but first let’s go through Instagram and Twitter. I did the same test with Instagram except the original image had pixel dimensions of 1080×864 since that is the best you can get back out of Instagram.
| Original “Quality” | Original File Size (KB) | Post File Size (KB) | % Smaller |
|---|---|---|---|
| 100% | 1404 | 263 | 81% |
| 90% | 1020 | 263 | 74% |
| 80% | 743 | 262 | 65% |
| 70% | 563 | 263 | 53% |
| 60% | 441 | 264 | 40% |
| 50% | 328 | 266 | 19% |
| 40% | 262 | 258 | 2% |
| 39% | 257 | 256 | 0% |
| 38% | 251 | 255 | -2% |
| 30% | 221 | 244 | -10% |
| 20% | 187 | 227 | -21% |
There didn’t seem to be a quality level for this image where the downloaded image had the largest file size like happened with Facebook. It almost doesn’t matter what quality setting you use with Instagram posts. You get about the same quality out judging solely on file size.
The Photoshop export JPEG quality at 39% seems closest to the compression engine used with Instagram posts, but there is still nothing a photographer can do to bypass that from happening. Instagram does also seem to be doing a little bit of upsampling when the image quality is very low.
The data from the other tests thus far with Twitter led me to believe that it might just be possible that an image compressed at a specific setting could bypass the compression engine at Twitter. Here is the same kind of quality level test for Twitter with the pixel dimensions of the original image at 4096×2731.
| Original “Quality” | Original File Size (KB) | Post File Size (KB) | % Smaller |
|---|---|---|---|
| 100% | 11056 | 2424 | 78% |
| 90% | 7364 | 2432 | 67% |
| 81% | 5184 | 2444 | 53% |
| 80% | 5116 | 4884 | 5% |
| 77% | 4648 | 4448 | 4% |
| 70% | 3836 | 3696 | 4% |
| 60% | 2984 | 2904 | 3% |
| 50% | 2196 | 2132 | 3% |
| 40% | 1736 | 1704 | 2% |
| 30% | 1444 | 1428 | 1% |
| 20% | 1212 | 1208 | 0% |
| 10% | 908 | 916 | -1% |
Still amazed the quality level of the JPEG images that come out of Twitter. They are significantly higher quality than come out of Facebook and Instagram. Funny how Twitter is not really considered a platform for sharing images.
The data tells us that the Photoshop quality setting of 20% comes closest to producing the same file size as what comes out of Twitter, but as with the other two services there was no quality setting that bypassed the compression engine Twitter uses with images that are posted to the service.
Like was the case with Facebook, the quality level of 80 for this specific image yielded the largest JPEG file coming out of Twitter, meaning there is an advantage in setting the quality level somewhere between 60% and 80% in Photoshop to produce larger JPEGs in Twitter. Yet again, 77% seems like a really magical value to be using for publishing images to the web as a really good balance between size and quality.
Closer Look at Quality Test
The quality test is a strong indicator that it doesn’t matter which quality level a photographer chooses when exporting their images for sharing to the web, all of these social media services are still going to compress the image. Though all of that was based purely on file size. Now that I have posted these images at the highest resolution supported by the platform, I can do the numerical analysis to quantify the difference between the original and the image that came out of downloading it after posting through the service.
Let’s start with Facebook. The image that was closest in file size was when the image was exported out of Photoshop at a quality level of 48%. Here is the Photoshop difference with threshold between the 48% quality JPEG exported from Photoshop and the image downloaded after posting it to Facebook.
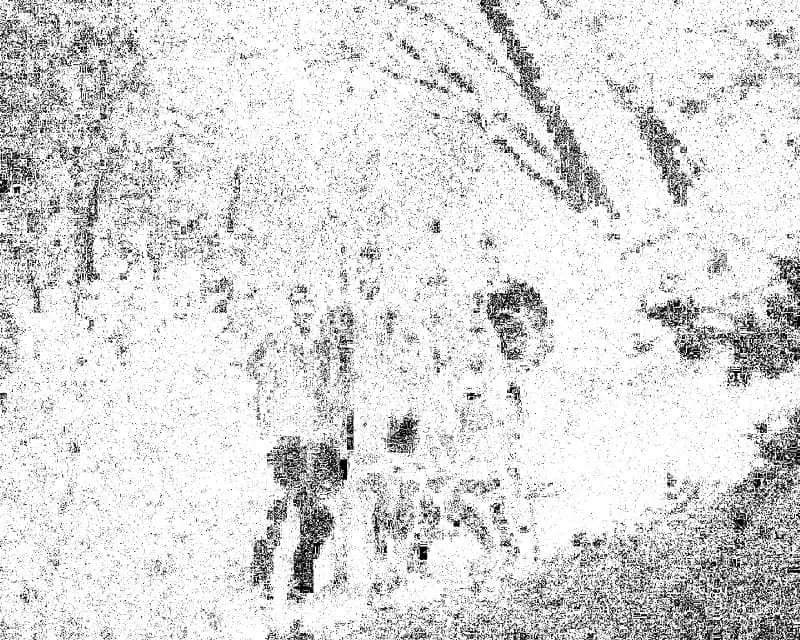
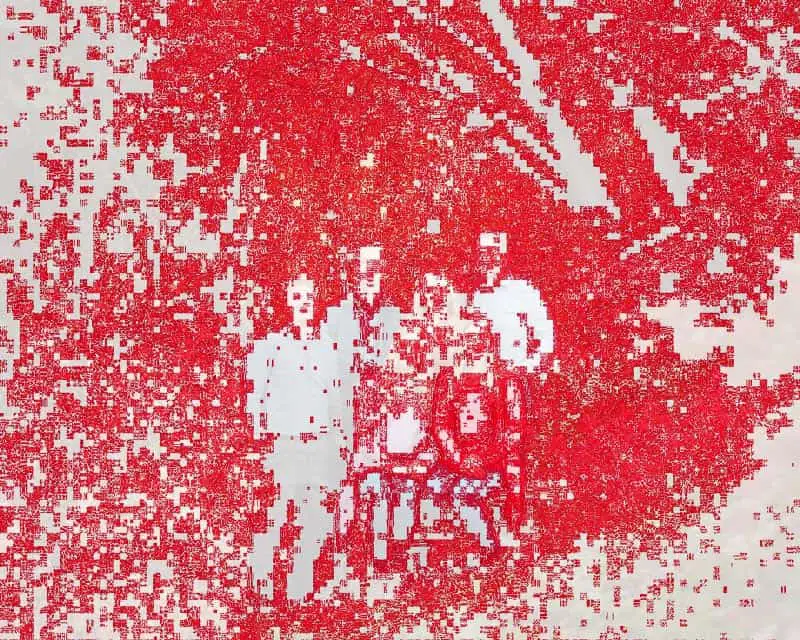
The white indicates the pixels that were changed from what was in the original image. Yes, the file size is very close to the same, but you can see visually that there there are a lot of differences between the two images. Here is the ImageMagick compare PSNR metric visually.
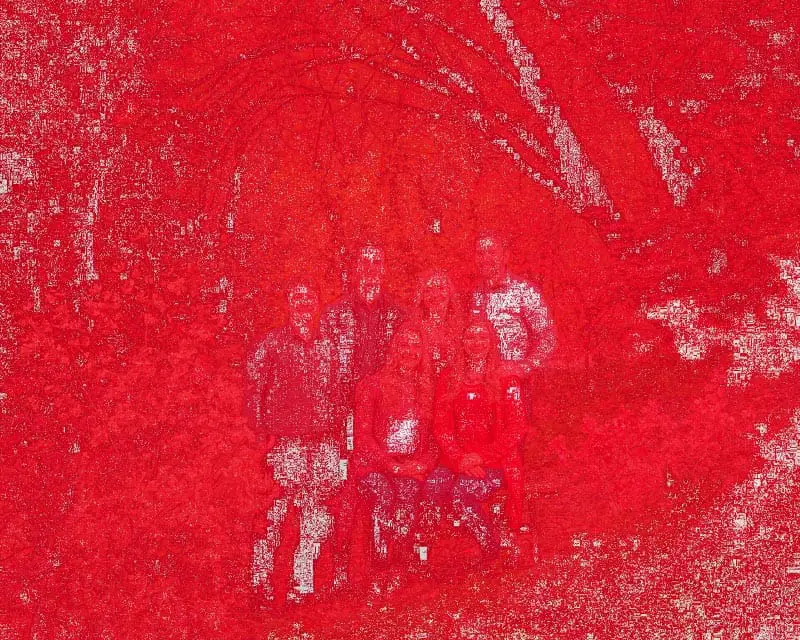
Red shows the pixels that changed. Again you can see that there wasn’t a whole lot the same between these two images even though they had similar file sizes. Even better, the ImageMagick PSNR metric gives us idea of how similar the images are and this compare gets a value of 38.04. I think it very roughly means only about 38% of the pixels between these two images with a similar file size were the same. To me this shows for absolute certainty that there is nothing a photographer can do when exporting an image to bypass the compression engine used by Facebook.
We can’t leave out Instagram and Twitter from this analysis. Let’s go to Instagram next where the quality level of 39% produced an image with a file size closest to the original. Here is the Photoshop difference with threshold.
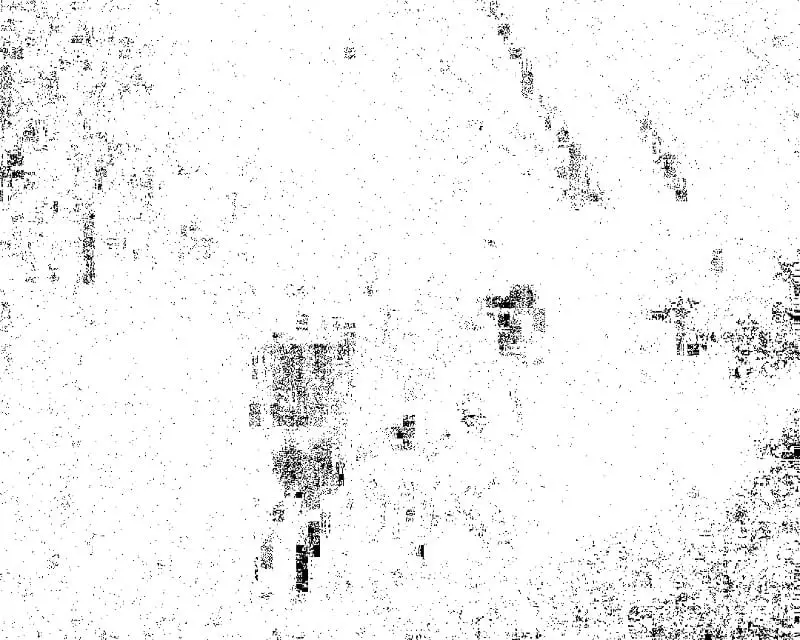
Yep, lots of white. Not much the same between those two images even though their file size was similar. Here is the ImageMagick compare PSNR metric visually.
The PSNR numerical metric was 31.53. Again, very clear that these two images don’t have a lot of pixels that are the same. I just doesn’t matter much what a photographer does when exporting an image and posting to Instagram. That image is ALWAYS going through the compression engine.
Finally, let’s wrap things up with Twitter. This is the one that had the most chance for a photographer to export their image in a specific way to bypass the compression engine used by Twitter. The file size data tells us that it is probably the same as Facebook and Instagram, but here is the Photoshop visual difference between the image at quality of 20 that had the closest file size after posting.

Wow. There isn’t any white on there. This looks about the same. OK. What about ImageMagick PSNR?
No red! And the PSNR metric came out as “inf”, which means 0 differences between those two images. Yep, the image that was downloaded from Twitter was identical to the original image! Hmm. A quality level of 20% though? That isn’t great. How about a look at our magical quality level of 77%? Here is the Photoshop difference for quality 77% and Twitter.

Still no white! What does ImageMagick compare on the PSNR metric have to say?
Still not red and the PSNR numeric metric was also “inf”. This made me wonder if Twitter compression always produces images that are no different at a pixel level, so I ran ImageMagick over all of the images.
| Original Quality | Original File Size (KB) | Post File Size (KB) | PSNR |
|---|---|---|---|
| 100% | 11056 | 2424 | 33.73 |
| 90% | 7364 | 2432 | 33.71 |
| 81% | 5184 | 2444 | 34.01 |
| 80% | 5116 | 4884 | 0 |
| 77% | 4648 | 4448 | 0 |
| 70% | 3836 | 3696 | 0 |
| 60% | 2984 | 2904 | 0 |
| 50% | 2196 | 2132 | 0 |
| 40% | 1736 | 1704 | 0 |
| 30% | 1444 | 1428 | 0 |
| 20% | 1212 | 1208 | 0 |
| 10% | 908 | 916 | 0 |
Twitter is different from Facebook and Instagram. Your image is still going through the compression engine, evidenced by the file size difference, but anything below 80% quality is going to remain close enough at a pixel level to consider the image to be identical.
Final Thoughts
After all of this testing I can say with 100% certainty that as of early 2021 there is nothing a photographer can do when exporting their image bypass the compression engines used by Facebook, Instagram, and Twitter. The simplest export settings to use in both Photoshop and Instagram is a quality level of 77% and the longest edge set to 4096. If the image you are uploading to social media has banding in the sky then increase the quality to 80% in Photoshop (does nothing in Lightroom). That way you get a JPEG formatted in a way to get the highest quality result out of Facebook, Instagram and Twitter.
If you aren’t posting the image to Twitter, you may as well set the longest edge resolution to 1920 (maybe 2048) and use a quality level of 77%. That will give you the highest quality output for both Facebook and Instagram. You may also consider doing this if you are posting the image to Twitter as an image with the resolution of 4096 pixels on the long edge is quite a lot and good for 13″x9″ prints.
Podcast: Download (Duration: 1:18:56 — ) | Embed

Comments
Hey just a heads up around 1h11m there is over lapping audio,
Great show appreciate the mind numbing research you do.
Oh my. Sure enough a clip moved over top another one. Thanks for letting me know!!!
Thank you for all your hard work. I actually found this very interesting. I followed along on the web site while I was listening to the podcast. Kudos!
Wohh, so much work you’d put into this testing – I’m amazed. Thank you so much. Just what I’ve needed. I’m exporting imaged to social media right now, based on your suggestions. Let’s have a diet coke 😉
Great Stuff, Jeff !! Really appreciate the hard work !! Very interesting – the way you went about with the analysis. And will surely try out the uploads with your file size settings. I have just recently started listening to your podcasts. Excellent information for us Amateur Photographers.
Great episode Jeff, and I am humbled by the tenacity, rigour and downright patience of your approach. However…
It may just be me, but I’m still lost as to why I want to compress the image for upload at all. Saving it at 77% quality and letting the platform re-compress is, by definition, nowhere near “the best” representation of my work. I’m also not worried about file size for storage because a) I’m not going to be archiving that JPG copy at my end anyway, b) once it’s been uploaded the amount of space it takes up on FB/Insta/Twitter servers is of no consequence to me whatsoever, and c) file size and bandwidth during upload are irrelevant in an age where the difference in speed between a 500Kb file and a 5Mb one is measured in the region of sub-second.
Am I possibly missing something? Highly likely! It wouldn’t be the first time I’ve missed the big picture (no pun intended), and everyone else ends up frustrated by attempting to explain something ridiculously simple which I just haven’t grasped. However, if we can agree that the server-side process is going to involve re-compression regardless of the data it’s fed then all of this strikes me as a solution to a problem that doesn’t exist; another of those phantoms of which photographers insist on pursuing the minutiae, to the detriment of just getting out and taking pictures.
Resize for sure, but otherwise export as TIF/PNG and publish. Job done.
All of which being said I love your show and find it invaluable, and this episode is still fascinating to me. As I say, the point is probably going way over my head, and anyone reading this is probably groaning at my stupidity.
A Diet Coke is on its way to you, sir!
@Craig,
The goal of this article was to do the ultimate technical test to see if there is any way a photographer can pre-compress an image so that the social media networks won’t compress them again. I have seen it posted in many places that if you do this or that as you export then the compression algorithms won’t run on your image when you post them. Maybe that was the case at some point, but my testing seemed to prove that there is literally nothing a photographer can do to make it so that their image isn’t being compressed when it is posted to any of the social media sites (though Twitter did less than the others).
I also expected to see that with some of them the more times you posted the image through the service the more it got compressed. I had seen articles in the past where a posting the image, taking that result, and posting it again eventually led to the image being so compressed you couldn’t actually discern what the original image was. My testing in 2021 proved that is not the case with any of these services. They definitely put the image through their compression engine every time, but within 30 posts none of them were actually changing any pixels.
With that said, the boring answer to your questions here is that I write the articles for photographers of all technical skill levels. Most of them want to be told numbers to put in a box rather switching up output formats and some of the challenges that can result (like a TIF over 10GB because it has too much resolution or layers). The bottom line in the recommendation is that the aggressive compression used by the social media networks don’t really benefit from the minor differences in the source file at the high end. Meaning the final result out of those compression engines isn’t any different between a TIF and a JPEG at 77.
Your point about disk space and bandwidth might be good for you, but there are lot of photographers who do keep their exports and/or have significant challenges with bandwidth speeds and/or data caps. Especially when some are sharing hundreds of images a week (some are delivering images to clients this way) it can really add up. So again with my recommendations I am trying to have the advice be as universally applicable as possible. JPEG at 77 proves to have no worse a result and saves on those resources for the photographers who need that to be considered (and probably don’t really know they do).
Jeff
Hi Jeff – Thanks for the detailed investigation – very interesting. I had two comments/questions:
1) I consider the process of exporting from LR before sharing to social media to be “old school” – I haven’t done that for a very long time. Because both Apple Photos and Lightroom are fully cloud-ified, I can edit on desktop, then go to my phone or tablet, select an image, and click Share and then share to Flickr, Instagram, Facebook, Glass, and any other app (I use this process 3x/day on a set of social services). Of course I don’t know what dimensions are being used there, but the results look great and I assume that each company has optimized the upload size for their service. So while it’s interesting to learn what dimensions are optimal, I also haven’t needed to know for a long time because the social services create the Share Sheets optimized for their own systems.
2) I was really surprised you didn’t include Flickr in the set of services you tested! Sure it’s not as popular as it once was, but I still get a lot more traffic than I do on IG, FB, or Twitter, and they’ve got the best tools for photographers. Plus they let you upload at much higher resolutions, and I don’t believe they do any compression whatsoever! Which makes it kind of odd for your testing purposes, but I would have that aspect would have made it an appealing suggestion in the context of your podcast.
If you’re curious to learn more about where Flickr is at traffic-wise in 2022, I wrote this piece a bit ago which you might find interesting:
https://medium.com/@shacker/flickr-is-no-ghost-town-31433c340d34
Thanks and best,
Scot