Beginning Macro Photography
Don, let’s start off the show by talking about what a competent photographer who has never done any macro can do to get started. Let’s say this photographer is one who knows their way around their camera, knows how to control their settings to get good exposure, but has never done any macro shooting. How would you recommend such a photographer get started with minimal gear/cost?
Don: You don’t know what you don’t know. For most of my career I have used the plants and nature in my backyard and a makeshift studio in my kitchen to produce really fun images.
Minimal Gear/Cost For Macro Photography
Let’s talk about how you can dip your toes into the macro photography world without breaking the bank.
Inexpensive Macro Lens Options
You may immediately approach macro photography thinking you have to buy a macro lens. Certainly that can help things but you can do quite a bit without that which we will talk about in a moment.
If you want to buy a macro lens you don’t have to spend the crazy money like the Canon L series macro lens! Autofocus and stabilization is not something that really makes a large difference in the macro world. Go for the Tamron 90mm macro or Panasonic makes a 30mm macro for the micro 4/3 world. They are going to be a few hundred dollars.
Use Extension Tubes For Macro!
Much less expensive is to use something like reversing rings. If you take a 50mm lens, one that most photographers have, if you put it on your camera backwards it turns that lens into a macro lens.
My favorite way to do macro work inexpensively is to use extension tubes. They fit between the camera body and the lens. Sort of like you can probably picture in your head the old antique cameras with the bellows on them. The further you could push the lens away from the camera, the closer the subject is to the front of the lens element.
If you take a 24-105 everyday kind of lens and you put extension tubes between the lens and the camera you can get focus when the subject is much closer to the lens that you could previously. Using a lens that is about 100mm tends to work the best for doing macro with extension tubes but feel free to experiment with other focal lengths.
Experimenting is the key to good photography. Experimenting let’s you be create and ask yourself what-if? You may fail, but you learn so much from failures and it makes it that much sweeter when it works and you produce an image you wouldn’t have been able to prior to experimenting.
One Pitfall In Macro Photography
If you have a wide angle lens and you put too much distance between the lens and the camera using extension tubes, it will shift the focus so far forward that the focus point is internal to the lens and doesn’t make it to the sensor.
I have put a 12mm extension tubes on a fisheye lens and the focus point literally becomes the front element of the lens when I focus to infinity on the lens. Anything further away from the lens will be entirely out of focus. If that focus ring is set to anything other than infinity you won’t have anything in focus.
Try things out with longer focal lengths. 50-100mm.
Hold Subjects With Clamps
I like to hold my subjects in place using something called a third hand tool. Essentially a set of two alligator clips on a weighted base that you can move around on a little swivel. Allows you to hold little flowers or other things still so that you can shoot around them.
I buy them in bulk and treat them as expendable. I submerge them in water and they rust all out by the end of the shoot but I get a great image out of it.
If you are going to be outdoors and not in your kitchen or somewhere inside your house then the Wimberly Plamp is the thing to use. It is a large flexible arm with joints like a gorilla tripod.
Lighting for Macro
You have to start taking control over the light. Take a normal, black, rain umbrella to create a little shade for what you are shooting. Then I have done a lot of shooting with a ring flash off camera because it tends to be too much if it is on camera.
However, over the past several years I have become very keen to use a really bright LED flashlight. When I do workshops on water drop photography I outfit my students with one of these flashlights. You can get a good one for $50.
It is a good investment. Works in the summertime and the wintertime for all sorts of subjects. Helps that it is constant lighting so that you can see what you are going to get without having to pop a flash and do a guess and check kind of process to figure out what power level to use.
Hypodermic Needle to Create Perfect Drops of Water in Macro
This is a tip that came from a student who as a dentist. Use a hypodermic needle to place the water droplets! He had more access to them I did, but you can get them pretty easily on eBay or Amazon. If you want to play around with water droplets this is the easiest and most reliable way to place the water wherever you want them to be.
The material of the needle is hydrophobic and the water wants to get away from it. Other things I have tried have left me trying to shake the drop off of things that are not hydrophobic and it makes it really hard to get them precisely where you want them.
Some may suggest using glycerin to help make the drops form the way you want them to. I have done that and it changes the viscosity of the water so that it won’t run away once you place it. Like if you want to have it stay on a leaf or a surface where it runs off then it may help. I find that using normal water with a hypodermic needle works really well.
Spray Bottle Creates Good Droplets With Some Subjects in Macro
Another thing that makes a really fun subject for macro work is using a dandelion seed or any kind of seed that expands out and designed to catch in the wind and then use a dollar store spray bottle to wet it down very gently. Water droplets will form pretty easily and play perfectly for a water droplet diffraction image.
More Expensive Gear Recommended For Macro Photography
Venus Optics Laowa 100mm is a piece of gear that will achieve a 2:1 magnification. Most macro lenses only have a 1:1 magnification, which means that when you bring it as close to the lens element as you can and still get focus if you are using a full frame sensor a quarter would fill the frame. If you want to go closer, and that is where you will go if you get into this, then you want more than 1:1.
Still need to get closer, then the Canon MPE 65mm macro is what you need. It goes all the way to 5:1 magnification. You can get an ants face to fill the frame with that kind of magnification! However, be warned, it is the MOST difficult lens to use in Canon’s entire lineup. If you go and search for one on eBay that is used, chances are it has been used exactly once and the person wants to get rid of it because they thought it didn’t work.
The difficulty with that Canon MPE lens is that the depth of field is so very shallow. The closer you are to the subject the narrower the depth of field and it is very difficult to deal with. You can get to a fraction of a millimeter.
Is It Better to Shoot Full Frame for Macro Photography?
There are actually some advantages to shooting crop, or even better micro four thirds, when shooting macro over full frame. That depth of field will be a little larger and you can achieve a little more more magnification with a smaller sensor. I love shooting Panasonic for macro.
However, there is a downside. When you have a 20 megapixel sensor in full frame and a 20 megapixel sensor on crop the full frame sensor will be made up of photosites that catch light in the digital sensor that are much bigger “buckets” than those on the smaller sensor size. That can be important with macro because diffraction will come into play.
When light passes through an opening, it creates a circular wave. At wider apertures it doesn’t make a big difference, but as that aperture gets smaller and smaller (physically smaller but mean a bigger and bigger number) this circular wave starts to “paint outside the lines” where the light that should end up in one photosite on that sensor actually ends up in another one. It makes your image look very soft and out of focus.
In macro the aperture isn’t just the number that is on your camera or that you have set in the dials of the lens in the case of manual aperture lenses (many macro lenses are manual aperture). The magnification of the macro lens really is applied to the aperture too and you may think you are shooting at f/22 when in reality it is f/96 where diffraction can be a real problem.
Macro Photography Techniques
As I have invested time and practice into getting better at photography over the past few years I have discovered a lot of techniques that have made a big difference. Macro is a different enough world in photography that there is some techniques that a photographer who has never done it needs to know and practice.
You Have Complete Control Over the Background in Macro Photography
Unlike pretty well any other genre or form of photography, with macro photography you have full control over the background that will be in the shot. Make full use of that. Be very deliberate in what your background is going to be. If you don’t like what is naturally there, change it.
Bring blurry prints or buy hanging plants from the hardware store and create a background that uses color contrast to be more visually interesting and make your actual subject stand out.
How to Focus With Macro Photography
Regular photographers will let auto focus do its thing. Macro photographers are better off to not use auto focus or even touch the focus ring at all. Instead, manually move your focus plane through the scene.
Auto focus will typically fall to the foreground and will just fail miserably with macro photography most of the time. Using the focus ring is going to shake the camera. You need to be able to hold that camera as still as possible and trying to control that focus ring destabilizes the camera.
Use high speed continuous or the like drive modes on your camera as well. Hold down that shutter and then slowly move your camera forward and backward through the scene. This isn’t spray and pray technique, this is just how the world of macro photography works because you have to overcome a very narrow depth of field.
Good macro photographers shoot 50 to 100 photos in order to have one work. If you take 10 shots you won’t have any of them work. The keeper rate is going to be very poor, so just be ready for it. Hold down that shutter and move back and forth until the buffer fills up. Wait for a moment, do it again.
Shoot Macro Using the Viewfinder
You can try to use a tripod as you are shooting macro but I find it very limiting and preventing me from moving around fast enough to get my shot, especially when I have insects I am trying to use as actors in my scene. It takes some practice but shooting macro handheld will be better.
Hold the camera with your left hand under the lens bringing your elbows in as close to your body as you can. Having your elbows flapping out to the side doesn’t stabilize the camera. Have your right hand holding the edge of the camera again with your elbows as tight as you can.
Finally, smoosh that camera into your forehead as much as you can stand it while you look through the viewfinder to compose your scene and track your subject. This will provide multiple points of contact to help keep your camera steady and give you the best chance to get sharp pictures.
When I shoot in my backyard I get my clothes completely dirty. I will be on the ground, getting my elbows in to support that camera moving back and forth. It just makes a complete mess.
Camera Settings to Start With For Macro Photography
You need to balance things. Start out at f/8, maybe go to f/11. Your depth of field is going to be falling off to be very narrow no matter what aperture you are using.
As your magnification is increasing you need to think of things like you are adding one stop to your aperture. This includes the first magnification, at 1:1 that f/8 is actually f/11. If I am at f/22 I am actually at f/32. If I have extension tubes on then I might actually be at f/45 where diffraction is going to come into play.
Try to stay away from extreme apertures. In rare cases I will shoot at f/16 and use focus stacking, but mostly plan to shoot at f/8 to strike a good balance between getting as deep a depth of field as you can without introducing a lot of diffraction.
I would also increase the ISO to give me what I need. I would rather have a grainy shot than an out of focus shoot. Keep ISO up a stop more than you would normally.
Feel Full Freedom to Compose
With most other genres of photography you have to work to find a good composition that is realistically within some limits. Landscape photographers need to get that horizon line level. Portrait photographers need to get their subjects to look natural and be posed in beautiful positions relative to their surroundings.
Macro photographers really don’t have these constraints. You probably won’t have a horizon line at all in macro. If you want to turn your camera 30 degrees to get the stem of a flower to form a diagonal line you can do that. Position your camera however you want. I have shot spiders upside down on my ceiling and it totally works because you can just rotate it around in post without any problem.
Water Droplet Diffraction in Macro Photography
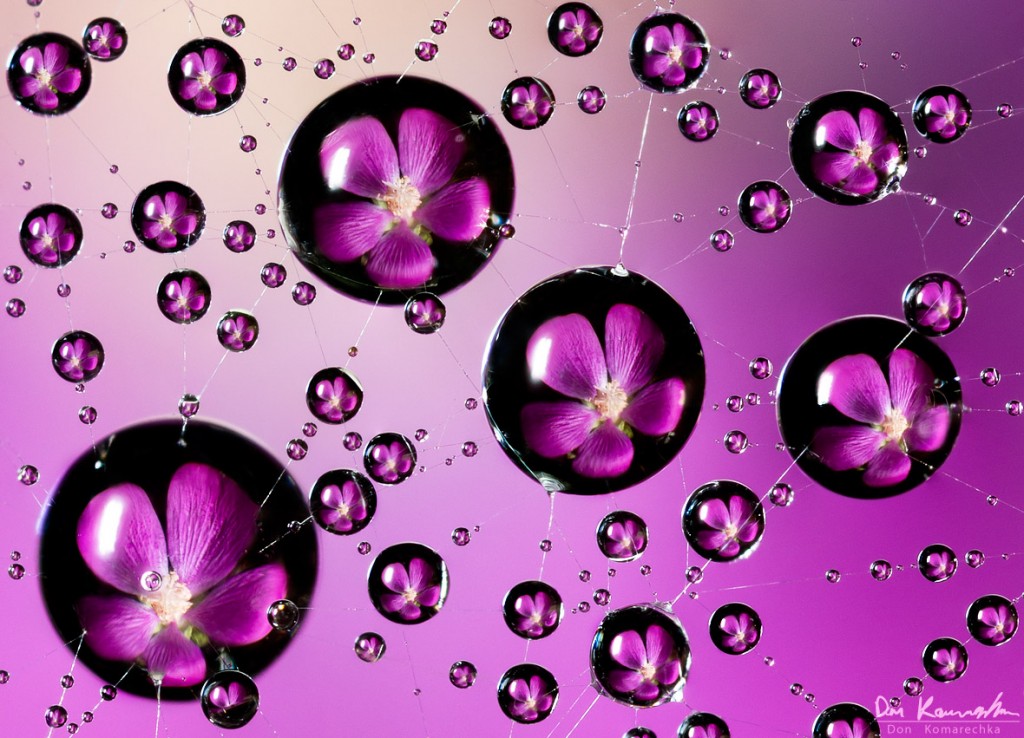
Water droplets adds depth to macro photos. There is so much you can do with subjects when you add water. It is a little like a magic trick. When someone doesn’t know how the trick is done they are in awe and wonder how you pulled it off. That is water droplets in macro.
We already talked about the gear you can use to place water droplets in your scene, but let’s talk about how you can create amazing images with them.
The water droplet acts like a lens. The more spherical it is the better a lens it will be. This is where that hypodermic needle will really help. You can make beautiful round drops of water and place them wherever you like.
You focus on the droplet. Place something behind the droplet that will be completely out of focus and play around with exactly where it is at until it is entirely in focus in the water droplets.
Then, and this is the key, you predominantly light the background. You can’t completely ignore the foreground, but when the background is getting the majority of the light it will glow inside of those water droplets. This is where the magic is.
You don’t have to use a live flower in the background. You can use anything, including a photo. Use your imagination and ask that what-if question!
Adding Actors to Your Macro Photography
Some insects will cooperate very naturally. A preying mantice will sit very still for long periods of time. Ants will not. Ants are tough. They seem totally oblivious to water droplets for example and will end up having one get on its butt and drag it around in a very unpleasing way.
I did find a good shortcut recently. If I combine a bowl of water with an ant, that ant will just explore a flower without leaving. They won’t go through that much water.
Bees are fun to work with because if you spray them with a little bit of water they won’t fly until their wings dry out. You can use that spray bottle we talked about already to spray a bee and then just place them wherever you want and they will stay there for at least a minute or so before it will fly again. Stage the foreground and the background before I go find the bee, then I will find the bee and spray them and rush over to place it where I want it.
You Will Fail Shooting Macro Photography
We already mentioned this a little but I want to just say it again here at the end of this episode. No matter how good you may be at other forms of photography, beginners learning to shoot macro will fail and fail often. If you are failing, you are doing it right!
Don’t let it discourage you. It is going to take a lot of practice and experimentation for you to get to the point where you can create the kinds of macro images you envision. You are going to throw away so many photos while you work towards creating one that you are happy and even proud of, but you can do this!
Don’s Book: Macro Photography: The Universe at our Feet
Don has a book that is a kickstarter project here in June 2019. It is a book that will give instructions on everything you want to know about macro photography. If you like this episode then you really have to check out Don’s book. If you back the project on kickstarter it will be coming out in December 2019.
Don has experience doing books through kickstarter before, so this is not a project that you have to be too concerned about backing without getting the product. The project is already funded and Don will make it happen.
Episode Resources
- Don’s new macro photography book: Macro Photography: The Universe at our Feet
- Petapixel Article: Shooting Water Droplet Refractions for Magical Macro Photos
- Don’s website: https://www.donkom.ca/
Reminders
- Photo Taco Facebook group, ask to join and write “Jeff Harmon” as the name of the host.
- Follow the show on Instagram @phototacopodast or Jeff’s personal account @harmonjeff
- Follow the show on Twitter @phototaco or Jeff’s personal account @harmon_jeff
- Send email suggestions on show topics to phototacopodcast@gmail.com
- Check out the other podcasts on the Master Photography Network over at masterphotographypodcast.com
Podcast: Download (Duration: 52:35 — 36.4MB) | Embed
Comments
Dear Sir , Went through your blog on macro photography and it was amazing and shows lot of insights on how to take up macrophotography and big fan of your work