
How To Make Lightroom Classic Import 90% Faster
This is not a new topic here on Photo Taco. I have talked about this magical process, something Adobe calls the Embedded Preview Workflow (added to Lightroom Classic back in Oct 2017), here on the show before. I did an episode called Lr Embedded Preview Workflow back in April 2018, so about two years ago.
So why am I revisiting this topic? You may be hoping to hear me say that Adobe has done some work on this so that there is something new to make the import process go even faster. Yes, I think it has changed a little with how preview building goes in Lightroom Classic ever since Adobe partnered with Intel to get things tuned up a bit. However, my advice for everyone listening is largely the same as I gave in 2018. I recommend you do not build those previews until you have finished your culling process and are ready to adjust the survivors in the Develop module of Lightroom Classic.
There are two reasons I am revisiting this topic here in April 2020. Let’s go through them.
Episode Sponsor
I get contacted very regularly by marketing departments from various photography products who want to partner with the show and I turn most of them away because I just don’t believe in the product enough for a sponsorship. When Phlearn reached out I was really excited because my friend Aaron Nace and the folks over at Plearn.com produce video training for Photoshop that I can’t recommend strongly enough. It is incredible. Aaron has forgotten more Photoshop than I have ever learned. A huge portion of what I know about Photoshop has come from video training over at Phlearn.com. Aaron is truly a Photoshop master, but even more important, he is a really good teacher. I have rubbed shoulders with a lot of people who know Photoshop really well but they usually don’t know how to teach others very well. It doesn’t matter the topic; retouching, coloring, compositing, or using camera raw for editing your photos. Aaron knows it, he knows how to teach it, and make it fun! Included in a year’s subscription to Phlearn.com is instant access to over 150 in-depth video tutorials and they are not done there because they are releasing two new PRO tutorials every month. Priced at $99.95 per year, the annual subscription is an absolute steal and listeners of Photo Taco get an even better deal with 20% off that first year by using coupon code phototaco20 at checkout. I love Phlearn.com and I know you will too.
Embedded Preview Workflow Tutorial Video
The first reason is that I have just released a new free tutorial on How To Make Lightroom Import 90% Faster. There are four sections to the tutorial where I walk you through exactly what you have to do in Lightroom Classic to make the import process almost as fast as a culling tool like Photo Mechanic from Camera Bits.
Now before you go write that email, I said ALMOST as fast as Photo Mechanic. It isn’t as fast for sure, you can probably save about 2 minutes on a batch of 1,000 raw files if you pay the $150 licensing fee for Photo Mechanic. But Lightroom Classic can get close by using the Embedded Preview Workflow and knocking out 90% of the time of the import process you are probably used to.
The second reason is that I have done a whole lot of testing on this fresh here in April 2020 and I have discovered a few things that either changed without a big announcement from Adobe or I misunderstood back in 2017.
Let’s start with the tutorial of how to do the embedded preview workflow.
Tutorial Section 1 – JPEGS In Raw Files
Did you know that your raw files have JPEGs inside them? They all need them so that they have something to show you on the back of the camera as you review the photos you have taken and so that file browsers on your computer like Finder and Explorer can show you thumbnails of the images.
Embedded JPEGs
Not all camera manufacturers do this the same. All of the Canon and Nikon raw files I have looked at have full resolution JPEG images embedded inside their raw files. Actually, most of them put at least two JPEGs inside their raw files. One is a TINY thumbnail image that is about about 160×120 pixels. The other is a JPEG that has the same, or very close to the same, pixel dimensions of the original raw file.
These aren’t images that are on your memory card because you shot JPEG+RAW. Your camera generated and put those JPEG images inside the raw file and then wrote it all to the memory card. This is why it is called the “embedded preview” workflow process because these JPEGs your camera has already put inside your raw files are PERFECT to use for culling. Much better than wasting the time, CPU, and memory having Lightroom build previews. By making a few choices in import and following a few rules, we can tell Lightroom Classic to use those JPEGs inside your raw file instead of generating previews and cut out 90% or more of the time it takes to import!
Embedded JPEGs That Are “Too Small”
Before we go into how to do this, I do have to tell you that not all cameras embed JPEG images into their raw files the same way. You notice I mentioned Canon and Nikon. That’s because I don’t know of a Canon or Nikon DSLR or mirrorless camera that does not embed JPEGs like I just told you about. There is a good chance the other manufacturers besides Canon and Nikon are not putting that high resolution JPEG in their raw files. At least not one that is even close to the full resolution of the raw file itself.
For example, the raw files from the Sony A7R3 have a pixel dimension of 7952×5304. The largest JPEG image embedded in that raw file is only 1616×1080, about 20% of the raw file and something far less suitable to support this process. That JPEG is really only good enough for a Full HD 1080p display, not for a 2K, 4K, or higher resolution display than many of you listening are using today. Adobe addressed this very directly in the blog post where they introduced this embedded preview workflow:
“Lightroom checks if the embedded preview size is 50% of that of the raw image. If not, the standard preview is created instead of reading the embedded preview.”
This process isn’t supposed to work then for cameras that have embedded JPEGs that are too small. The solution for that situation is to shoot JPEG+RAW. That way you make sure you have a full sized JPEG to use in this process and Lightroom will actually use that JPEG in just that way. Adobe calls the JPEG next to the raw file a “sidecar” file in the import process, not to be confused with the .XMP sidecar files where edits can go if you choose to enable that in Lightroom Classic (I recommend you do NOT).
You can check your own raw files to see the size of the JPEGs embedded in your raw files using a free online tool from Jeffrey Friedl at http://exif.regex.info/exif.cgi to see if you may need to shoot JPEG+RAW to use this process.
Embedded Preview Workflow Still Works With “Too Small”!
However, it looks like there is a really good chance you don’t have to shoot JPEG+RAW even though Adobe clearly said you would have to if your raw files have embedded JPEG images that are too small. I can’t say it universally, there are far too many raw files out there and you very well may need to shoot JPEG+RAW on your camera to make sure this workflow works, but I tested with those raws from the Sony A7R3 and it still worked just fine.
Remember, the largest preview inside the Sony A7R3 is only 20% of the pixels in the raw file. Adobe clearly said the cutoff was 50%, yet when I tested the embedded preview workflow using those raw files as I prepared for this episode, it totally worked just like the raw files from Canon and Nikon I used in the same test. In fact, not only did the process work exactly the same functionally, Lightroom was able to pull the JPEG from the raw files to support the embedded preview workflow a tiny bit faster than it could for Canon and Nikon raw files – probably due to the size of the JPEG being smaller.
Trying to figure out why this worked, I wondered if maybe what Adobe meant with their two sentences on the topic in the blog post from 2017 was that the JPEG had to be at least 50% of the standard preview that Lightroom would build or Lightroom wouldn’t use that JPEG and would build the standard preview. So I tested that. I used a 4K display where the pixel size of the standard preview defaults to 6016px on the long edge. That JPEG embedded in the Sony A7R3 raw file is only about 27% of that size, well under the 50% cutoff, and yet Lightroom Classic very happily used the embedded JPEGs and did not build standard previews on import. The embedded preview workflow still worked.
I haven’t yet to see a raw file where the embedded preview workflow does not work. If you end up trying it out and you can’t get it to work then drop me a line and let me know.
Tutorial Section 2 – Lightroom Classic Preferences and Import Dialog Settings
Unfortunately Adobe hasn’t made it possible for Lightroom Classic to walk you through what it takes to use the Embedded Preview workflow process. Let’s talk about the preferences and configuration of the Import dialog to use the embedded preview workflow and speed up the import process by about 90%!
Critical Preferences Setting
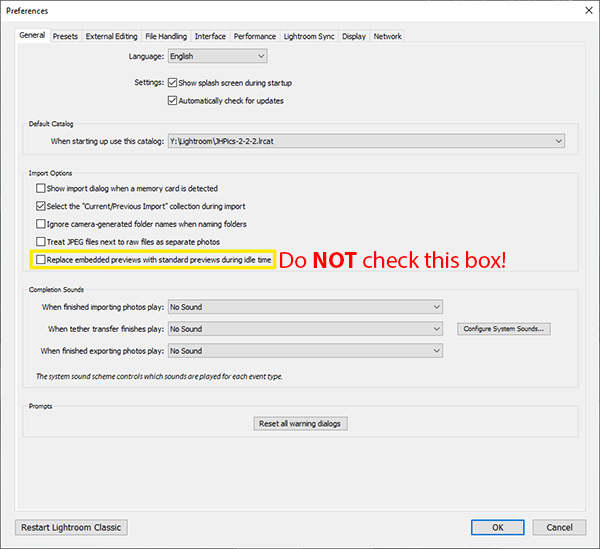
The first thing you really need to make sure is NOT enabled is the “Replace embedded previews with standard previews during idle time” option in the General Preferences of Lightroom Classic. You get there through Edit > Preferences on Windows or Lightroom Classic > Preferences on Mac. Go to the General tab on the Preferences dialog box that comes up, and then make sure the checkbox with that label is NOT checked.
It isn’t the end of the world if that checkbox is enabled, but it will kind of undo the very thing we are trying to get Lightroom Classic to do with this embedded preview workflow. We are doing all we can to tell Lightroom Classic we don’t want it building any previews and to use the JPEG images embedded in the raw files. With this checkbox enabled, even if you follow the rest of the process, Lightroom Classic is going to be constantly working in the background on building standard previews to replace those embedded previews. This takes CPU and RAM away from what you are doing in Lightroom Classic and we don’t want that.
Critical Import Configuration
Next we need to make sure we configure things with the Import dialog a very specific way. This is the piece that Adobe added to Lightroom Classic back in late 2017 to version 2018 of the software (confusing that it came in 2017 and the version was 2018, eh?). The same options have been available for over two years now, but you have to manually set them to use the embedded preview workflow.
You know how to get the Import dialog started, do that but don’t hit the Import button on the lower right of the screen until you have validated a couple of configuration things.
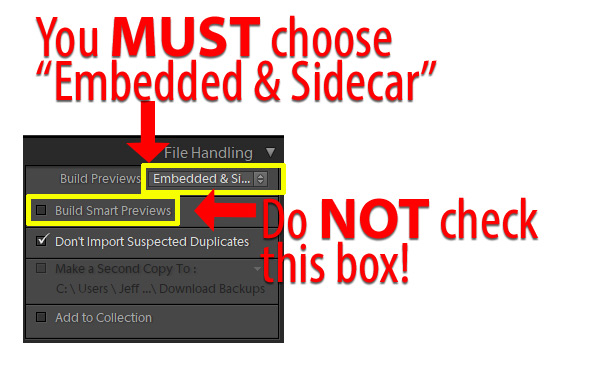
In the upper right of the Import dialog you have a panel called “File Handling” The first dropdown is labeled “Build Previews”. This dropdown controls how Lightroom Classic is going to build previews for the files you are importing. The default here is for that dropdown to be set to “Standard”. We don’t want Lightroom to build those standard previews – yet (we will do that in a later phase).
If you click on that Build Previews dropdown then you see choices of “Minimal”, “Embedded & Sidecar”, “Standard”, and “1:1”. I find people can remember what to do when they understand each option, so here is an explanation of each option in that dropdown:
- Minimal: Lightroom Classic will only extract those tiny thumbnail JPEGs that are inside the raw files. If you plan to ONLY use the grid view in the Library module to cull you images, you can use this option for the embedded and preview workflow, but I recommend the next option so that you can use the loupe (full screen) as part of your culling process.
- Embedded & Sidecar: Choose this! Choose this! Lightroom Classic will extract the thumbnail and the full resolution JPEG and use those instead of building any previews – as long as you stay in the Library module (more on this later).
- Standard: Lightroom Classic will build a preview version of the image that will look good in the “fit” view (not zoomed in) of the Library and Develop modules. We do need to build these previews (especially if you use presets), but we don’t want to do it for all of our raw files on import.
- 1:1: Lightroom Classic will build a full resolution preview of the raw image that can be used to zoom in to 100% (1:1) or more (like 2:1). Just like “Standard”, we do need to build these previews but we don’t want to do it for all of our raw files on import.
For this embedded preview process to work you need to choose the “Embedded & Sidecar” option. We need the Standard and 1:1 previews, but we will build them AFTER we do the culling process. Think of how many images you actually end up editing from an import. Nearly every photographer uses a small fraction of the images they shot. Why waste time having Lightroom Classic build previews for images we are never going to edit?
Before leaving this topic, the other critical thing you have to do is make sure the “Build Smart Previews” checkbox is disabled (NOT checked). Again, we don’t want Lightroom Classic to build any previews as we do the import, and that includes Smart Previews. Smart Previews are used with “mobile” workflows. If you sync a collection in Lightroom Classic to the cloud or you plan to take your catalog (.lrcat file and directories) on the road with you without taking your raw images, you need Smart Previews to be built. You may never build Smart Previews for these images if you don’t use Lightroom Classic this way.
Embedded Preview Import!
With the Build Previews dropdown set to Embedded & Sidecar and the Build Smart Previews checkbox disabled (NOT checked), you can now hit the Import button on the import dialog. If you have never done the embedded preview workflow before, you are probably used to hitting the Import button and then finding something else to do while Lightroom takes forever to build previews. Let me give you some numbers on the difference if you do the embedded preview workflow.
I did some testing on my desktop computer, a Windows 10 PC I custom built back in 2014. It has an Intel 4-core Core i7 CPU overclocked to run at 4.2GHz, 32GB of RAM, a 3GB NVIDIA GeForce 1060 video card, and multiple internal SSD and magnetic drives. The computer is no slouch, even 6 years later here in 2020, but there is certainly far more capable hardware available today. I did several import tests using raw files from Canon (300 from 80D), Fuji (200 from XT-3), Nikon (300 from D750), and Sony (200 from A7R3).
Importing a total of 1,000 raw files from each of those cameras with the Build Previews set to “Standard” and the Build Smart Previews checkbox enabled took nearly 30 minutes (27 mins 35 seconds). That probably sounds about right to most of you listening. During the import process Lightroom Classic was very difficult to use as the CPU and RAM was pretty heavily consumed by Lightroom Classic building all of those previews.
Importing the same 1,000 raw files from each of those cameras but setting Build Previews to “Embedded & Sidecar” and disabling the Build Smart Previews checkbox the entire import process took a little over 3 minutes (3 mins 7 secs). That is 90% less time, and even better was that during those 3 minutes Lightroom Classic is barely doing any work making it fully responsive to proceed with a culling process in the Library module.
I did the same test on the Mac too. My 2018 15” MacBook Pro with 6-core Core i7 2.2GHz CPU, 16GB of RAM, a Radeon Pro 555X GPU with 4GB of RAM and SSD drives for the catalog and the photos. Other than slightly different hardware, the other big difference is the MacBook Pro was connected to a 4K display. Importing those same 1,000 raw files took just shy of 52 minutes. Using the embedded preview workflow that went 94% faster taking only 3 minutes and 10 seconds.
Incidentally, the Fuji raw files were the slowest to import when building the previews, taking an average of 5.73 seconds per image. Second worst was Sony at 3.11 seconds per image. 3rd was Canon at 2.53 seconds per image and Nikon was the fastest at 1.97 seconds per image. When using the embedded preview workflow Fuji remained the slowest at 0.43 seconds. Nikon (0.14), Canon (0.16), and Sony (0.07) were all pretty close. The time for the Sony raws saw those most benefit with a 98% improvement on time to import.
Tutorial Section 3 – Culling Your Photos
With the Lightroom using the JPEGs embedded inside your raw files, you are now ready to do your culling. You need to choose which of the images you just imported you are actually going to edit. Lightroom Classic offers many ways to do this, use whatever process makes the most sense to you.
- Pick flags: Some photographers prefer culling with pick flags. Best to use the keyboard shortcuts. “P” key for pick, “X” key for reject, and “U” key to remove any flags”.
- Color labels: Some photographers prefer culling with color labels (I use them but not for culling). Again, learn the keyboard shortcuts to help you do this the fastest possible. The colors are set using the 6-9 keys for red, yellow, green, blue, and purple (no way to unset a color via keyboard, you have to click off the color just above the filmstrip).
- Star ratings: My personal preference is the star rating system for culling images. I don’t use all 5 stars in the process, I want to make a decision on which photos I want to work on from my shoot within a second or two per image and having to decide between 5 star ratings takes far too long. I only use 1-3 stars, which means I put three fingers over the 1,2, and 3 keys so that I can hit them very quickly.. In my process 1 means garbage, 2 means the photo has potential, and 3 means I want to edit the image.
Again, it doesn’t matter which of these rating systems you use to cull your images, do that however you like and whatever makes the most sense to you. However, there are two key things to having your import be complete 90% faster and one of them is VITAL to having the embedded preview workflow function:
- Decide Fast! Don’t spend a lot of time per image making a decision. Decide good or bad in a second or two and move on (TIP: you can get things to go even faster if you enable Caps Lock then Lightroom Classic will “auto advance” after you rate a photo so that as soon as you give a photo a rating it automatically goes to the next photo!)
- DO NOT LEAVE THE LIBRARY MODULE! Seriously. Just DON’T DO IT. There are many situations where going to the Develop module will mean you are suddenly asking Lightroom Classic to build the very previews we have worked so hard to avoid. See the next section for help on how to do this well in the Library module.
Culling In The Library Module
After you click the import button in the import dialog, Lightroom Classic defaults to going back to the LIbrary module. I don’t think Lightroom Classic was designed this way just to support the embedded preview workflow, but staying in the Library module throughout your culling process is 100% ESSENTIAL to making it work. Did I mention you MUST CULL IN THE LIBRARY MODULE??!!!
Culling in the Library module of Lightroom Classic is especially important if you apply presets to your images on import. See, the only way Lightroom Classic can show you the effect of the preset on your image is to build those standard previews, and the 1:1 previews if you are going to zoom in. I have seen so many photographers struggle with the performance of LIghtroom Classic because they use the software incorrectly by culling their images in the Develop module. The Develop module is for editing your photos, not culling them.
I can already hear what it is you are thinking. But I can’t cull my images in the Library module, it only has those tiny thumbnails and I need to see them full screen so that I can decide if it is a photo I like or not. Well, let me give you another tip here then, you can see your images full screen even in the Library module! Yep, there is this view in the Library module called Loupe view that has been part of the product for years and years but most photographers have no idea it is there.
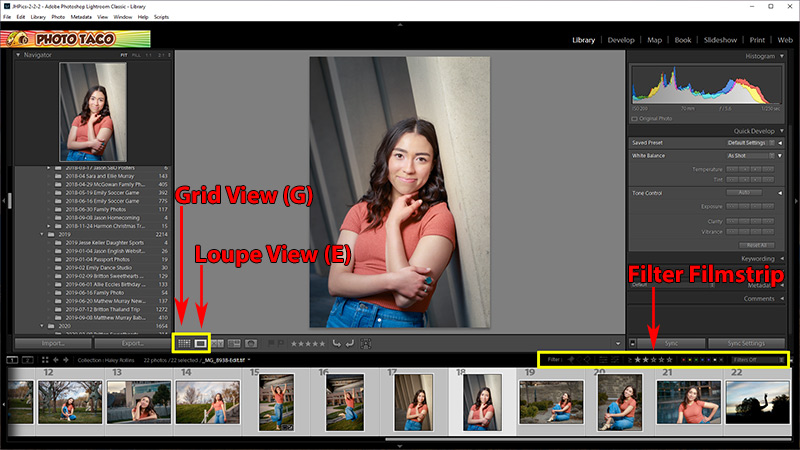
I recommend you Cull in at least two phases. The first phase is a pass where your objective is to make a decision on the rating in less than 1 second. Do this in the Grid View of the Library module using the thumbnails. Remember, enable the Caps Lock key and Lightroom Classic will auto advance to the next photo as soon as you provide your rating.
When you are done with that first pass, you should be down to a pretty small number of images and you need to go through your “maybe” ratings. To make a decision on those “maybe” images and have them be in or out, you need to see them full screen in Lightroom. DON’T GO TO THE DEVELOP MODULE!!!!
First, you need to narrow the images in the filmstrip down to the images that are at least a maybe and not show those that are definitely out by clicking on the filters in the lower right of the Library menu just above the Filmstrip. Click on the filters that match the rating system you used to cull. For me I click on the second star so that Lightroom will only show the images rated two stars or higher. You should see the filmstrip change and only show the images that are at least a maybe through the culling process.
Now you are ready to see those images full screen, so click on that second icon in the lower left corner of the Library module just above the filmstrip to go to Loupe View, or to make things faster hit the “E” key on the keboard. That is the shortcut for Loupe view and it doesn’t matter where you are in Lightroom hitting the “E” key will always take you to this view. I remember it as “E” stands for “everything”, I want to see “everything” of this image. Go through your photos one more time and decide on those “maybe” images then you can build the previews for just those that survive.
Building Previews On Culled Survivors
Once you have narrowed things down to small portion of the images that you are going to edit, you can have Lightroom Classic build those previews and make your time in the Develop module as painless as possible:
- Select all the images in the filmstrip in the Library module
- Library > Previews > Build Standard Previews
- Library > Previews > Build 1:1 Previews
Wait for that to finish, shouldn’t take all that long when you do this for just the images you are going to edit, and you are ready to get in the Develop module to edit your images!
Reminders
- Photo Taco Facebook group, ask to join and write “Jeff Harmon” as the name of the host.
- Follow the show on Instagram @phototacopodast or Jeff’s personal account @harmonjeff
- Follow the show on Twitter @phototaco or Jeff’s personal account @harmon_jeff
- Send email suggestions on show topics to phototacopodcast@gmail.com
- Check out the other podcasts on the Master Photography Network over at masterphotographypodcast.com
Podcast: Download (Duration: 46:15 — 33.0MB) | Embed
Comments
Pingback: Is It Safe To Delete Lightroom Previews.lrdata? - Photo Taco Podcast
Referring to colour labels you stated, “no way to unset a color via keyboard, you have to click off the color just above the filmstrip”.
Actually, the numbers 6 through 9 toggle the colours. Pressing 6 sets the label to red. Pressing 6 on an image that has the red label removes the red label and so on for 7, 8 and 9.
Jeff, Do you choose either standard previews or 1:1? Or do that in sequence as you indicated in the last step?
I don’t build any previews on import. After culling I build the standard previews for the images that survived the culling process.
new to your podcasts – very much enjoyed them and learned ALOT from this episode.Since i convert to DNG on import wondering where that fits into you speeding up system
Thanks
@Sonny,
Nope. Exactly the opposite. Converting to DNG will slow down your import significantly. It takes a lot of processing to convert the raw images from your camera to DNG. I have long recommended not doing this as the benefits are so small I don’t think the trade-off with time is even close to worth it.
Great article!!! The best explanation Ive seen of embedded previews and how to use them! I just need clarification on one thing. Ive read in several articles that the previews built during import are used only in the library module, that the Develop module rebuilds the previews from scratch when you enter that module. If that is true, then you dont need to build previews at all while in the library module. Just use the embedded previews.
See item 5 in this article.
https://www.on-sight.com/best-practices-for-lightroom-performance/
“Work from smaller previews. ……. Try it! Remember these previews only effect what we see in the Library module, not the Develop module, and it doesn’t effect the quality of prints and files sent to clients. Reducing the file size of your previews addresses latency issue switching between the Library and Develop modules.”
Yep, that’s right. Previews are only used in the Library module.
But, if the previews are only used in the library module, then there would be no reason to generate the standard and 1:1 previews you recommend in your last step “Building Previews On Culled Survivors”. This is because Lightroom will build its own preview when you move an image to the Develop module, and, once an image is edited in the Develop module, the embedded preview of that image in the library module (and only that image) will be replaced with a preview that reflects the develop edits.
@Ed,
A good point. I was trying to say that if you want to build previews then that is the point to do so. It isn’t clear from how I have worded it so I am going to update the article.
I don’t actually build any previews ever. I have Lr build whatever previews it needs as I use the tool. It has been an emphasis over the past few releases to have Lightroom be much smarter about how it does this to improve performance.
Pingback: Post Processing in Lightroom - Clipping Path Creative Inc