Episode Sponsors
Phlearn – When Phlearn reached out I was really excited because my friend Aaron Nace and the folks over at Plearn.com produce video training for Photoshop that I can’t recommend strongly enough. It is incredible. Aaron has forgotten more Photoshop than I have ever learned. A huge portion of what I know about Photoshop has come from video training over at Phlearn.com.
Aaron is truly a Photoshop master, but even more important, he is a really good teacher. I have rubbed shoulders with a lot of people who know Photoshop really well but they usually don’t know how to teach others very well. It doesn’t matter the topic; retouching, coloring, compositing, or using camera raw for editing your photos. Aaron knows it, he knows how to teach it, and make it fun!
Included in a year’s subscription to Phlearn.com is instant access to over 150 in-depth video tutorials and they are not done there because they are releasing two new PRO tutorials every month. Priced at $99.95 per year, the annual subscription is an absolute steal and listeners of Photo Taco get an even better deal with 20% off that first year by using coupon code phototaco20 at checkout.
I love Phlearn.com and I know you will too. If you have been afraid of Photoshop this is the solution! Head over to Phlearn.com and use coupon code phototaco20 to get 20%. I want to thank Phlearn.com for helping to make this episode possible.
Not A Paid Ad for DeNoise AI
The DeNoise AI software was not given to me for free or in exchange for creating this content. Like many of you I saw a lot of marketing ads for DeNoise AI and as a photographer who does a lot of sports I decided I needed to investigate DeNoise AI to see if I could create better low-light images. I bought DeNoise AI licensing as a normal consumer directly from the Topaz Labs website. I didn’t let Topaz Labs know that I was doing this review and they have not influenced my testing or the information here.
What is DeNoise AI?
DeNoise AI is software you run on a desktop computer that uses artificial intelligence (AI) to remove noise from images. It is at version 2 right now, that is the version I tested for this episode. What does this “AI” thing mean? Here is what Topaz has on their FAQ page:
We train an Artificial Neural Network with millions of blur-sharp image pairs. The neural network will eventually “remember” what the sharp image should look like if it sees a blurry image. After months of training, we then upload a blurry image to the neural network and ask it to sharpen it. The network will recall what it has learned from all the image pairs it trained with and will attempt to apply the same changes to the new blurry image that it saw in previous sharp images.
Different from other noise reduction tools where an algorithm is being applied equally to all of a photo and you have a few things you can adjust to make it so that applying that algorithm to all of the photo looks the best it possibly can, DeNoise AI is supposed to be analyzing your photo and applying different amounts of sharpening to different parts of the image. There are a lot of spectacular examples on the Topaz Labs DeNoise AI product page that really get your hopes up that this software is the holy grail for finally getting rid of the noise in your photos.
I liked what I saw on the DeNoise AI product page, but I am always skeptical that it will work that way for the images I create. So I put it to the test. Read on to find out if I think you should invest in Denoise AI.
DeNoise AI Worfklow
DeNoise AI not only reduces luminance and chroma (color) noise from you photos, it also does deconvolution sharpening (some call this capture sharpening) as part of the process. Since it is doing the deconvolution sharpening Topaz Labs recommends the following on when to use DeNoise AI:
“We recommend applying noise reduction first in your workflow before making any other edits and here’s why: you don’t want to sharpen or enhance the noise! By reducing the noise first, you’ll have as clean an image to work with as possible”
There are three ways to incorporate DeNoise AI into your post-processing workflow, let’s walk through them.
Workflow Option 1 – DeNoise AI Stand Alone
Your first option is to use DeNoise AI as a stand alone program. Just like you use Lightroom where you start the program on your computer and then choose images to process. You can open up the DeNoise AI application on your computer and then open up a single image (jpg or raw) and process it.
You can also batch process a folder of images through the stand alone program. Though, if you think Lightroom is slow, wait until you see how long it takes to process a folder of raw files. I attempted to batch process a group of soccer photos I recently shot at night with the game played under lights. I say attempted because it was too slow for me to wait for the process to complete. More on resource usage and some detail on this in a moment.
Workflow Option 2 – DeNoise AI From Lightroom Classic
Option number 2, and most likely the option most of you listening would want to choose, is using DeNoise AI on one or a select few images as you are processing a shoot. This process is very similar to the process you may be used to with round-tripping to Photoshop from Lightroom.

You import your raw files into Lightroom as you normally do and when you have a specific image you want to process with DeNoise AI you right click and choose Edit in DeNoise AI. The same stand alone program in option one opens up on your computer and the raw image you right clicked on in Lightroom automatically gets loaded. When you are done you hit save in DeNoise AI, the stand alone software closes, and the denoised version of the raw file shows up in Lightroom.
If you are following the suggestion from Topaz Labs to get the best possible results, you wouldn’t want to do anything to the photo in Lightroom before doing DeNoise AI. For a raw file, that would include the color noise reduction that Lightroom does by default (that slider is to 25). You should take the slider down to 0 (you will see color noise in the image) and then let DeNoise AI handle the color (called Chroma in DeNoise AI) noise.
In my testing I found that DeNoise AI produced much cleaner images when I handled the color noise reduction using Adobe Camera Raw leaving that color noise slider at 25. I also recommend you apply your lens correction profile to the image before you go into DeNoise AI. I have had trouble getting the right lens correction profile applied to an image after it has round-tripped to another program.
Note: DeNoise AI does not currently work from the new Lightroom, only from Lightroom Classic. You would need to use DeNoise AI stand alone first and then import your noise reduced photos into the new Lightroom.
Workflow Option 3 – DeNoise from Photoshop
Your third option is to use DeNoise from Photoshop. Again, just like Lightroom, the advice Topaz Labs offered here is that you don’t want to do any camera raw adjustments to the image before DeNoise AI. If you are opening up a raw file in Photoshop the Adobe Camera Raw box will open up. Also like Lightroom, I recommend leaving the color noise slider at the default (25) and applying your lens profile to the image here in the initial Adobe Camera Raw dialog as you bring your raw image into Photoshop, but that should be it.
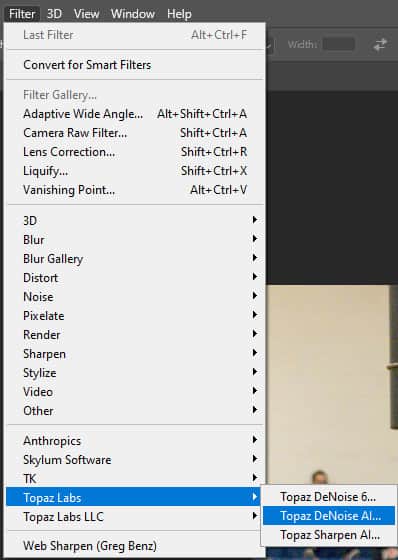
As soon as the raw image opens in Photoshop by just hitting OK on that Adobe Camera Raw dialog box, then you can go to Filter>Topaz Labs>DeNoise AI (you should see this menu option added after installing DeNoise AI) and it will open up the DeNoise AI stand alone program and load up the image you had open in photoshop. Do your noise reduction and hit save. Your image should then be updated in Photoshop with the noise reduction applied. Now you are ready to whatever else you would like with your image in Photoshop, including more Adobe Camera Raw adjustments.
Using DeNoise AI
This is not a full tutorial on how to use DeNoise AI (coming soon!), but as a Lightroom user the sliders in DeNoise AI didn’t work the way I thought they would so let’s walk through one detailed example.
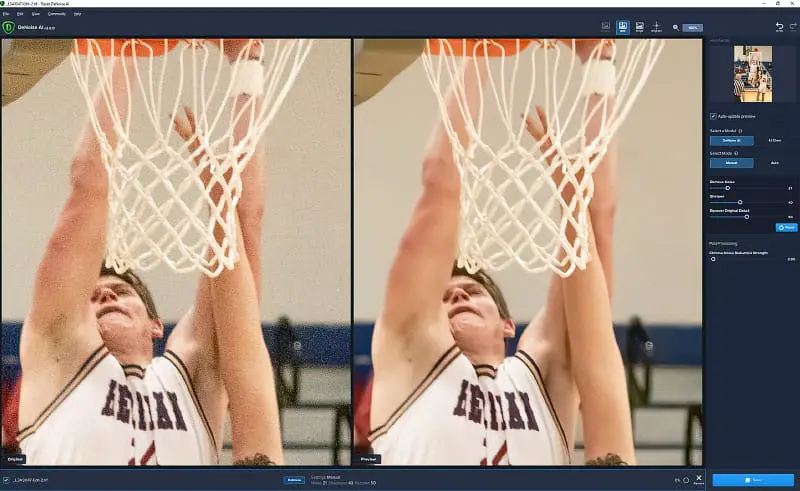
Screen Layout and Sliders
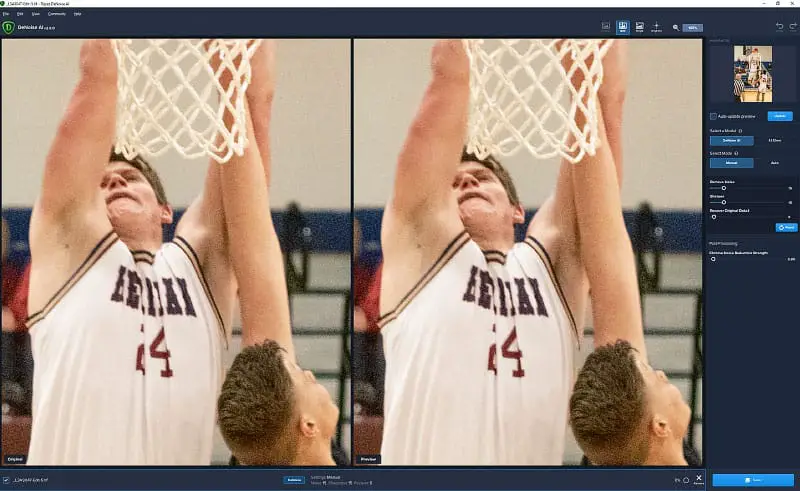
When you first open the DeNoise AI interface you have a before and after side-by-side comparison of your image taking up most of the screen. The left shows before, the right after. By default the view is at 100%, which means only a portion of the image can be shown. You can change this view by clicking on the button next to the magnifying glass at the top of the screen and choosing 50%, 200%, or 400%.
In the upper right hand corner you have a navigator that you use to change which portion of the image is shown at the zoom levels available. Helpful, but also a source of a complaint I will share before the end of the show.
Below the navigator is a checkbox to turn on Auto-update preview, which I recommend you keep checked. It means that every move you make in the tool brings up a “processing” message, but the alternative is to make a few changes and then hit an update button when you want the image on the right to actually show the effects of what you have done with the sliders. I don’t know why you would want to do that.
Continuing down the right hand side you next have a choice on the model that the software will use to remove noise from your photo. You can choose between DeNoise AI (the default) and AI Clear. Topaz Labs says the difference between the two is this:
“DeNoise AI and the original AI Clear utilize two different types of AI networks but are both extremely effective at removing noise. DeNoise AI provides more capabilities in fine-tuning noise reduction while AI Clear provides quick options for those looking for less input. You can also select “auto” on either model and let the software decide the right settings for your images.”
Topaz Labs
In the YouTube videos from Topaz Labs they also explain that AI Clear is for photos with little or moderate noise that need the deconvolution (capture) sharpening all raw files need. The DeNoise AI model is for heavy noise reduction. It offers more sliders and takes more time to process with every little change of those sliders. I found that if you are working on portraits AI Clear seemed to be a better model. I will provide an example of that in a moment. The good thing is you can try out both models in auto mode and get a quick idea of which one is going to be best for your image.
Below the model choice is your choice between Manual and Auto. It defaults to Manual when you first open the program. I think you should use Auto in every image you process as the first step using the software (see Step 1 below).
When you choose Manual there are five sliders to tune the AI specific to your image. I will go through a little about each in the steps below. Even though these steps are detailed, this is an example of one image I am using to illustrate the process I used to remove noise. It doesn’t mean these same values are going to be where you want to set the sliders.
The key point here is to try things. Experiment as you use DeNoise AI to reduce the noise in your images. Some of it is going to look terrible as you do experiment, which is great because that means you know what you don’t want to set things to as you use DeNoise AI.
Step 1 – Decide on the Model
I recommend you start by enabling Auto and then changing the model back and forth between DeNoise AI and AI Clear. Watch the preview on the right side of the split view to see which of them you think is most effectively removing the noise and retaining the fine details. This is the fastest way to decide if you aren’t sure which model you should use on your image.
The guidance from Topaz Labs, combined with my experience putting hundreds of images through the software for over a month, is to use AI Clear on properly exposed images taken at ISO 800 or less. For everything else, including images that were shot at lower ISO but are underexposed by more than a stop, DeNoise AI is most likely the better choice.
Note: Auto will almost always be overdone. Just like ice cream, donuts, and everything else good in life, too much of a good thing is not good. That is definitely the case with noise reduction. You have to remember that you are looking at an image at 100%. Even though it may look like the noise has been removed very well, when you look at the image with less zoom you are likely to have things that look like plastic – especially human skin. You can go too far with noise reduction in Lightroom/Photoshop using Adobe Camera Raw and the same can be done here in DeNoise AI. Images are supposed to have a little grain, you take it all away and things look funny.
Step 2 – Switch to Manual
Once you have decided on your model, hit the manual button and you will see how it is the software decided the sliders should be set. From this point on I am going to focus on DeNoise AI as the model because there really isn’t much to choose from with AI Clear and the changes are obvious to figure out.
With the DeNoise AI model I found that the values for the Remove Noise and Sharpen sliders chosen by Auto were pretty close to where I put them in my final noise reductions on most of my images. It was helpful for me to note down what Auto suggested as a reference point I used when I tried them at different values to see if I could improve the noise reduction or get closer to what I wanted from my images.
If at some point you can’t remember what Auto looked like, just hit that Auto button again so that you can see how it was and then you can hit Manual again to customize things again. I found it very helpful to go back and forth while working on an image so that I could really understand the impact to the noise and the sharpening the sliders had on each individual image.
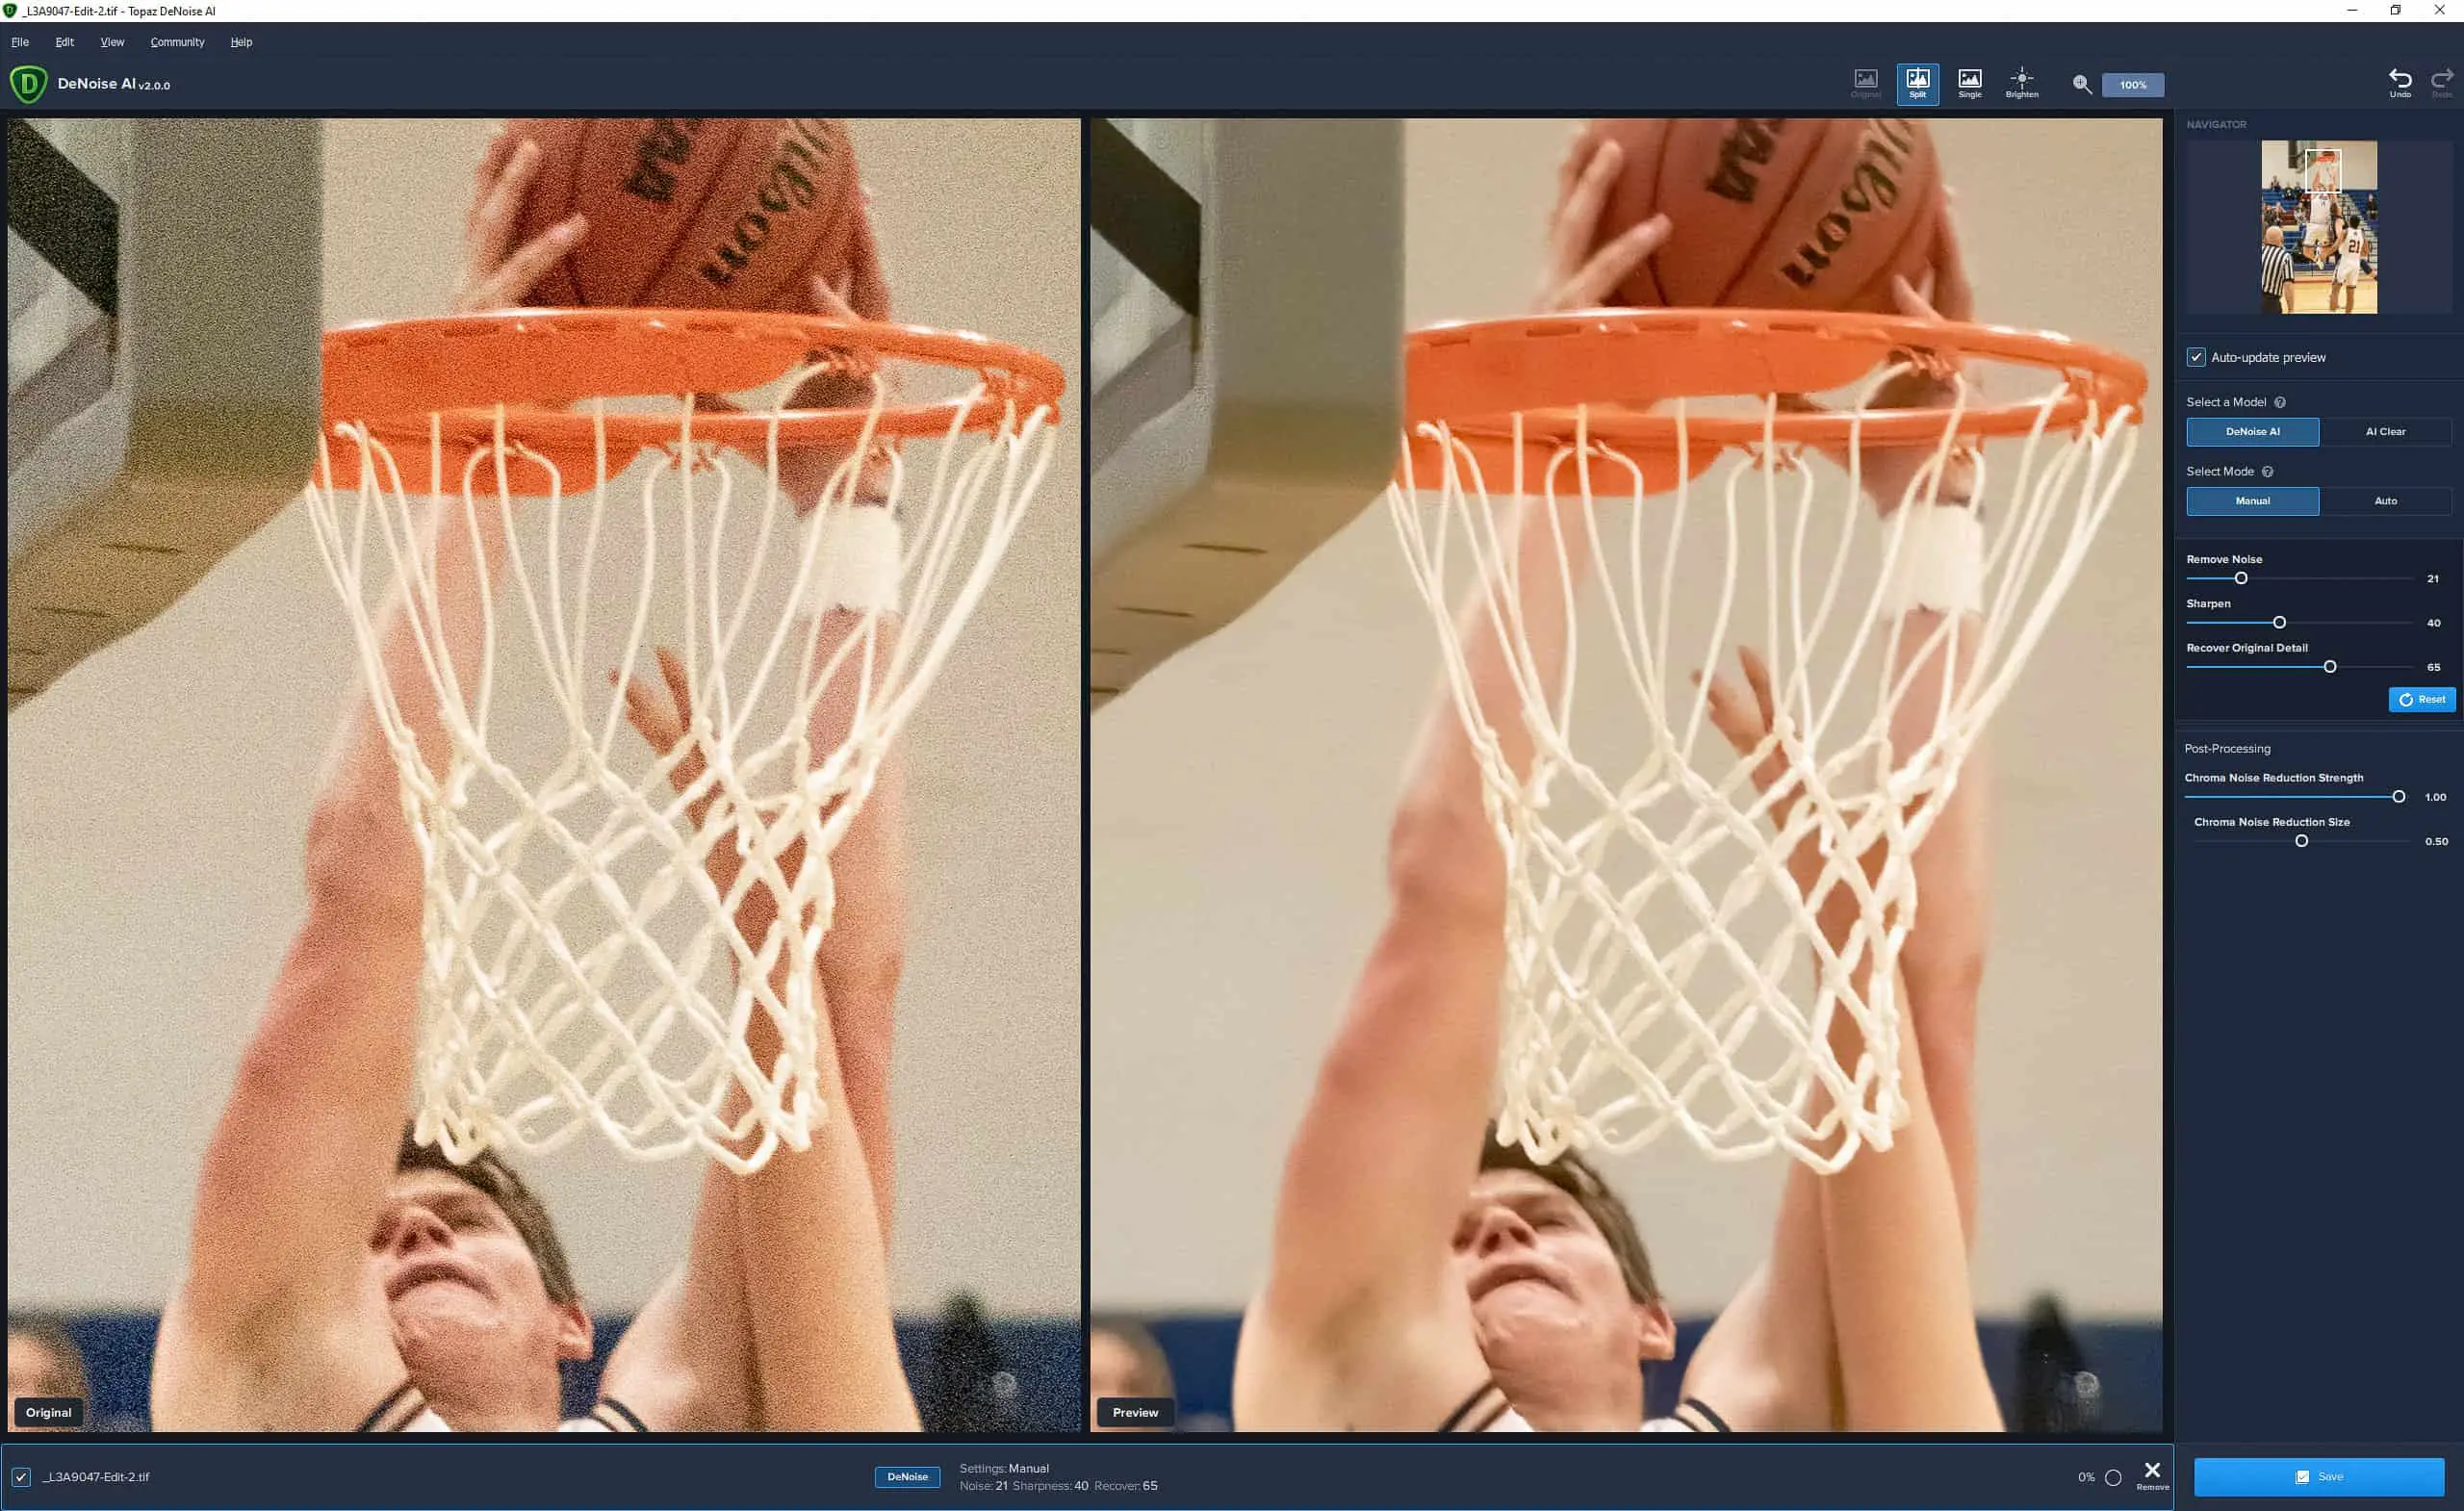
Step 3 – Tune Remove Noise Slider
The Remove Noise Slider seems pretty obvious in the name, right? As you move the slider to the right it is going to remove more noise from the image. I found that the slider being fully set to the right, all the way to 100, was always too much for all of the images I tested. Reduce Noise to 100 means plastic skin and a tremendous loss of detail just like it does with any noise reduction tool.
Hopefully you have taken note of the settings of the Remove Noise slider that Auto gave you. Just like I advise as you are working with the sliders in Lightroom, take it up to insane. Go all the way to 100. It is helpful to see what too much looks like so that you can start backing it down a little at a time to see where we like it best.

In this example 100 is definitely removing all of the noise from the image, but the results make the skin look like plastic and the effect is definitely overdone. I back it off to 50 and wait for the preview to update.

Still looks like too much to me. As I said earlier, the goal is not to remove all noise at the 100% view, there should be a little bit. I tried 25, still looked a little much, so I walked it down by one until I got to 21.
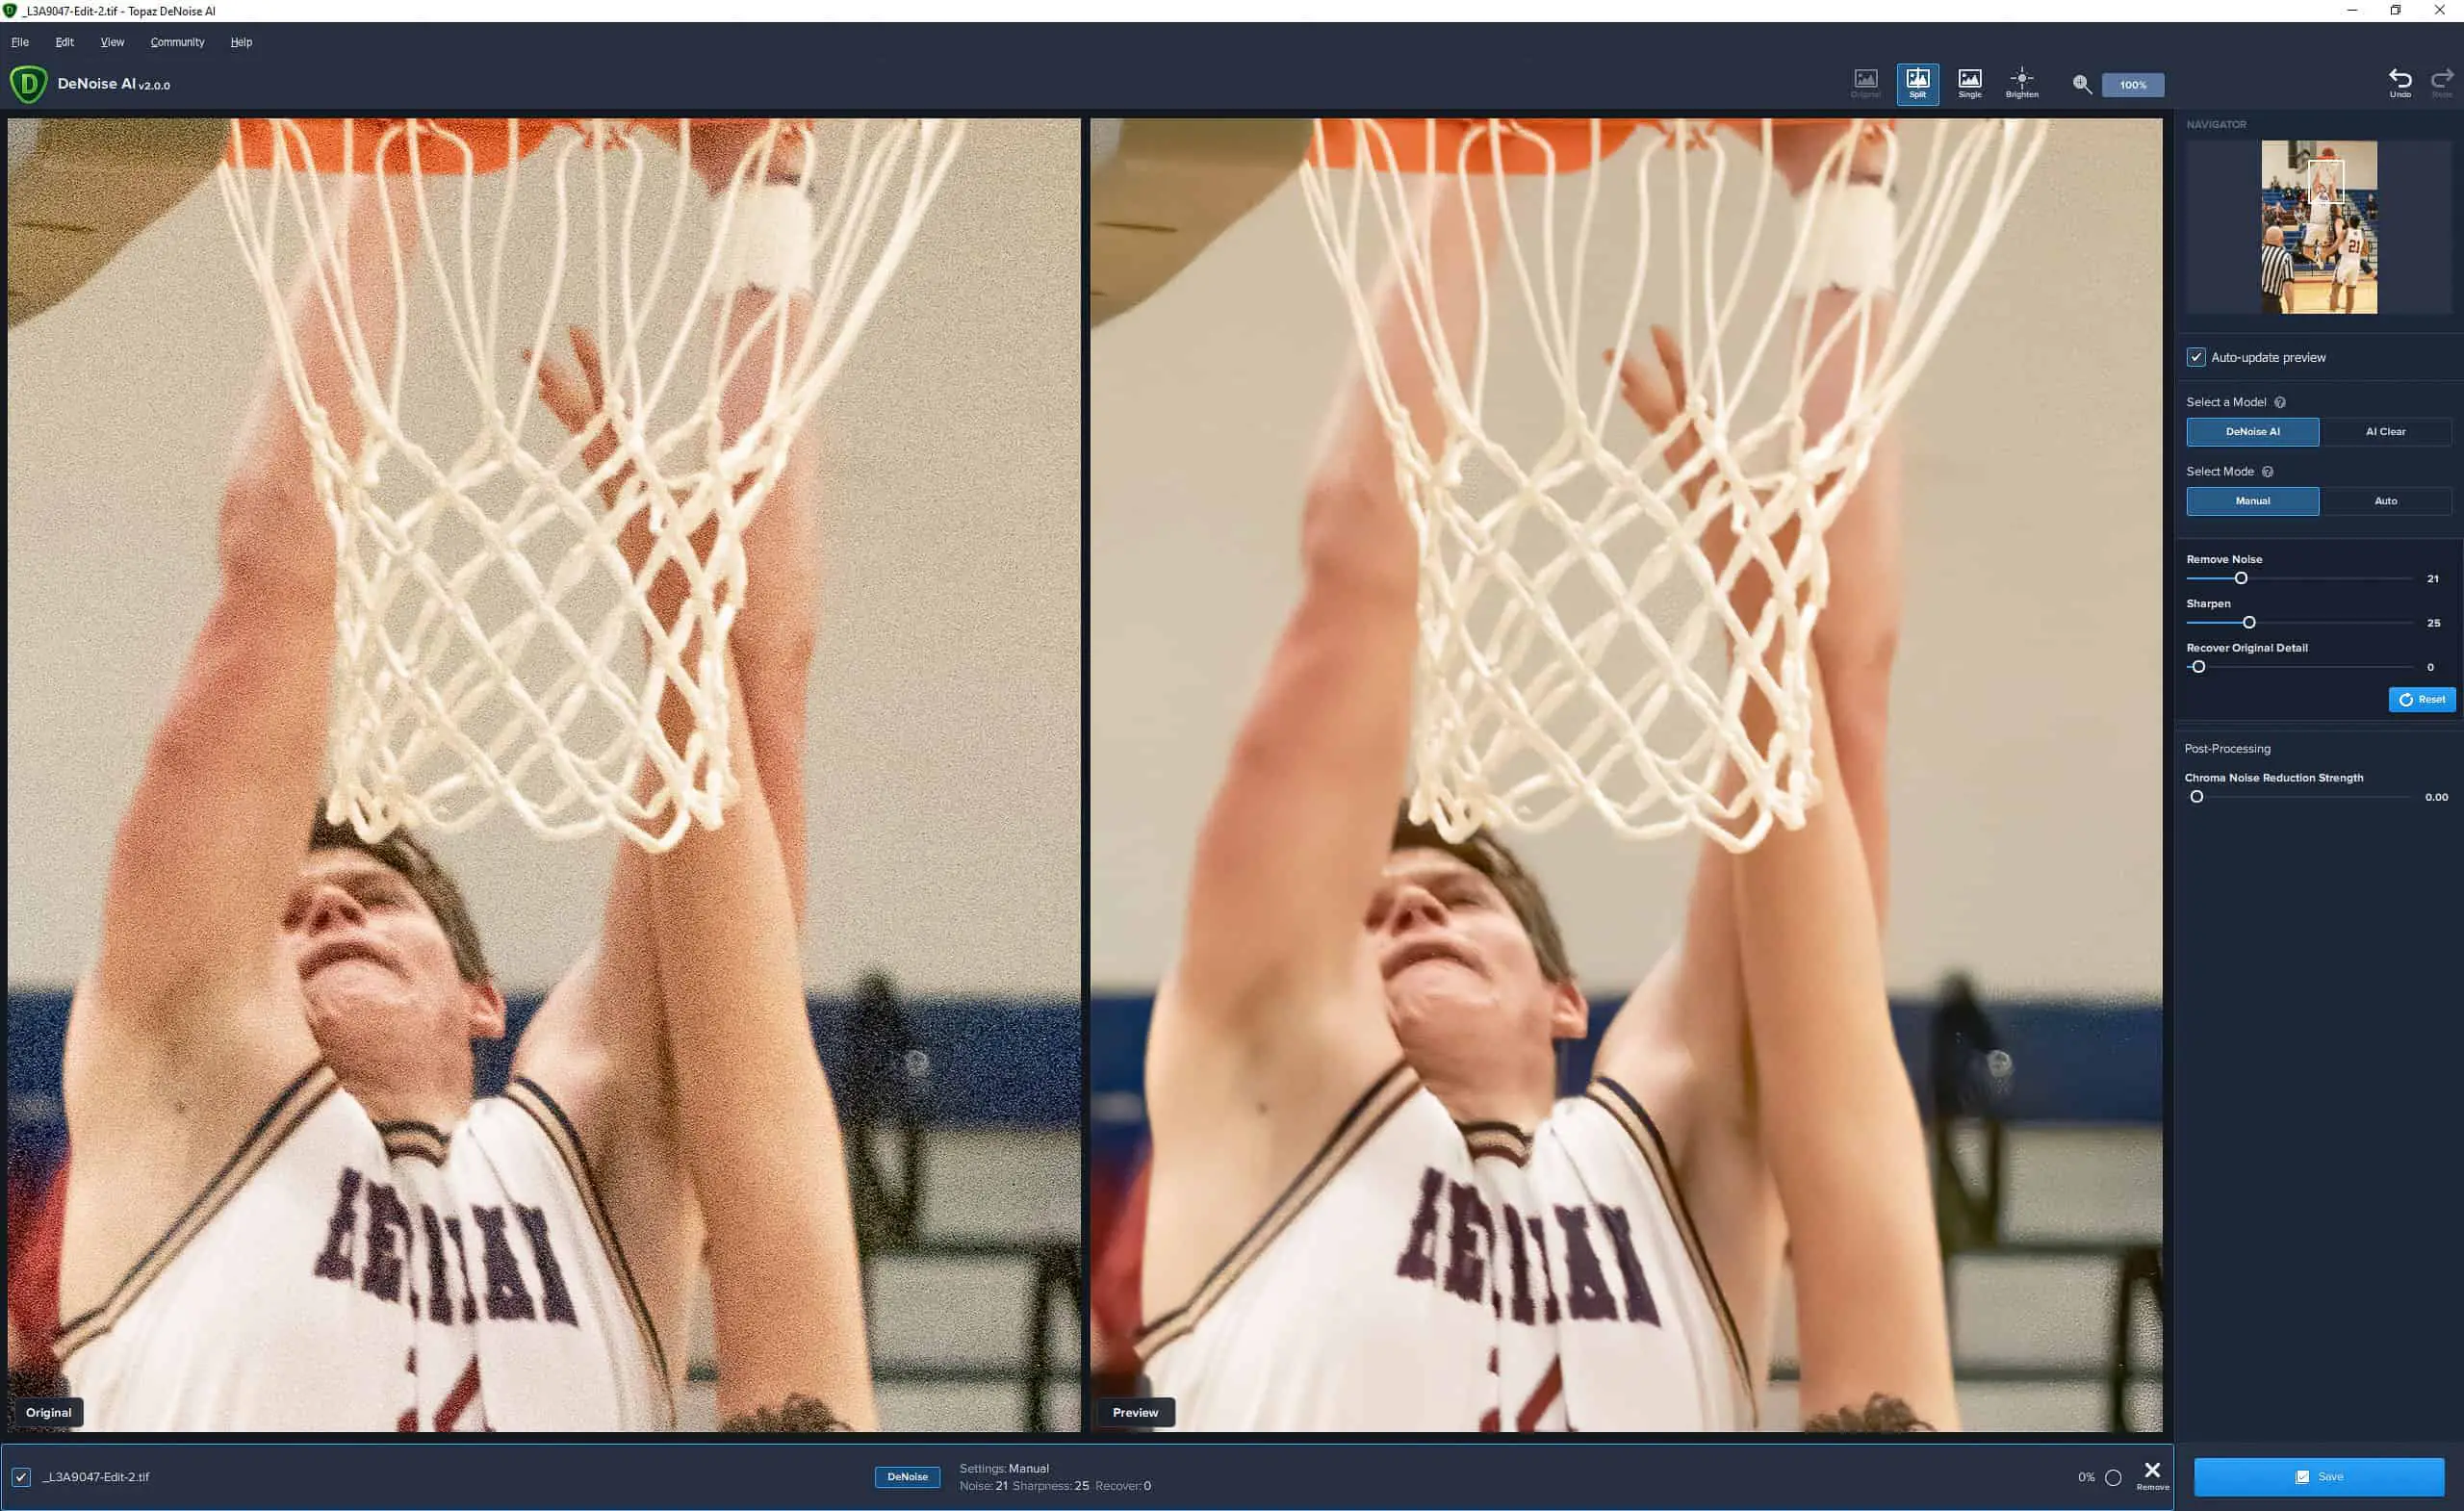
A little bit of noise here and there, but very well controlled. The edges look like they may have lost some sharpness though, so now let’s play with the Sharpness slider.
Step 4 – Tune Sharpness Slider
I approach setting the Sharpness slider exactly the same way as I did Reduce Noise. Start by taking things up to crazy at 100 on the Sharpness slider.

The first time I did this I was surprised at the result. It looked to me like rather than sharpening the image and showing more detail, more noise reduction was applied! That the little bit of noise I decided I was fine leaving in the image when I left the Reduce Noise slider at 21 is now totally gone. Even stranger, the sharpness doesn’t seem to be very different.
It’s like as I turned up the Sharpen slider the approach the AI is taking to battle the noise has changed. It looks to me like the Sharpen slider gives the AI permission to seek out the edges in the image and remove the noise right up to the edges. Now the Remove Noise slider is probably too high at 21. At this point I could either back off the Reduce Noise slider or back off the Sharpen slider. I don’t think we want any of these sliders at 100, so I tried backing off Sharpness to 50 and see what happens.

The image looked identical to me at 50 as it did at 100. Still over the top on the noise reduction with the edges lacking sharpness and the skin looking like plastic. Let’s go to Sharpness of 25.

Now a little bit of the noise comes back into the background of the image. Still not sure I see much of a difference in the sharpness of the edges, but some difference in the noise. I slowly increased Sharpness from 25 to 40 one step at a time and I think right at 40 I have a better balance with the noise in the background. Still a little over the top with the noise reduction, so maybe we need to see what Recover Original Detail can do for this image.
Step 5 – Tune Recover Original Detail
Not every image needs Recover Original Detail. In fact, Auto never seemed to turn it on across any of the images I tested out in DeNoise AI. But it is there so let’s see if this image gets some help from the Recover Original Detail slider. Just like the other sliders, let’s take it up to crazy and see what the impact is to the image.

Recover Original Detail at 100 brings some noise back into the photo, but it is handled much better than with no noise reduction. I want to see if there is a value under 100 where I can maybe reduce a little more of the noise, strike a balance between 0 and 100. I set it to 50 (this slider increments by 5 instead of 1).
To me the image looked exactly the same at 50 on Recover Original Detail as 0, so I set it at 75. It was really hard for me to see any difference between 50 and 75, but I see a difference at 100. So I also decided now to go to a 200% view. There is some danger here because if you get things to look like there is no noise at 200% when you go back out to the full image you are likely going to end up with plastic skin. There should be some grain in the image at 200%, the goal is not to get rid of all of it.
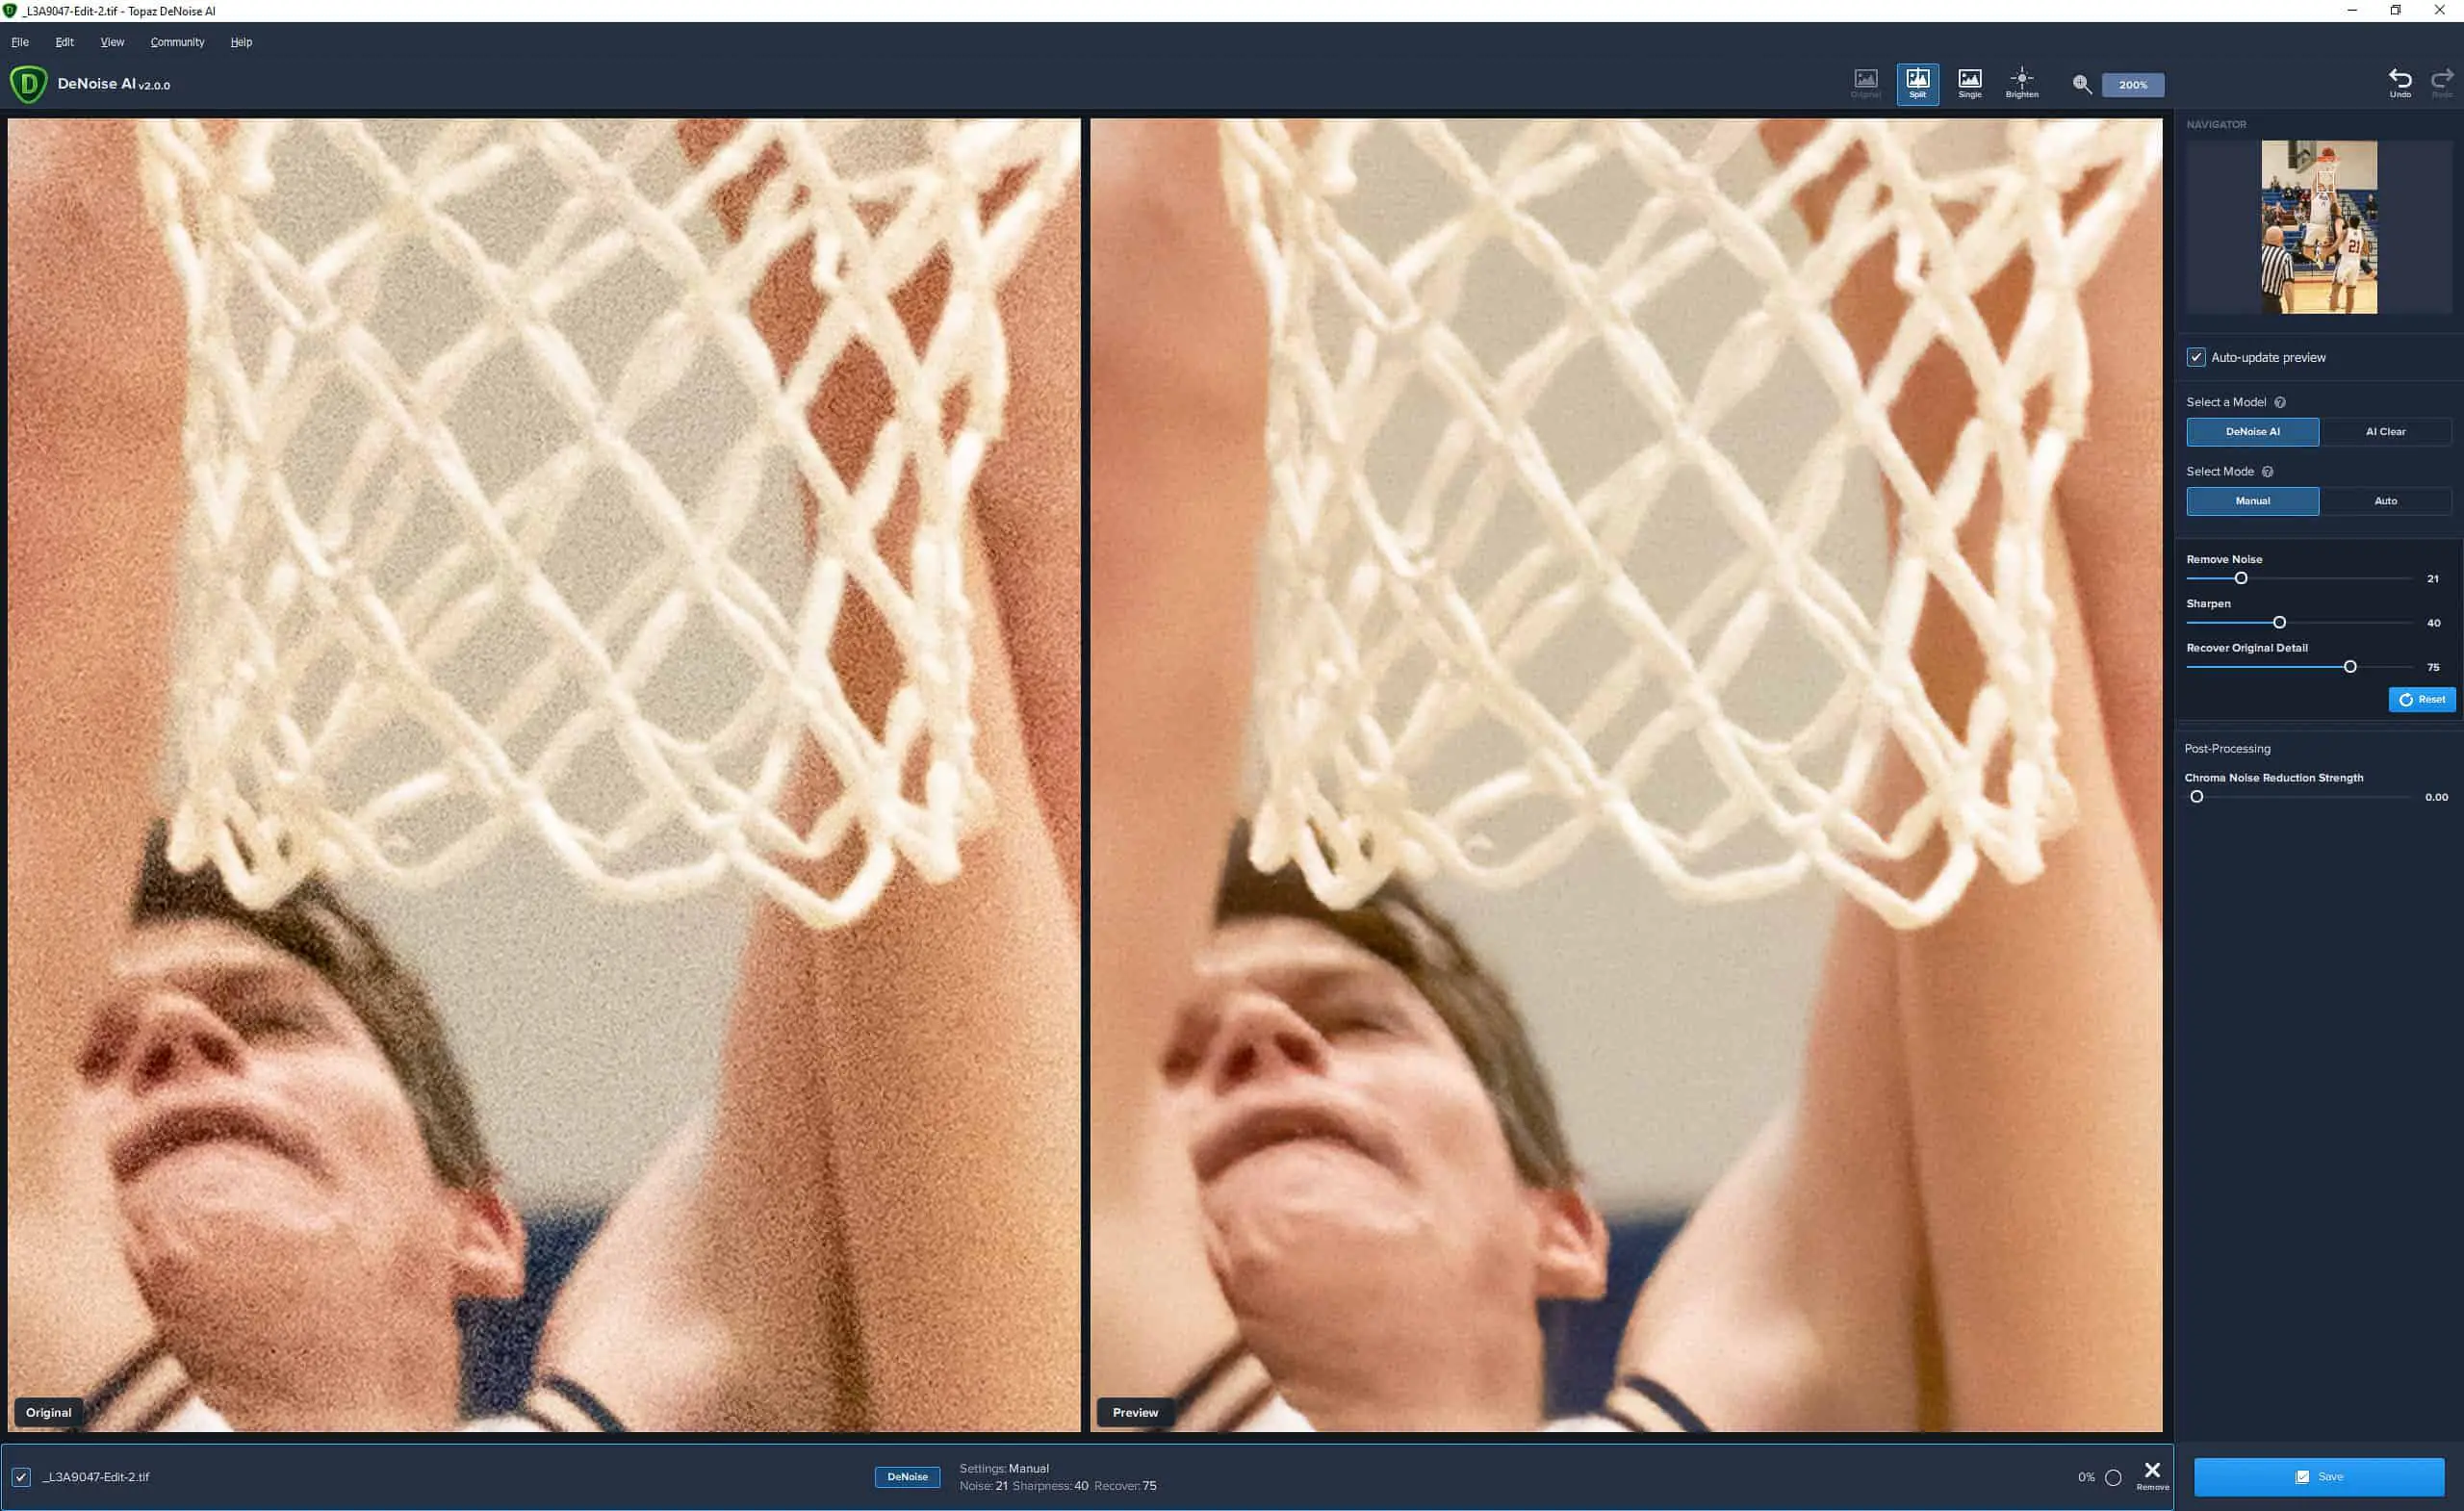
After trying the Recover Original Details slider at a few values , I like 65 for the Recover Original Detail.
I move that 200% view around to a few locations to make sure I like how things are looking. I play with the sliders a little to see the impact as I look at other areas. I think I like the settings I have for this image.
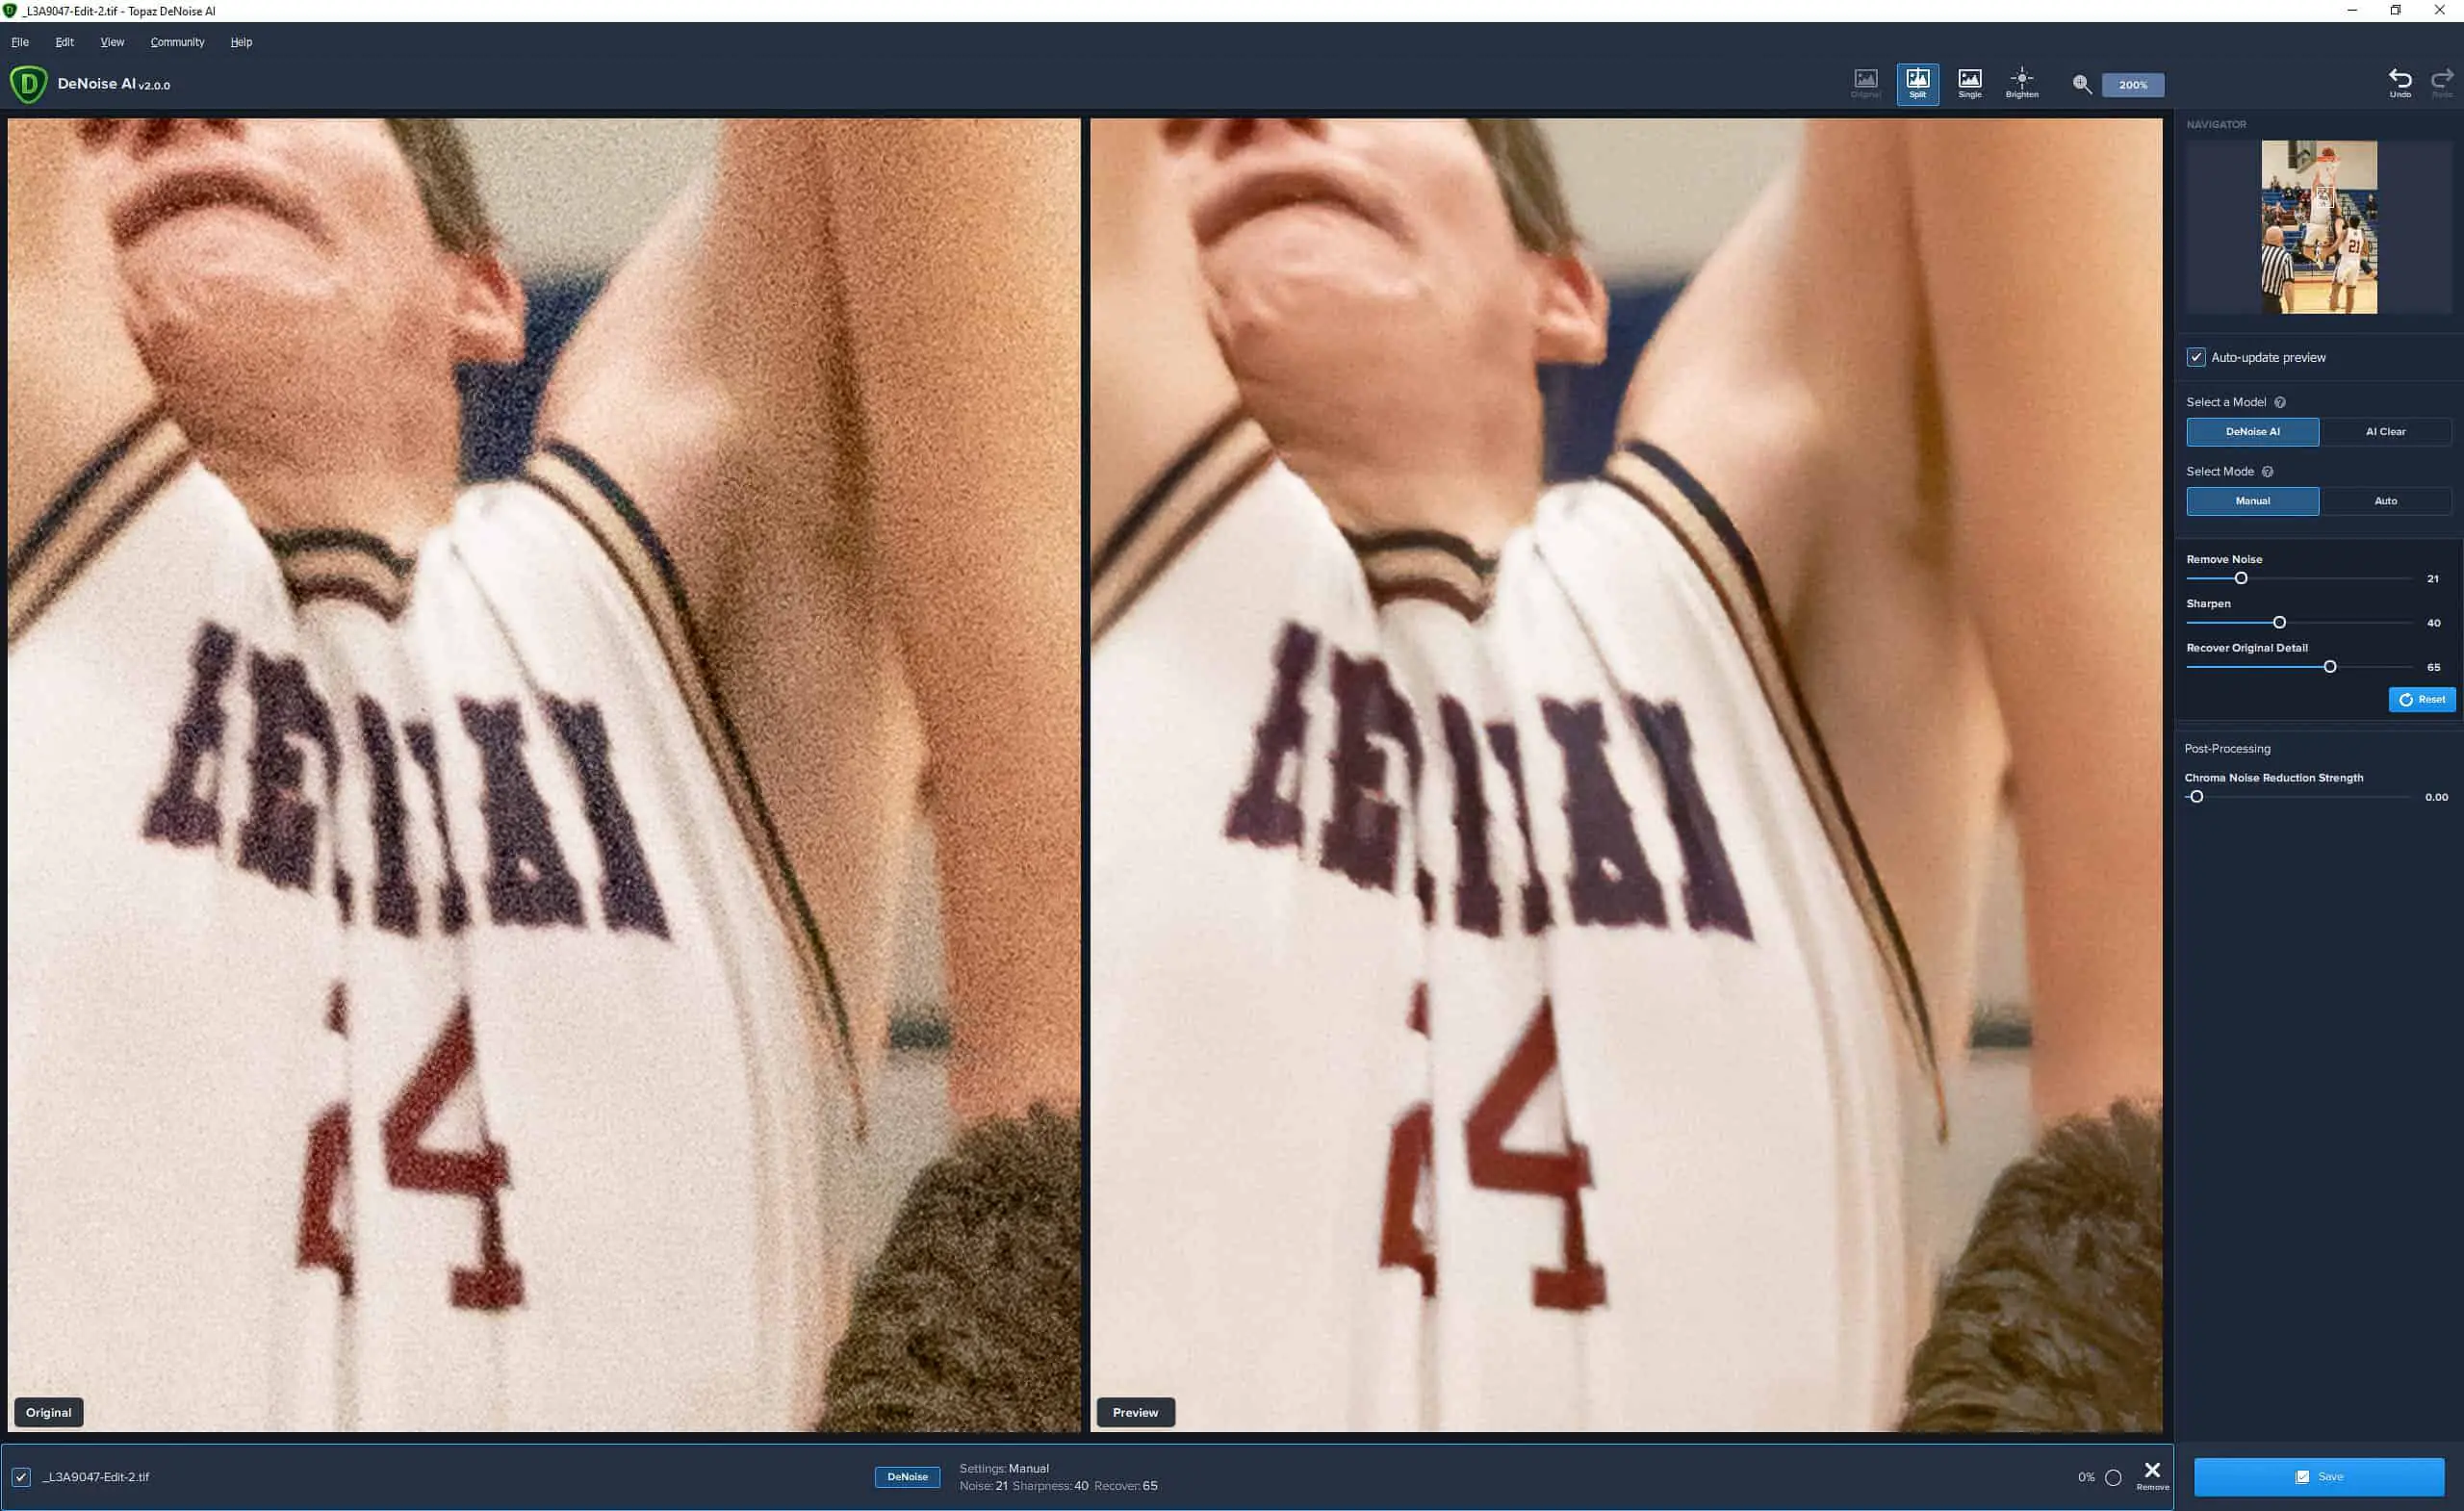
Step 6 – Chroma Noise Reduction Strength
Topaz Labs recommends that you don’t do color (they call it chroma in DeNoise AI) nose reduction before editing the image in DeNoise AI. However, in my testing I got cleaner and sharper images if I allowed Lightroom to have the default noise reduction slider for raw files at 25 rather than using the Chroma Noise Reduction Strength slider in DeNoise AI.
You certainly can try the slider out, but because I left the default noise reduction slider in Lightroom at 25 prior to removing noise in DeNoise AI (I didn’t change anything else), you can see even at 100 it didn’t do anything to this image.
Step 7 – Save
Hit the save button, and that should be it. You will see a message saying that the image is being processed (should take several seconds). If you started in Lightroom you should see a new version of your image in your filmstrip. If you started in Photoshop you should see your layer updated with the noise reduced as you set it to.
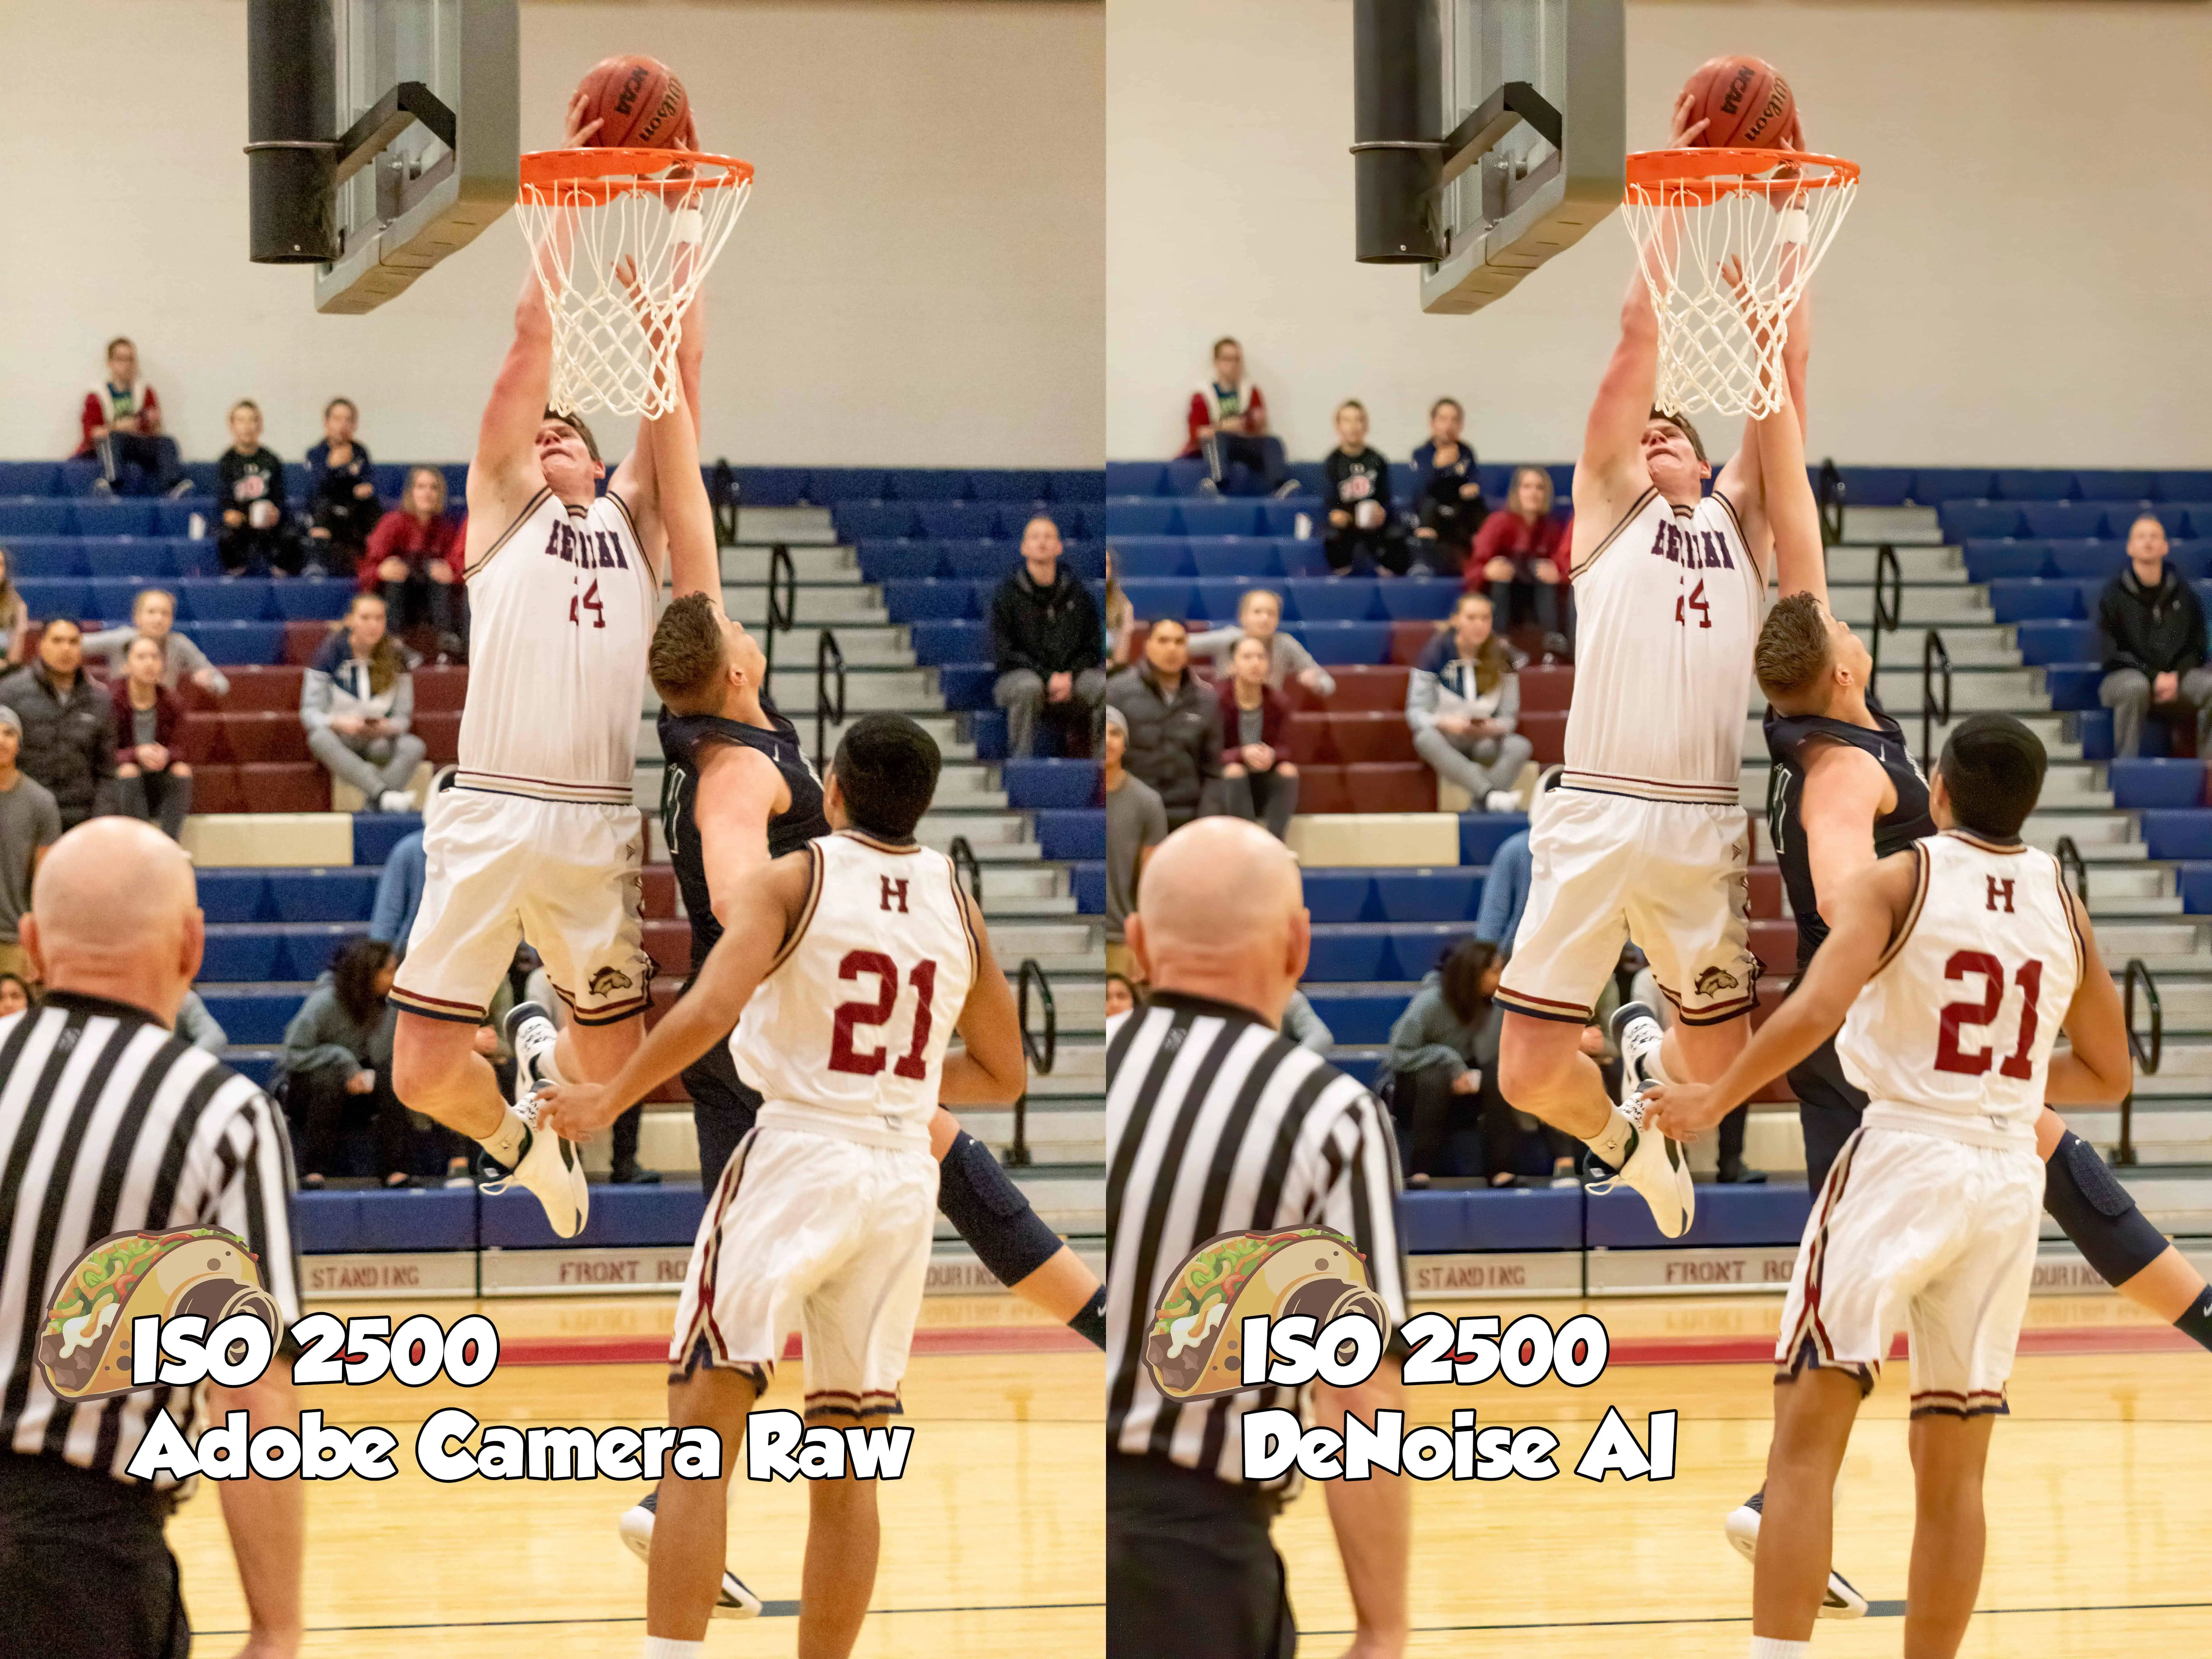
Here is what the final image looked like doing the noise reduction the best I could in Adobe Camera Raw vs DeNoise AI. I have more examples below.
DeNoise AI vs Lightroom/Photoshop
Many photographers don’t know that the engine used in both Lightroom Classic and the Adobe Camera Raw filter in Photoshop are the same thing. There are a couple of other features in Photoshop that deal with noise reduction, but none of them are close to as good as what can be done using Adobe Camera Raw.
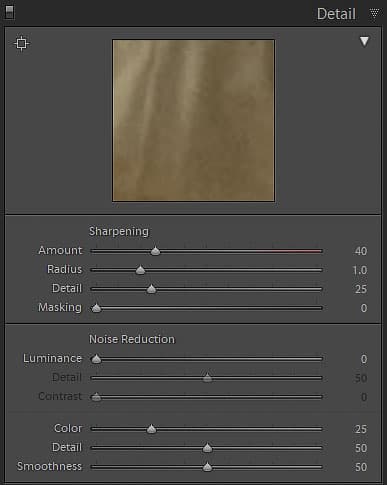
You can find these Adobe Camera Raw noise reduction sliders in the Details panel of Lightroom. There is a Sharpening section and a Noise Reduction section in that panel.
By default Lightroom applies some sharpening and some color noise reduction to raw files. On really noisy images luminance noise reduction needs to be applied. See How To Sharpen and Reduce Noise In Lightroom for more information on how to do this. Remember, it doesn’t matter which tool you use to reduce noise, it can be overdone.
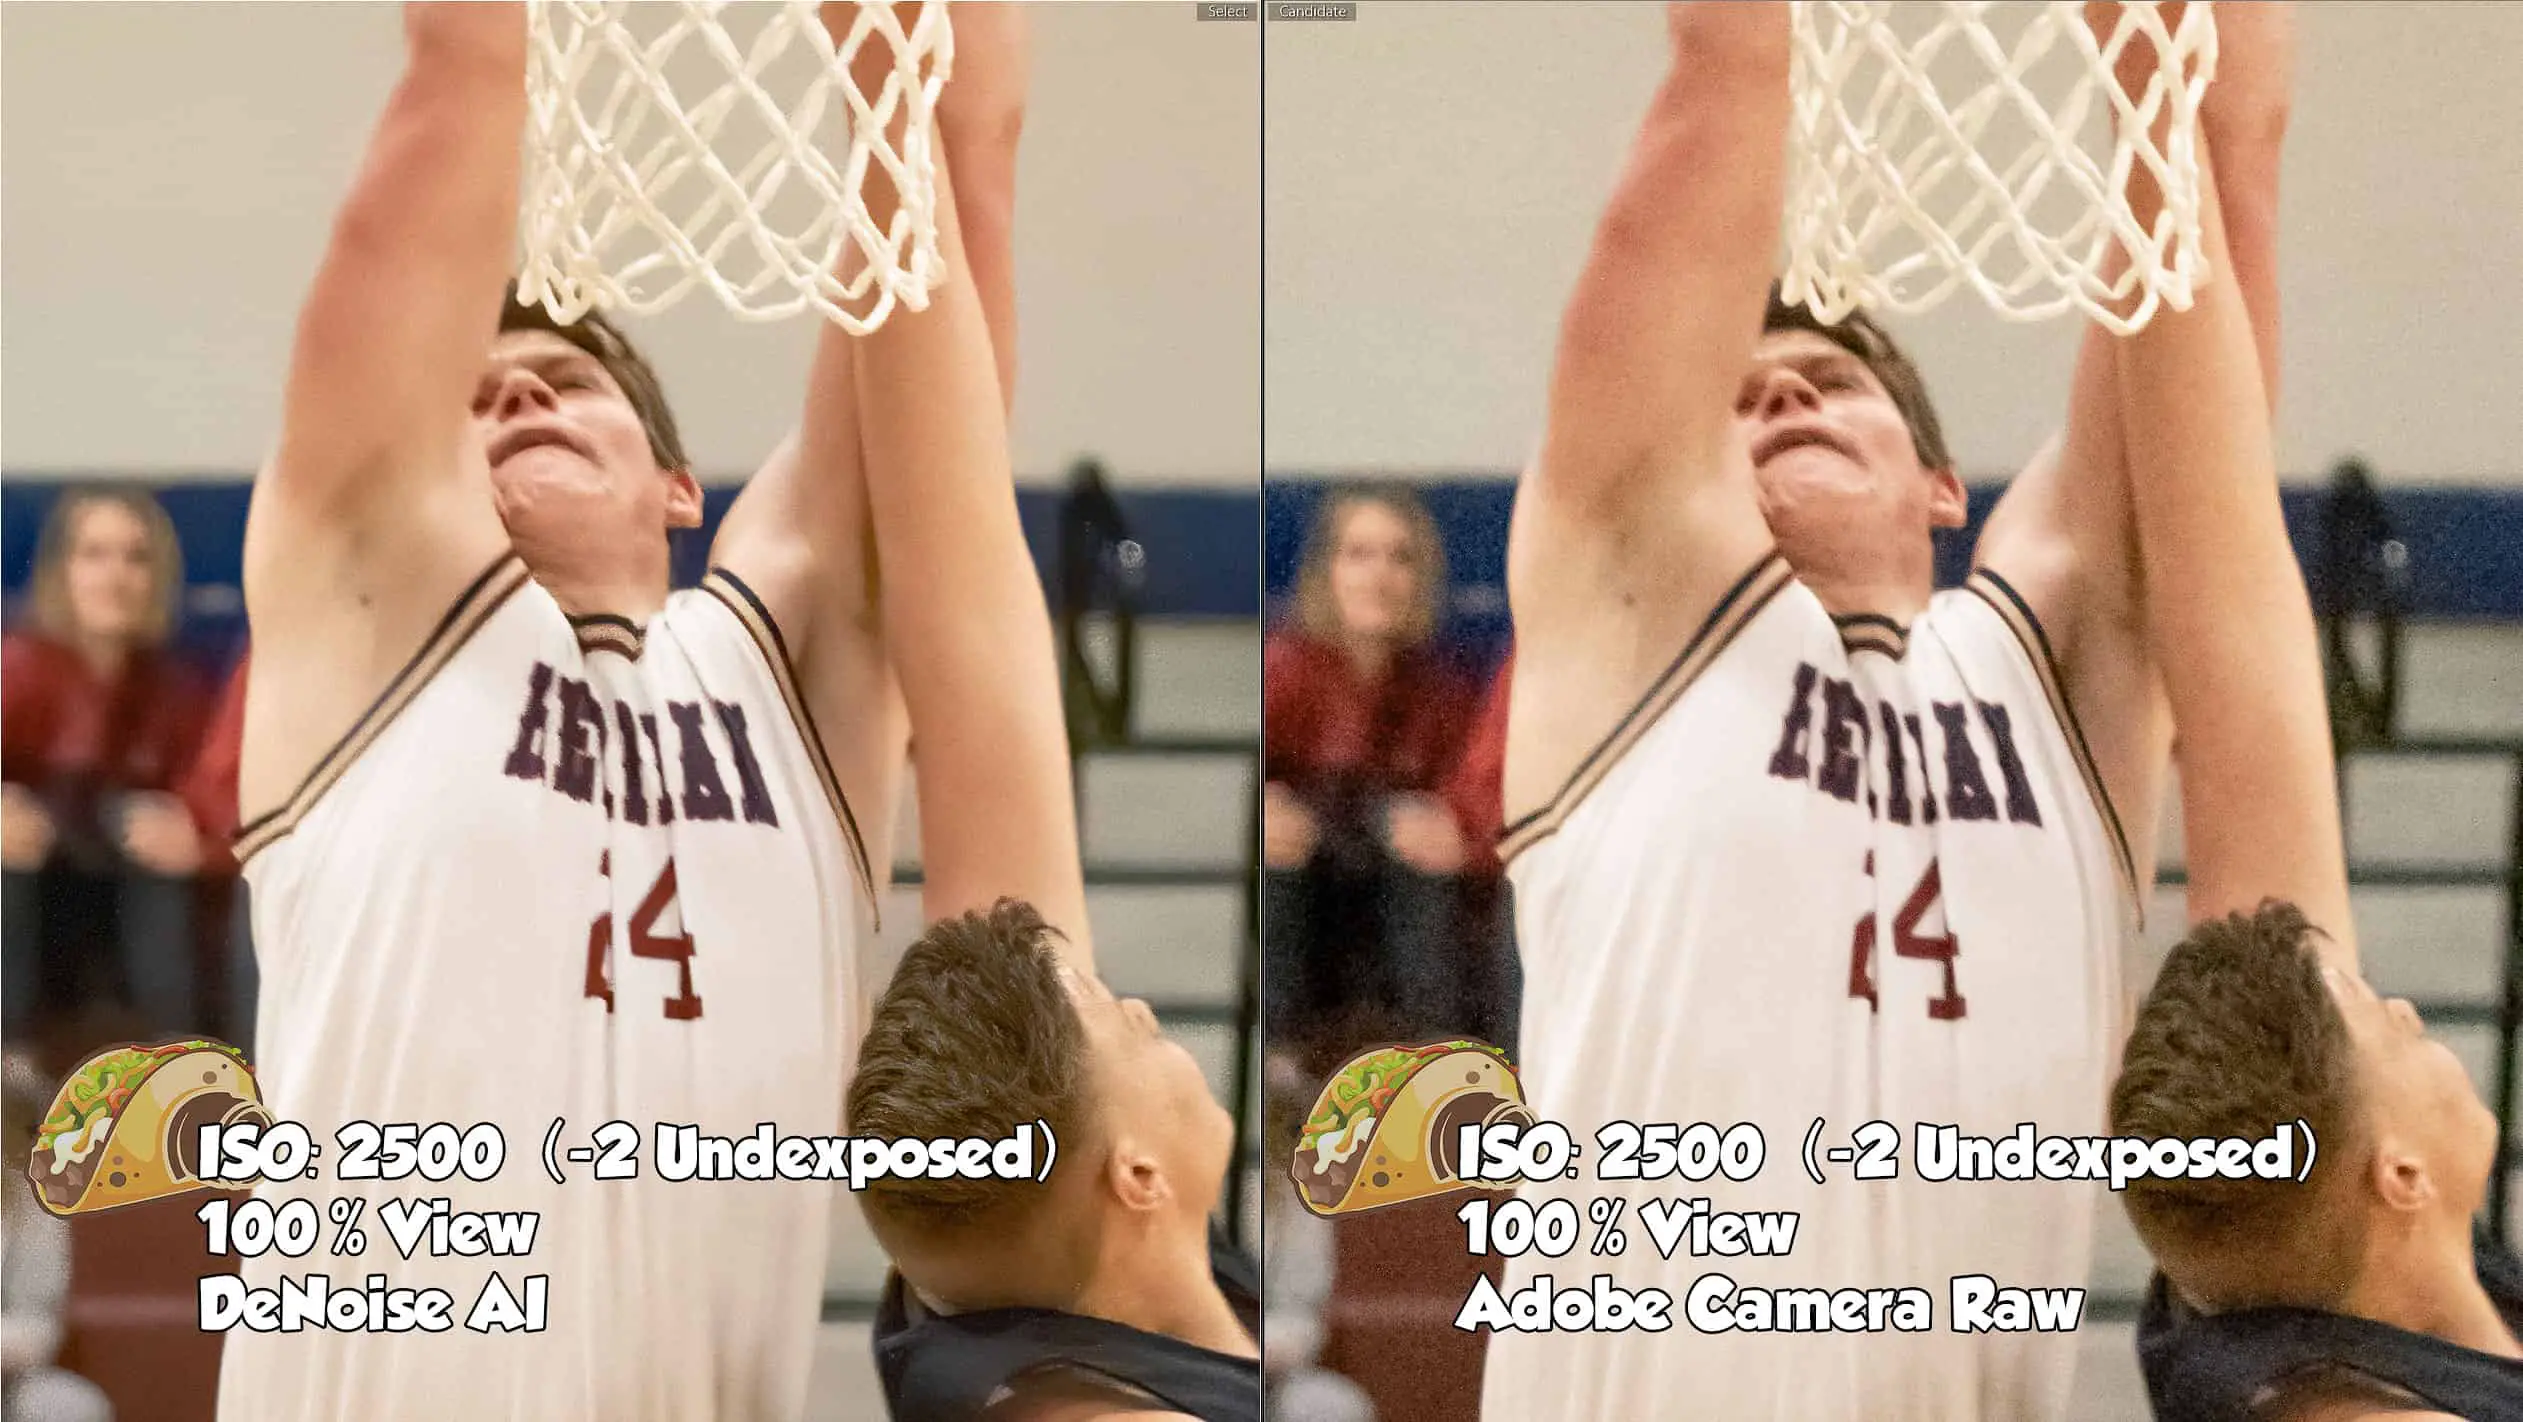
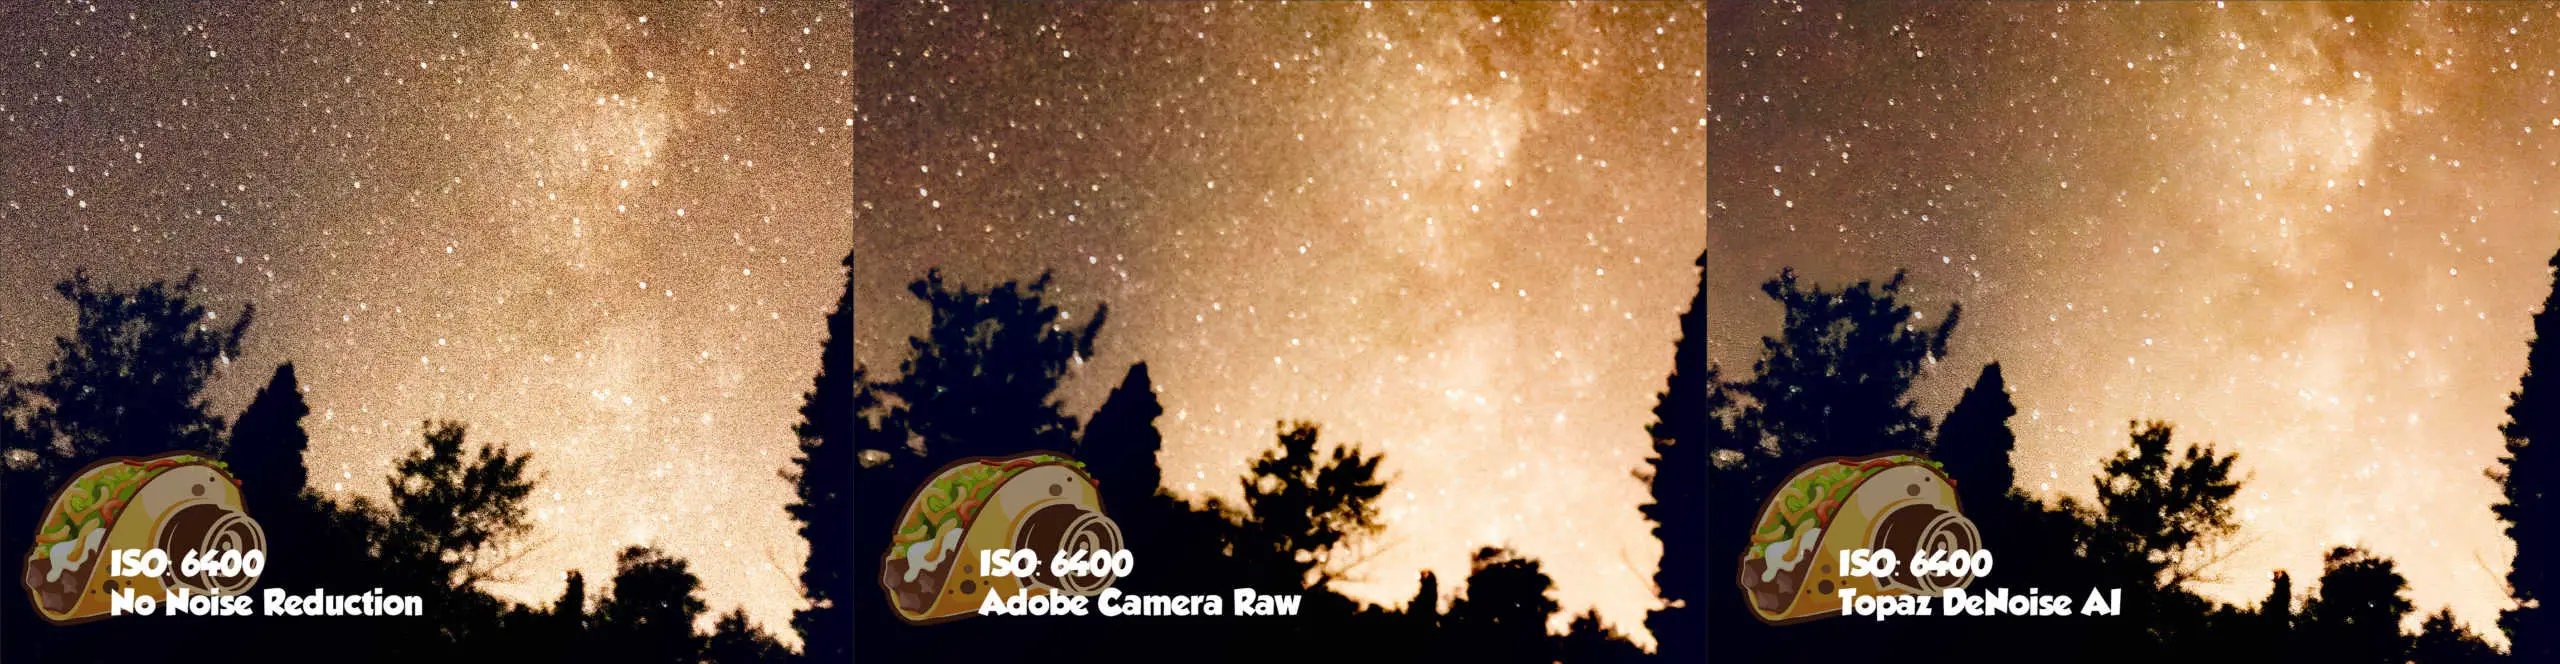
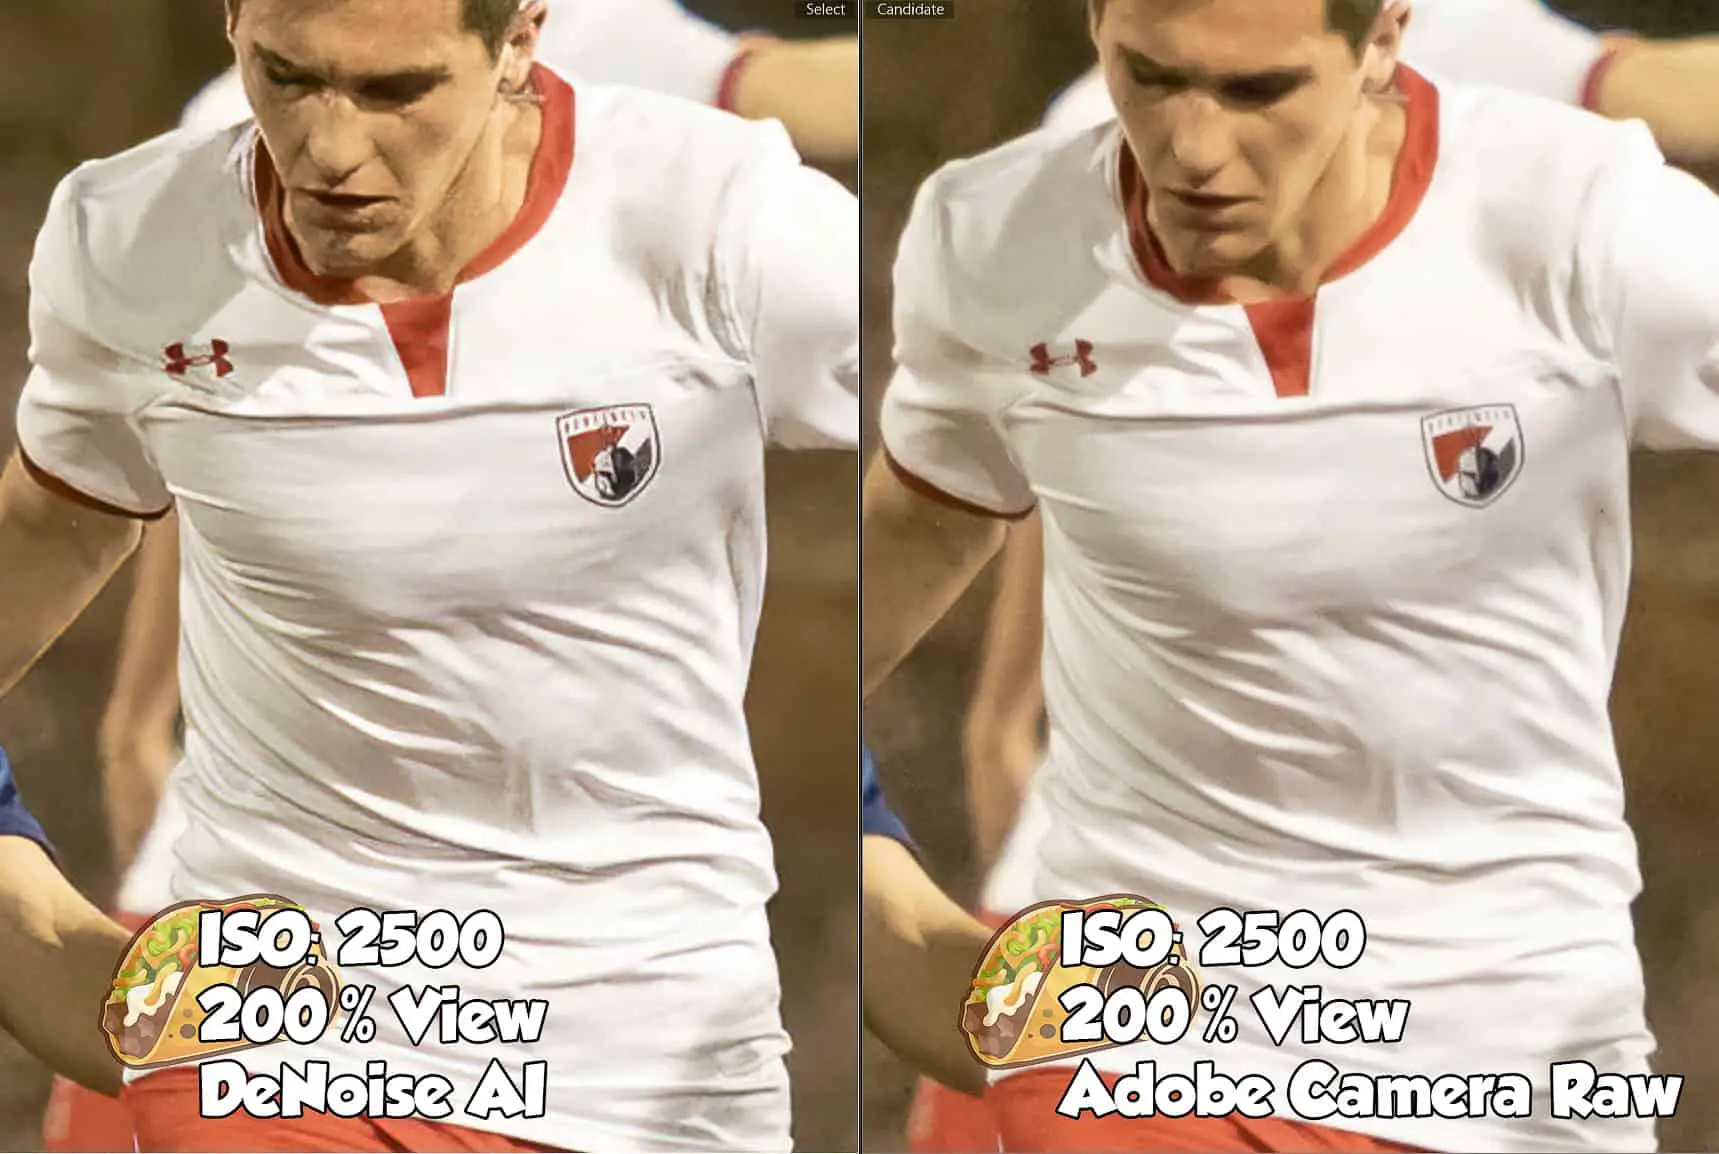
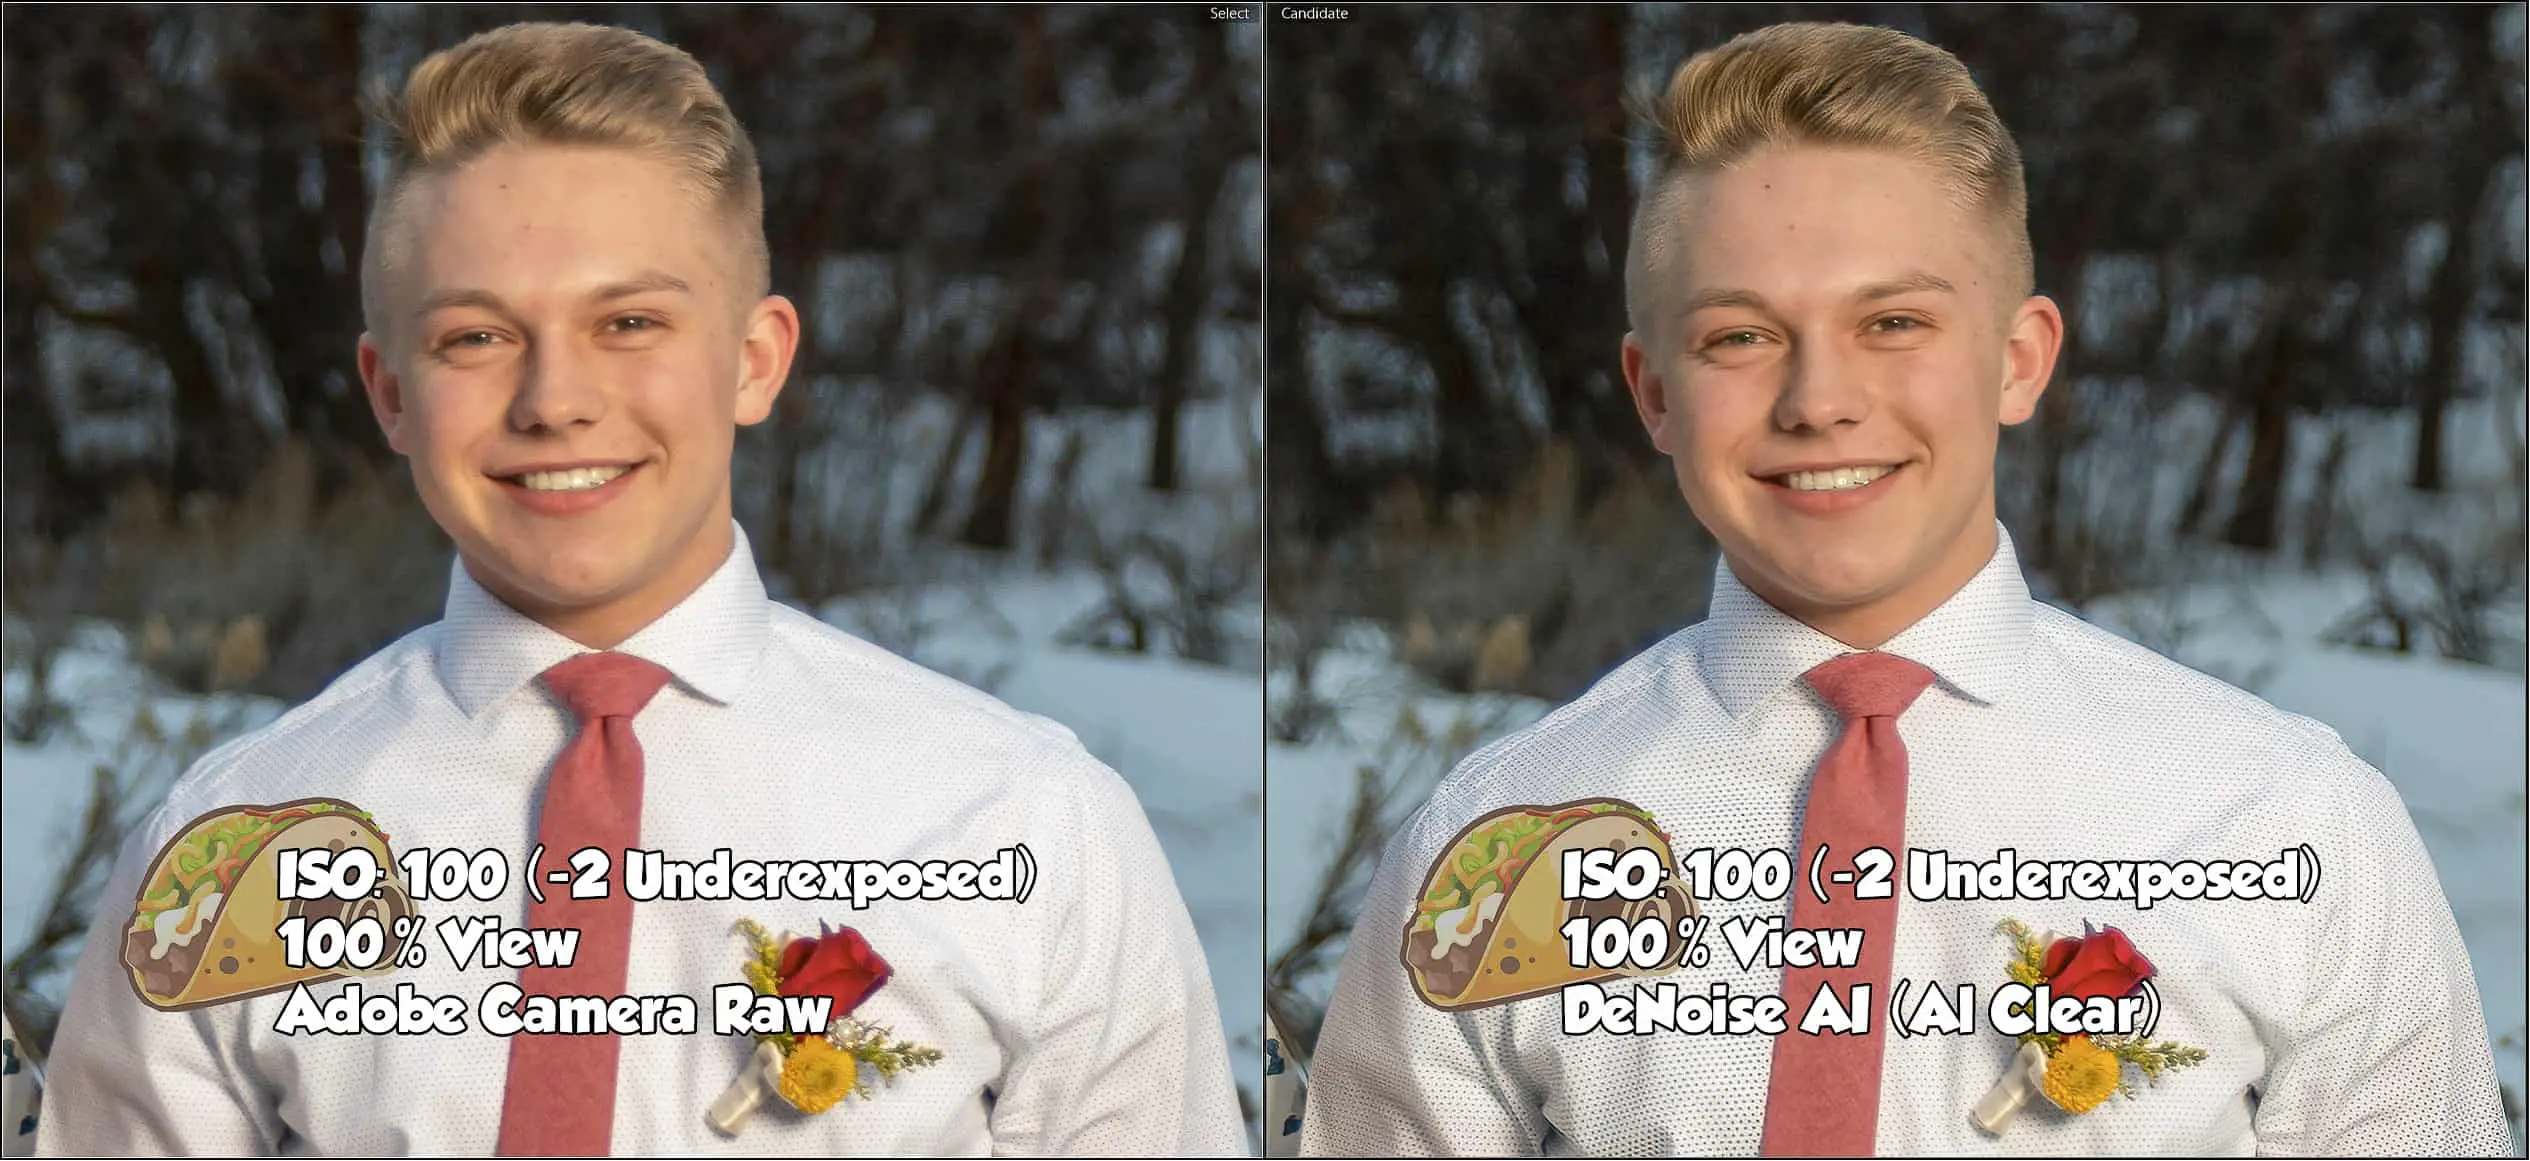
Below are a few examples that compare the noise reduction results with DeNoise AI vs Adobe Camera Raw. I worked hard to find the balance between sharpening and noise reduction to get a final images to look their best in both tools. Then I took special care in exporting these raw files to jpg to make sure the compression did not affect the detail of the images using the incredible web sharpening filter add-on from my friend Greg Benz. You can click on each of them to get a hi-res version of the image to do some pixel peeping!
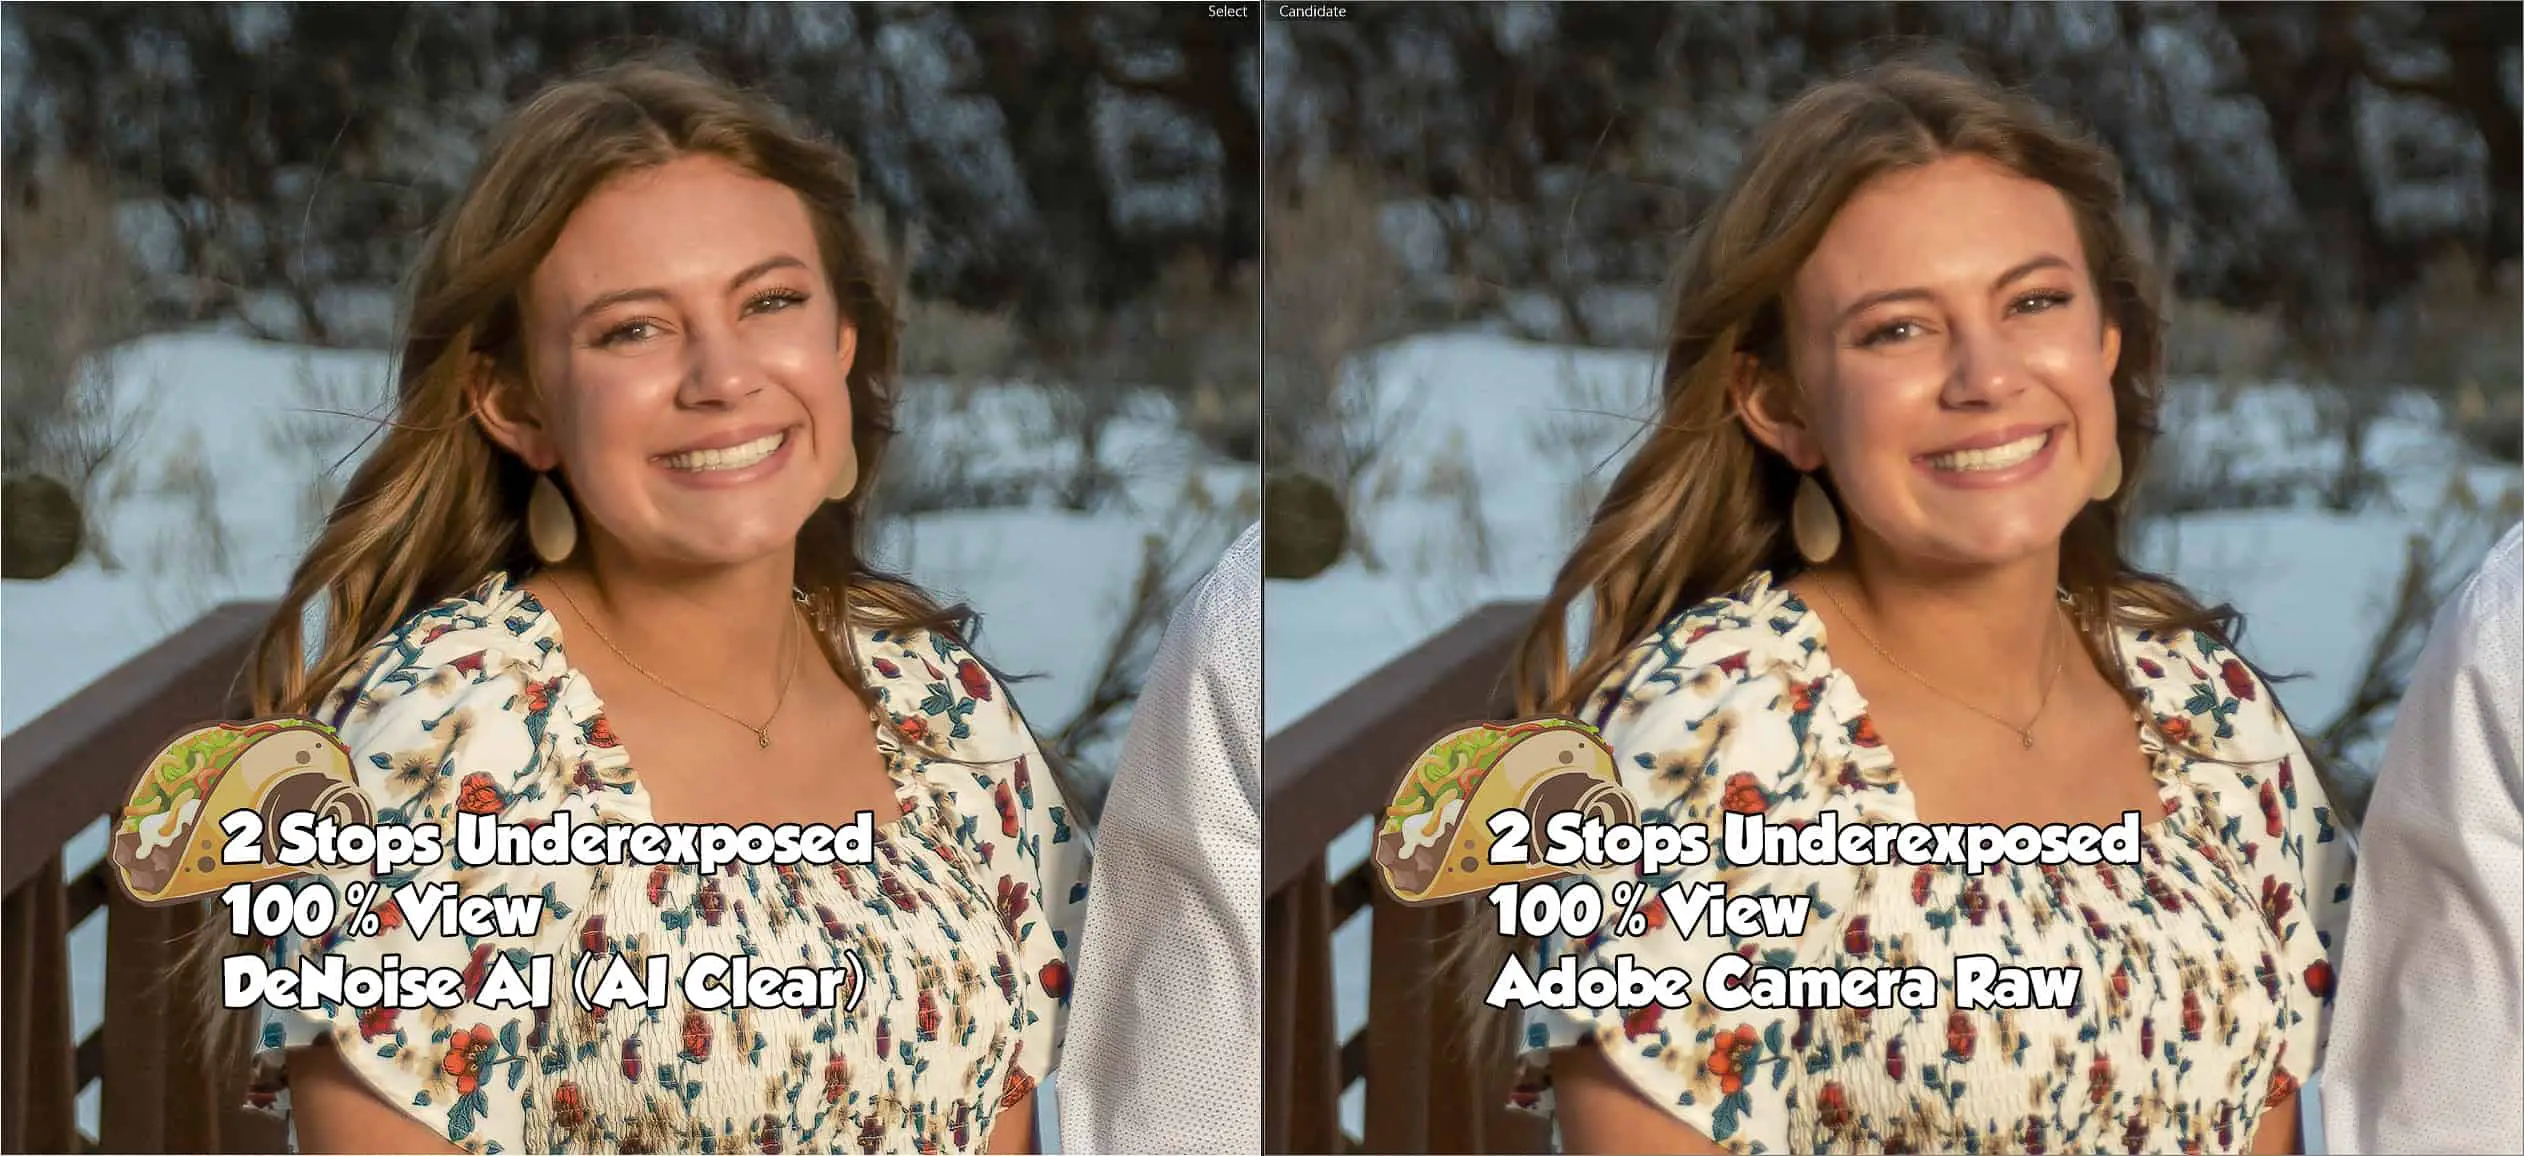
The thing to take special note of here is that the AI Clear model was significantly better than the DeNoise AI mode for this portrait. The eyelashes of the woman in the photo were significantly more detailed using AI Clear here. This makes sense because the noise profile for this image was moderate.
DeNoise AI Hardware and Performance
It wouldn’t be a Photo Taco review if we didn’t talk about the hardware requirements and performance of the software. Unlike a lot of photography products that claim to use artificial intelligence, I really believe that DeNoise AI is actually doing that with the images. I believe that because of the hardware utilization I observed running the software.
Hardware Utilization
I first tested DeNoise AI on my 2014 custom built Windows desktop computer that runs a Core i7 4770K overclocked to 4.2GHz with 32GB of RAM and NVIDIA GeForce GTX 1060 GPU with 3GB of memory. With that hardware, and nothing else running here is the utilization:
- On launch. On launch the software took about 100MB of RAM and 200MB of GPU memory.
- Loading a single 24 megapixel raw file. RAM usage went up to 400MB, GPU memory to 300MB.
- Moving the DeNoise AI model sliders. At 100% view (the default) it took about a 3 second wait for the preview to update using 25% CPU, about 600MB of RAM, 98% of the 3D video card engine, and 1GB of GPU memory. At 200% view the preview updated much faster, under a second, and took about the same resources. At 50% view the preview update took about 9 seconds using 33% CPU, about 600MB of RAM, 98% of the 3D video card engine, and 1GB of GPU memory .
- Saving a single image: 35 seconds using 40% of the CPU, 1.2GB of RAM, 98% of the 3D engine of the GPU, and 2.6GB of GPU memory.
For those of you who don’t have any idea what those numbers mean, DeNoise AI uses significantly more GPU hardware than Lightroom or Photoshop (on average) as it processes an image. Now things can get crazy in Photoshop with many layers and doing things like HDR panoramas, but for those “normal” photo adjustments DeNoise AI is using the GPU significantly more. That’s a good thing in my book.
I next tested DeNoise AI on a 2018 15″ MacBook Pro with a Core i7-8750H that turbo boosts to 4.1GHz, 16MB of RAM, and switchable graphics between Intel UHD Graphics 630 or Radeon Pro 555X with 4GB GPU memory. I let MacOS Catalina choose which graphics card it would use and as soon as I launched DeNoise AI it chose the AMD GPU even on battery power.
- On launch. The same as above taking about 100MB of RAM and 200MB of GPU memory.
- Loading a single 24 megapixel raw file. Same as above with the RAM usage up to about 400MB, GPU memory to 300MB.
- Moving the DeNoise AI model sliders. At 100% view (the default) it took about a 2 second wait for the preview to update using 35% CPU, about 850MB of RAM, 50% of the GPU, and 1.8GB of GPU memory. At 200% view the preview updated nearly instantly, well under a second, and took about the same resources. At 50% view the preview update took about 6 seconds using 50% CPU, 870MB of RAM, 91% of the GPU, and 3GB of GPU memory.
- Saving a single image: 33 seconds using 82% of the CPU, 1GB of RAM, 100% of the GPU, and 2.7GB of GPU memory.
Finally, I tested DeNoise AI on a 2017 13″ MacBook Pro with a Core i5-7360U that turbo boosts to 3.6GHz, 16GB of RAM, and Intel Iris Plus Graphics 640 with 1.5GB of GPU memory.
- On launch. The same as above taking about 100MB of RAM and 200MB of GPU memory.
- Loading a single 24 megapixel raw file. Same as above with the RAM usage up to about 400MB, GPU memory to 300MB.
- Moving the DeNoise AI model sliders. At 100% view (the default) it took about a 3 second wait for the preview to update using 35% CPU, about 925MB of RAM, 5% of the GPU, and 720MB of GPU memory. At 200% view the preview updated nearly instantly, well under a second. No change in RAM usage, but it only took 15% of the CPU and 3% in the GPU. At 50% view the preview update took about 10 seconds using 90% CPU, 1.1GB of RAM, 25% of the GPU, and 300GB of GPU memory.
- Saving a single image: 68 seconds using 90% of the CPU, 1.6GB of RAM, 25% of the GPU, and 300GB of GPU memory.
Yes, DeNoise AI needs some hardware to function. If you don’t have a discrete graphics card the performance when you hit the Save button to have the entire image processed is 2x slower but the sliders were not much different using the integrated Intel Iris Plus Graphics 640 vs discrete GPUs.
Some photographers may find it difficult to run Lightroom, Photoshop, and DeNoise AI all at the same time unless you have a well equipped computer. You can find recommendations for that in the Buying Guides for Photographers here on the site.
DeNoise AI Batch Mode
DeNoise AI supports a “batch mode” of sorts, meaning you can use it to remove noise on a folder full of images. I tested this out by opening a folder that had 1,682 24 megapixel raw files from a recent night time soccer game played under lights. Plenty of noise in those images.
You see exactly the same UI to do this processing, the difference is that a whole list of images is shown at the bottom of the screen. You can follow the same process outlined here to configure the model and noise reduction sliders and have that apply to all of the images, or you can go through them one at a time and customize each one.
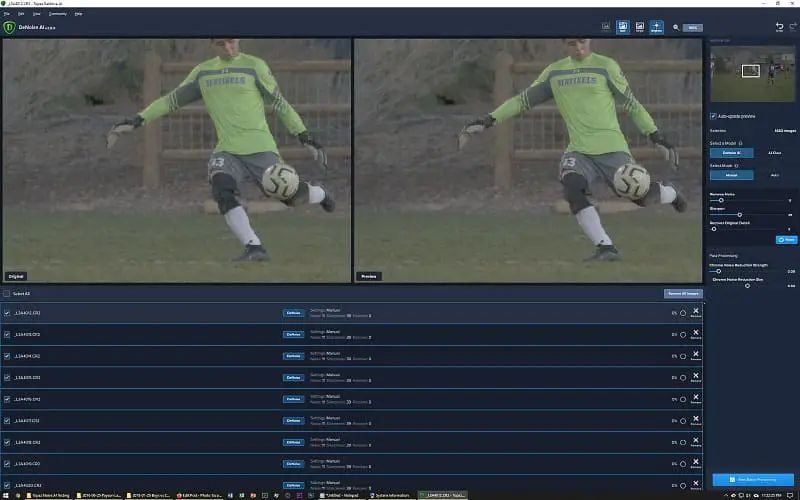
I tried the first approach with my test set of 1,682 raw images. I opened the folder up in DeNoise AI, and then selected all of the photos in that folder. The list of all the images is shown below the side-by-side image preview and changes you make to the model or sliders on the right are replicated to every image that has the checkbox checked in that list.
With the checkbox set on all 1,682 images, I set the model to be DeNoise AI, and then manually set the sliders to my liking for the first image. All of the images were taken using the same settings and with the same light, so I thought it should mean that I would be happy with the same settings I worked out on the first image being applied to all of them.
I was also excited that this could be a way to exactly follow the process that Topaz Labs recommends with DeNoise AI as this would be the first thing in the workflow touching these raw images. I figured I could import the files that DeNoise AI produced into Lightroom and process them as I normally would from there, sans noise.
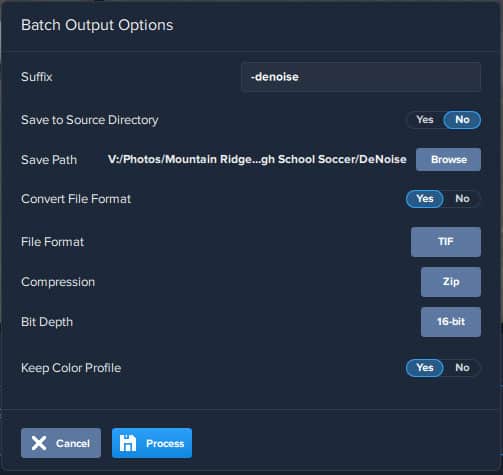
Even better, the dialog box after you hit the Start Batch Processing button lets you choose to have the images be in a format that supports the full information of the raw file choosing to have DeNoise AI output 16-bit zip compressed TIF files that preserve the color profile of the raw image! Perfect.
Then comes the challenge. With all of the hardware options I tested it took about 35 seconds to process a single image with those settings. I let the process run for 40 minutes and got 69 photos processed. Each TIF ballooned in size from the 23MB for the Canon CR2 raw format to a whopping 102MB (with no increase in resolution of course). So they are 4x larger in size and at the rate they were being produced it was going to take over 97 minutes to process all 1,682 images. I couldn’t wait that long for these images, so I killed the batch job.
But there are other output options. So I changed from TIF to DNG. Using DNG saved nearly ten seconds per image, taking about 26 seconds to process a single image. The DNG produced was even larger than the TIF at 114MB in size. Also not remotely practical as an initial step to processing a lot of noisy images.
There are two more options supported in DeNoise AI batch mode. I would never want to convert my raw files to jpg, but that is an option this is supported. It still takes about 30 seconds for DeNoise AI to process a single image and the resulting jpg with the quality level set to the highest value (10) is 12MB. Much better on the file size but now I have a jpg instead of a raw to process further. No go for 99% of my work.
Finally, there is png. DeNoise processed a single image in about 35 seconds when the compression is at the highest (which means no loss in quality with the png format being lossless). DeNoise AI warned that the highest compression will be the slowest as it processes them but in theory it should allow smaller file sizes to be produced. They files that resulted were slightly smaller than the TIF at 97MB in size. Still way too large.
I am glad Topaz Labs put a batch mode in DeNoise AI so that photographers have it as an option. However, the time it takes to process the images is just way too long for an image count large enough you would be interested in a batch mode and the files it produces are extremely bloated. I won’t be using batch mode.
Complaints of DeNoise AI
- Mouse only sliders. Changes in just one number of the Remove Noise slider can dramatically impact the noise reduction in the photo. It is a little bit difficult to change the slider by just a single number. I would like to see the slider work more like the sliders in Lightroom where you can click on the box showing the number and use the keyboard to change the slider by one number.
- Brightness and Contrast. Topaz Labs recommends using DeNoise AI as early in your workflow as possible, which means bringing images into the software that can be very underexposed. DeNoise AI needs brightness and a contrast sliders so that you can get a better idea of what the noise looks like. There is a brightness button, which seems to increase the exposure by one stop, and it didn’t really help me see the noise in my images. I found I often had to adjust exposure in Lightroom before going to DeNoise AI because I needed to better see the noise I am trying to reduce.
- Auto-update bug. With the Auto-update checkbox checked I had it happen numerous times that changes in the Navigator to what portion of the image is being shown didn’t trigger the software to run the DeNoise AI model and remove the noise according to the sliders that were set. It left the right panel showing the original noise. Seemed to mostly happen when the view was set to 50%. I had to uncheck the box and hit the update button.
- Needs a fit view. I do most of the work at a 100% view. Sometimes I need to go into 200%. Before clicking save I would really like to see a preview of the effect the DeNoise AI model sliders will have on the entire image. You can only go 50% and that isn’t enough to see even half of the 24 megapixel images I tested. This would be even less effective on higher megapixel images.
- Drag image in side-by-side view. The navigator is fine, but over and over I attempted to move the view of the image by dragging on the preview only to remember I had to go up to the Navigator in the upper right to do that. Really wish I could move around the image by dragging on the preview.
- Put “Auto” settings on left. It was good to see the noise of the original image on the left as I changed the sliders to see the impact they have in the preview on the right. However, it would be super useful if I could load some configuration of the sliders to the left side so that I could compare that with what I am fine-tuning on the right. Really useful would be to load what results from Auto on the left and then change the settings on the right so that I could compare those two things.
- Smaller file sizes. The file sizes produced by DeNoise AI are far too large. For a single file here and there I can deal with the file size bloating 4x in size, especially today where storage can be had in very large sizes inexpensively. But I would really like to see the output file size come down.
Final Verdict – Is DeNoise AI Worth Spending $80?
So many times when I see a lot of advertising for a photography product I have been disappointed in the product. I find most photography products don’t live up to the hype of the marketing. The good news is I think that DeNoise AI version 2 from Topaz Labs is not one of those products! Here is one that actually lived up to the hype – for the most part.
You can absolutely get good results doing noise reduction using Adobe Camera Raw. I have been happy with the images I create using a combination of Lightroom and Photoshop. When you use Photoshop to apply selective sharpening and noise reduction using masking techniques the results can be truly phenomenal. Photographers do not have to buy DeNoise AI to create stunning photos out of noisy images when they have Adobe Camera Raw available to them in either Lightroom or Photoshop.
However, I was able to consistently create a sharper, more noise free image using DeNoise AI over what I could quickly do in Lightroom and Photoshop. The time taken is kind of the point to me. The auto mode was almost never exactly where I ended up on my settings in DeNoise AI, but in most cases it was really close. DeNoise AI can save photographers a lot of time by letting the computer do most of the work.
At $80 to license DeNoise AI (affiliate link that won’t cost you anything extra) on up to two computers, it is an excellent option for photographers who consistently work on images created from low light capture environments. It isn’t a tool you will want to use on every low light photo you capture, but I think it is a tool every photographer should have in their toolbox for when they need some help dealing with noise.
Podcast: Download (Duration: 1:28:39 — 62.1MB) | Embed
Subscribe: Spotify | TuneIn | RSS
Comments
Wow. This was especially interesting since I recently purchased DeNoise AI and Sharpen AI. Very well written and helpful. Thank you.
What do you think of Sharpen AI? I am trying to determine which photos benefit from DeNoise AI, AI Clear, Sharpen AI/Sharpen, Sharpen AI/Stablize, or Sharpen AI/Focus. I find the Topaz product line-up very confusing with significant overlap.
@Bill,
Thanks for reading and for the kind words. I haven’t done this detailed review of anything else from Topaz yet.
A lengthy but very interesting review. I agree that DeNoise can work like a charm. I was not aware, until you pointed it out, of how much space the TIF files it creates occupies. I shoot Olympus and my ORF images triple in size. But the images are worth it!
@Alex,
Thanks for leaving me a comment. It is puzzling to me why it is the TIF files are so bloated, but I agree that it can be very worthwhile to get the noise cleaned up in some images where we need to squeeze out every tiny bit of image quality!
You mentioned possibly adjusting exposure etc first in Lightroom to better see noise. I would have thought that a better option for 2 reasons despite what topaz says. First don’t you lose some of the benefit of Raw In terms of tolerating more extreme changes, ability to adjust color temperature, etc by having converted to TIFF instead? If you do lose some of the tolerance for adjustments do you lose as much by converting to DNG? Second doesn’t increasing exposure in dark areas add noise rather than just make it more visible. If so wouldn’t we want to have introduced all the noise we were going to introduce before applying noise reduction?
@Eliot,
Thanks so much for reading/listening! TIFF files are just as robust as raw files. It is the format I recommend be used when round-tripping between Lightroom Classic and Photoshop over the PSD format. So there are no concerns with the file format itself, though the ginormous size of the files is concerning.
With regards to the noise increase when you raise the shadows, it isn’t adding noise when you do that. It just makes it visible. But that is the very thing I need in order to figure out what I am doing in DeNoise AI to battle the noise. Can’t fight a monster I can’t see. In my testing, I think exposure adjustments in Lightroom or Photoshop are just fine, the thing you don’t want to do is any of the sharpening that Lightroom applies to raw by default. I got better results taking images from Lightroom to DeNoise after making my exposure adjustments, the color noise reduction default (Lr did better than DeNoise on this), but making sure there are no sharpening adjustments.
Thanks. I just tested a TIFF in Lightroom and noted you also lose white balance and choice of Profile so perhaps it would be better to also adjust those before round tripping into AI
@Eliot,
A very good point. You do lose all camera specific information like the camera settings for white balance (though you have full flexibility to set custom white balance just like the original raw file better than with jpeg) and camera profiles that help you replicate the look of a jpeg from your camera. This is also true of the lens profiles that Lightroom can find before round tripping to an external editor with a TIF file.
So yes, doing those things first if you need Lr to help you replicate the camera look. You can however have full flexibility of editing the raw data just the same with the TIF as you do with your raw.
Thank you very much Jeff for this podcast, it gave me a good and helpfull perspective about the Topaz Denois AI. By the way I edited different RAW photogrpahs (with high ISO, till 1.800) with the trial Denoise AI, and with Adobe Camera Raw, and in the end I can say I got better result with Topaz Denois AI, just one thing I dindn´t like is that Denois AI always changes the illumination giving more light without asking me, so after editing with Denoise AI i have to open the photographs with Photoshop and change the illumiation back to make them darker, so that sounds for me not very professional. Is it any possibility to work with Denois Ai without having any change in the illumination?
thank you!
Thanks a lot
Pingback: Six Creative Portrait Images With Connor Hibbs - Master Photography Podcast
Now you have to purchase a license every year to get the major updates! $49.99
Pingback: What Can a Photographer Do With $200? - Master Photography Podcast
Pingback: Making DeNoise AI Faster - Photo Taco Podcast