Do You Find Photoshop Intimidating?
If you find Photoshop to be intimidating you are not alone! We constantly hear from photographers that they know they need to learn how to use Photoshop but they can’t figure out how to use the program. Hopefully you have found this post and podcast episode because you need that help and we are going to offer you tips for breaking through and taking the intimidation out of Photoshop.
You can do this! The seven steps outlined in this post have helped thousands of photographers get on the road to learning Photoshop, and most importantly to take the intimidation out of Photoshop.
Step1: Have a Goal
After talking to thousands of photographers about learning Photoshop, the biggest reason they find it intimidating has to do with the many buttons, panels, and menu options they stare at in the software having no idea what to do next. Photoshop is a powerful tool that not only can be used to do amazing things with photos and other art, there are almost always two are more ways to accomplish your creative vision!
The possibilities are so significant anyone who has never used Photoshop would have a terrible time trying to figure out what to do if they don’t have some guidance and direction. Getting that help is easy after you set a goal of something you want to do with Photoshop. Without a goal, you are wandering aimlessly in a tool that you don’t understand.
There are literally hundreds, maybe even thousands, of goals that you can have with Photoshop. Another reason so many find it to be so intimidating. Don’t start off shooting to do the most complicated types of things to your photos. Portrait photographers could have a goal of removing blemishes in the skin of their subject. Landscape photographers could start off with something like changing the lighting or colors in their photo. A more complicated goal would be something like compositing two photos together to make one – something you might want to learn after you get through the steps in this post.
Yes, these smaller goals you might be able to accomplish pretty well in other post processing tools like Lightroom. There are tools to change the lighting and colors and there is a spot removal tool in Lightroom that can help with blemishes, but to turn Photoshop into a tool in your toolbox you need experience and a small goal is the perfect way to get started. The point isn’t that you couldn’t do these small goals outside of Photoshop, because you can. The point is to become familiar with Photoshop and make it less intimidating.
Step 2: Open Your Photo In Photoshop
We are going to assume that you are using Lightroom with your photos here, but even if you use something else like Luminar, Capture One, or On1 the concept is pretty well the same. The most common way photographers get their photo into Photoshop is through a process referred to as “round tripping”.
You start in Lightroom, you may make some adjustments in the Develop module, and let’s just pretend you can’t quite get the photo to be adjusted the way you want in Lightroom and now uou have a goal to go into Photoshop and get that adjustment done.
- Select the photo you want to edit in Photoshop in Lightroom
- Right click on the photo and choose Edit in Photoshop or use the keyboard shortcut of
Ctrl-e(PC) orCommand-e(Mac) - Your photo, along with all of the changes you made in Lightroom, will now show up in Photoshop
The beautiful thing about this round tripping process is that when you are done you can save your photo and have the changes you made in Photoshop show up back in Lightroom (or many other post processing programs) right next to the original photo you started with! If you have had problems with that working, check out this 5 Things to Check When Your Photoshop Photo Doesn’t Show Up In Lightroom article (complete with YouTube video).
Step 3: Learn Adjustment Layers
Now that you have your photo in Photoshop, let’s see if we can accomplish your first small goal for adjusting a photo through the use of one of the most common tools in Photoshop. We suggest you start with something called Adjustment Layers.
If you have used another post processing tool like Lightroom the concepts behind Adjustment Layers will quickly feel familiar. All of the things you can do in the Develop module of Lightroom can be done through the use of Adjustment Layers.
Add An Adjustment Layer
To add an Adjustment Layer to your photo you can go to the Layer menu at the top of Photoshop then New Adjustment Layer and you will see a number of options that you can use to accomplish your goal. If you add the Adjustment Layer this way Photoshop is going to ask you about some options you can use as it creates the Adjustment Layer and adds it to your photo. For now just take the defaults.
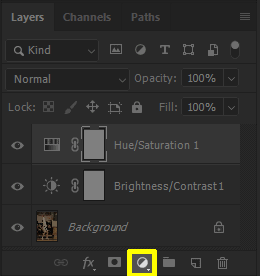
You can also add an Adjustment Layer by clicking in the tiny little icon in the lower right that looks like a circle the is half filled. The same Adjustment Layers are there, just a little faster way to adding them and Photoshop doesn’t ask you about the options like it did through the menus.
If you goal is to lighten/darken your photo, you can use any of the first four Adjust Layers to work on that but we recommend learning Curves first as an adjustment that is usually more powerful than you get in other post processing software. If you goal is to change the colors in the photo then try out the Hue/Saturation Adjustment Layer. If your goal is to make your photo a little warmer (more yellow) or cooler (more blue) then give Color Balance a try.
Search For Specific Help
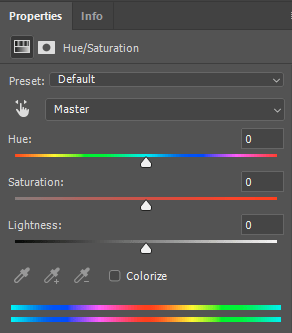
If as you add one of the Adjustment Layers, like say Hue/Saturation, you may also notice there are other things in the Properties panel that you can use to fine-tune your adjustment. This is exactly how you take the intimidation out of Photoshop, you can now go and search for specific help on how to use those options!
You are no longer staring at a screen not knowing what to do. You have a goal and now you have a specific question about how to use a Photoshop feature to accomplish that goal. From here it is pretty easy to search Google and/or YouTube to find specific examples of how to use each of the Adjustment Layers.
Experiment!
Now you need to experiment. This is the very best way to learn. Don’t be afraid of breaking something or ruining your photo. If you don’t like what you did you can close Photoshop and not save changes. Add all of the Adjustment Layers and play around with the controls of the adjustment in the Properties panel of Photoshop. As you play around with things you will learn about what each Adjustment Layer can do and even if it isn’t one that will help you to accomplish your goal this time, you might remember it being there when you have a different goal later.
Notice that you can go back and change an Adjustment Layer by clicking any of them and changing things in the Properties panel. If you decide that something you did in one Adjustment Layer is too much or too little, you can always go back to that Layer and change things at any point.
Also, remember that the point is not doing something in Photoshop here that you couldn’t do in Lightroom. Eventually that will be the case, but you probably could have done pretty much the same adjustment in Lightroom as you just did in Photoshop. The point right now is to become familiar with how Photoshop works.
Step 4: Learn Layer Basics
One of the most powerful things you can do with Photoshop is Layer Masking. It sounds hard but it is much easier than you think. A layer mask just controls the visibility of the layer. Let’s explain.
Layers Are Like Pieces of Paper
To help with learning about layers, add a Curves Adjustment Layer to your photo and then add a standard layer (click the icon that looks like a paper with the corner turned up ![]() in the Layers panel in the lower right or in the Layers menu go to New and then Layer).
in the Layers panel in the lower right or in the Layers menu go to New and then Layer).
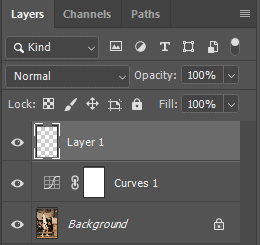
Now As you look in the Layers panel you should see a bottom layer labeled “Background”, a layer on top of that labeled “Curves 1”, and a layer on top of that named “Layer 1”. You should think of these layers like pieces of paper laying on top of each other. Your photo is at the bottom of the stack with the Curves Adjustment Layer on top of it.
You should think of these layers as individual pieces of paper. It isn’t a complete analogy because you really can’t see through a sheet of paper to the paper underneath it but hopefully the analogy will help. Layers in Photoshop can often show the pixels on the papers underneath them. Both of the layers you just added are allowing the photo pixels on the bottom layer to show through. In fact, the photo shown in the main view area of Photoshop shouldn’t look any different yet even though you have added two layers over the top.
Let’s say your goal is to put a yellow circle on your photo. Right now you have three layers, like three sheets of paper, and you could put that yellow circle on two of them (Adjustment Layers don’t support any kind of pixel manipulation in the main view of Photoshop, that is done through the Properties panel as described above). Your choices for painting this yellow circle are the layers labeled “Background” on the bottom or labeled “Layer 1” at the top. Before you go to make your yellow circle you need to decide which layer, or which piece of paper, you want that circle to be on.
“Destructive” Editing – Dangerous
If you selected the layer that already has all of the pixels of your photo, you could totally paint a yellow circle on the main view in Photoshop and you are going to over-write those pixels wherever you pain – something photographers call “destructive” editing. It’s destructive because you are telling Photoshop to replace the pixels from you photo with those you are painting. You couldn’t reverse those pixels on that layer back to the pixels from your photo without undoing you painting action. We always recommend you leave that “Background” layer alone because any editing done on that layer is destructive.
Pro Tip: Every time you round trip from Lightroom into Photoshop, the very first action to take on your photo is to duplicate the background. That way you can always get back to the original pixels from your photo. The keyboard shortcut to learn is Control-j PC/ Command-j Mac. Get in the habit of doing this and it will save a lot of frustration!
The better place to put your yellow circle is on the top layer that is currently named “Layer 1”. If you select that layer (just move the mouse cursor over that layer in the Layers panel and click) and then select the Paint Brush tool (looks like a little paint brush or just hit the “b” key) and set your foreground color to yellow, wherever you paint in the main view in Photoshop will show up over the top of the pixels on the layers underneath. You get the same effect as if you had painted over the pixels on the bottom layer but you are only painting yellow in that top layer, the top piece of paper.
Viewing and Ordering Layers
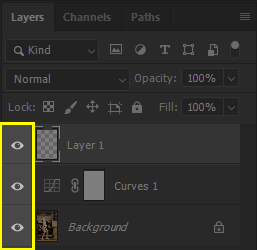
Notice that to the left of every layer in the Layers panel there is a little icon that looks like an eye. When the eye icon is there, Photoshop shows what is on that layer in the main view. If you click on that eye it will toggle viewing of the layer off. Hopefully you painted yellow on that top layer, so click the eye icon to the left of that layer and you should see what you painted go away on the main view. Click again where the eye icon used to be and the yellow paint on that layer comes back. No pixels from the original photo were harmed by your painting on the top layer.
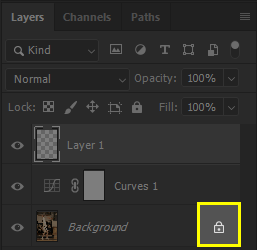
Should you decide that the order of the layers is not how you want, you can change them by simply dragging clicking and dragging the layer to where you want it to be. Though you will notice you can’t drag either of the layers above Background down below background right now. That is because that bottom layer has been locked into position, which is noted by the little lock icon to the far right of that layer. That same lock prevents the bottom Background layer from being moved up. If you click on the lock icon you will release the lock and now you can move the layers around as you need to accomplish your goal.
Layer Opacity and Blend Modes
Layer Masking that can help control how the layer is being applied to the layers below, and that will be covered in the next step. You should also learn about the Layer Opacity and Blend Modes.
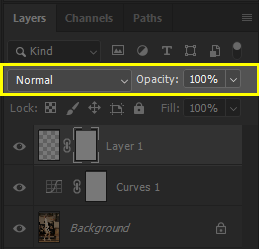
The opacity of the layer is set to 100% by default and you can find the control to change it in the upper right portion of the Layers panel. When opacity is set to 100% the pixels on the layer are going to 100% cover the pixels of the layers underneath. When opacity is set to 50% the pixels will be semi-transparent, showing the pixels on the layer with only about half the intensity. If opacity is set to 0% then the pixels on the layer won’t show up at all over the top of the pixels in the layers underneath.
Opacity is a really handy way to tone down an adjustment. If you make an adjustment and it seems a little too much, trying lowering the opacity of the layer to see if you can get the result you want. I like using this with sharpening in particular where I can sharpen a lot and then dial it back a little by making the sharpening layer less opaque.
The blend modes are in the drop down just to the left of the opacity. By default the blend mode is normal, which means the pixels on the layer are going to just replace the pixels on the layers underneath. If you drop down the blend modes you can see quite a list of different modes that will change that behavior. These blend modes give you different ways to have the pixels on the layer combine with the pixels underneath in interesting ways. We aren’t going to go through the blend modes here, go search on them to get more information.
Step 5: Layer Masking Basics
Now that you have an idea of how to use Layers, let’s talk about a slightly more advanced topic with Layers, Layer Masking.
Layer Thumbnails
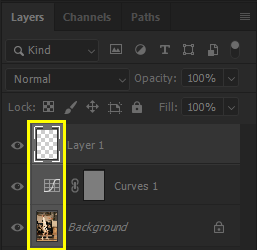
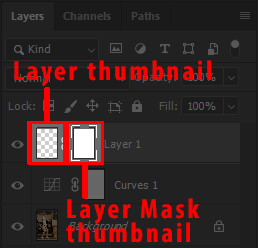
Notice that all three layers have a thumbnail to the right of the eye icon. The bottom “Background” layer shows a thumbnail of the photo you brought into Photoshop, the “Curves 1” layer has a Curves symbol, and the “Layer 1” layer has a checkerboard pattern.
This thumbnail shows you a view of the pixels that are on that layer. On the bottom layer you see your photo in the thumbnail because the pixels from your photo are on that layer – that piece of paper. Adjustment Layers don’t support painting pixels, so you get a symbol telling you what kind of adjustment layer it is. The top layer shows a checkerboard pattern because that is what Photoshop uses to indicate there are no pixels. If you painted yellow on that layer then that thumbnail should show some yellow where you painted and the checkerboard pattern everywhere else.
Layer Mask Thumbnails
Take a look at the “Curves 1” Adjustment Layer you added. There are a couple more symbols on that layer that aren’t the other two. To the right of the layer thumbnail is an icon that looks like a chain link. We aren’t going to worry about that here (go search for it and find out what it does!) because we want to get into the white box that is just to the right of it.
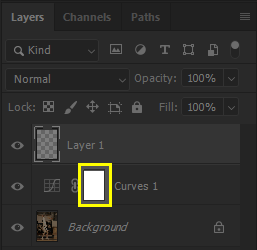
This white square is the Layer Mask thumbnail for the layer. When you create an Adjustment Layer Photoshop automatically adds a Layer Mask to that layer. It also defaults the Layer Mask to being fully white, which makes the Layer Mask do nothing. I know, that doesn’t help yet, so let’s walk through it.
Add a Layer Mask
First, let’s add a Layer Mask to the top layer. Photoshop did this for you with the Adjustment Layer but you need to know how to add them yourself. Select the “Layer 1” layer by clicking on it with your mouse and then click the little icon third from the left at the bottom of the Layers panel that looks like a rectangle with a whole in it ![]() or go to the Layer menu and choose Layer Mask > Reveal All.
or go to the Layer menu and choose Layer Mask > Reveal All.
This should add the chain link icon and a white rectangle to the “Layer 1” layer. Remember, that white rectangle is the Layer Mask thumbnail. The first rectangle on the left is the thumbnail for the layer, the one that just got added is the thumbnail for the Layer Mask.
Select a Layer Mask
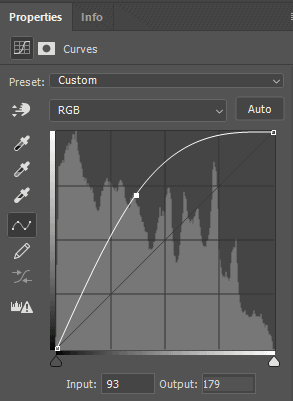
Let’s actually use our Layer Mask. Select the “Curves 1” layer by clicking on it. If you haven’t done it already, go make some kind of adjustment using the Curves tool in the Properties panel so that we can see the Adjustment Layer changing how the pixels look underneath it. Maybe click in the middle of the diagonal line and drag it up a ways, which should make all of your photo in the main view look quite a bit brighter. Notice how as you make the adjustment it is affecting ALL of the pixels in the photo. Let’s say you didn’t want to have it affect all of the photo, only a portion of it. This is where Layer Masks come in.
With the “Curves 1” layer selected the actions you take in Photoshop are only going to affect that layer, you are only working on that piece of paper, and not changing anything on the other layers. Notice that when you select the “Curves 1” layer the Layer Mask thumbnail (the white rectangle to the left of the layer name) has white highlights around the four corners. With those white highlights around the corners are on the Layer Mask thumbnail if you use any painting tools you are going to be affecting the Layer Mask for that layer. The difference will be easier to see with the standard layer labeled “Layer 1”.
Select the “Layer 1” layer and you should see those white highlights around the four corners of the layer thumbnail (the left rectangle). With the white highlights around the layer thumbnail anything you paint on the main screen will paint pixels on the layer. Now click on the Layer Mask thumbnail of the “Layer 1” layer (the right rectangle) so that the white highlights show up around the four corners. With the Layer Mask thumbnail selected if you do any painting you are painting on the Layer Mask and NOT affecting the pixels on the layer. Also notice that your color choices are only black and white while the Layer Mask thumbnail is selected on the layer.
See a Layer Mask
You can see the Layer Mask for your layer by Alt-click PC / Option-click Mac on the the Layer Mask thumbnail on the layer. If you haven’t made any changes to the Layer Mask when you do this, the main view in Photoshop will turn completely white. Photoshop is now showing you the Layer Mask for that layer. Everything white pixel on the Layer Mask tells Photoshop to apply that pixel of the layer to your image. Ever black pixel on the Layer Mask tells Photoshop to ignore that pixel on the layer and allow the pixels under it to show through unmodified. Even if there is a pixel (or adjustment) on your layer.
Let’s make this clearer by using the “Curves 1” Adjustment Layer again. If you are seeing only white in the main screen, go back to the normal view by Alt-click PC / Command-click Mac on the Layer Mask thumbnail again. Select the “Curves 1” layer by clicking on that layer (notice the white highlights are already around the four corners of the Layer Mask thumbnail because Adjustment Layers don’t let you pain pixels on the layer).
Use a Layer Mask

Select the Paint Brush tool (keyboard shortcut of b) and change the foreground color to black (keyboard shortcut is hitting the x key until you see a black rectangle in front of a white rectangle in the tools panel). You should see your photo in the main view in Photoshop and it has a crazy adjustment that made it really bright.
With the “Curves 1” layer selected and the Layer Mask thumbnail highlighted, paint black on the main area where your photo is being shown and you should see the adjustment defined by the Curves layer not be applied to the photo wherever you paint black. If you release the mouse button so that you aren’t painting, Photoshop will also update the Layer Mask thumbnail to show where it is you have painted black.
Again, if you want to see the Layer Mask itself, Alt-click PC / Option-click Mac on the Layer Mask thumbnail and the main area in Photoshop will now show you the Layer Mask for that layer.
Step 6: Touch Up Tools Basics
Photoshop offers some incredible tools to touch up photos. This is what the whole verb of “photoshopping” a photo really comes from.
Pro Tip: While you could use these tools on the layer where the pixels from your photo are at (“Background” in our example), that falls in the realm of destructive editing again and we recommend not doing that. Replicate the layer first (select the layer and then Ctrl-j PC / Command-j Mac).
Let’s go through the basics for a couple of touch up tools so that you can get familiar to them so that you can see how they can help you to accomplish goals with your photo.
Spot Healing Basics
Spot healing is the tool that looks like a band-aide with a dashed circle behind it ![]() . You use the spot healing tool on pixels in the main viewing area in Photoshop, so you need to make sure you have selected a layer that has pixels and that the layer thumbnail (left rectangle on the layer) is selected (remember the four white highlight lines around the corners of the layer thumbnail).
. You use the spot healing tool on pixels in the main viewing area in Photoshop, so you need to make sure you have selected a layer that has pixels and that the layer thumbnail (left rectangle on the layer) is selected (remember the four white highlight lines around the corners of the layer thumbnail).
After selecting the correct layer where you want to change the pixels of the layer to remove spots, select the spot healing tool from the tools panel and then move your mouse over into the main viewing area and your cursor should turn into a circle. If you only see cross-hairs and not a circle for your mouse cursor you need to increase the size of the circle. You can do this using brush properties in the upper left, but I find it simpler to use the brush sizing keyboard shortcuts of [ to make the circle smaller and ] to make the circle larger (these keyboard shortcuts work for changing the size of all brushes in Photoshop).
In general you want to make the size of the circle just barely larger than the thing you want Photoshop to “heal” in your photo. If it is acne on a person, size it so that it is just barely larger than the pimple. If it is trash on the ground, just barely larger than the trash. Then you cover the thing you want to heal and single click the mouse to have Photoshop use the content aware technology to analyze all of the pixels surrounding the circle and replace the pixels inside the circle with pixels that fit in.
The Photoshop content aware technology is improving all the time and usually does a pretty amazing job healing the pixels inside the circle, but it isn’t perfect. If you don’t like the job it did after one click, try clicking it again to see if the second time it did better.
If the spot you want to heal in your photo is really large, like say an entire person or some other large object, you can click and drag the circle to kind of paint over the entire object and when you release the mouse Photoshop will do it’s best to try and heal that object right out of the scene. You are asking quite a lot more of Photoshop when doing this and there is a much higher chance you won’t like the result. There are other tools, like Content Aware Fill, that have more options and are better suited for this kind of a task, but we aren’t going to go into that tool in this post.
Clone Stamp Tool Basics
If the spot healing tool fails to clean up the spot in the photo, the clone stamp tool is another good option to try and remove an object in your photo by replacing the pixels. With spot healing Photoshop takes a look at the pixels in your photo and takes a guess on what to do with the pixels inside the circle. With clone stamp you are going to do that work.
The clone stamp tool looks like one of those rubber stamp tools that you use with an ink pad to stamp ink on a paper ![]() . You use the tool in a really similar way to the spot healing tool where after selecting the tool when you move your mouse over the main viewing area in Photoshop you have a circle for your mouse cursor. The difference is you can’t just put that circle over the spot where you want Photoshop to replace the pixels. First you have to tell Photoshop from where in the photo it should copy pixels through something called “sampling”.
. You use the tool in a really similar way to the spot healing tool where after selecting the tool when you move your mouse over the main viewing area in Photoshop you have a circle for your mouse cursor. The difference is you can’t just put that circle over the spot where you want Photoshop to replace the pixels. First you have to tell Photoshop from where in the photo it should copy pixels through something called “sampling”.
Sampling with the clone stamp tool tells Photoshop from where it should copy pixels. You “sample” by putting the circle over the location where you want to copy pixels from and then Alt-click PC / Option-click Mac. Let me repeat that a little, you sample from an area in the photo where you like the pixels and you want those pixels to cover up the pixels you don’t like. As soon as you hold down the Alt or Option keys the mouse cursor changes to something that looks like a gun scope and wherever you click becomes a “sample point”, the point in the photo where Photoshop is going to copy pixels.
Release the mouse button and the Alt / Option key and the cursor becomes a circle again. Now position the circle over the top of the problem area you want to clone out and click the mouse. Photoshop will copy the pixels from the sample point you provided and paste them into the spot where you just clicked. If you click and drag the circle you can see that Photoshop will follow your mouse movements and move the sample point the same way, continuously copying the pixels from the sample area and replacing the pixels under the circle.
The clone stamp tool works really well in areas of a photo where there are repeating patterns like with grasses, bushes, trees, and sky. Perfect for cloning out garbage on the ground for example (though spot healing will probably do that well too).
Step 7: Give Yourself Time!
If you got here and still feel like you would have a hard time accomplishing any goal in Photoshop, you are not alone! Don’t be too hard on yourself. Think back to how long it took for you to understand how to get good exposure with your camera. It didn’t happen in a couple of hours. You didn’t read one post about the topic and become an expert. Learning anything takes time. For some it may click in fairly quickly, for others it takes longer.
Everyone starts out this way. NOBODY sits down in front of Photoshop and immediately knows exactly what to do. Stay with it. Keep trying. Follow the steps in this post, bookmark it if needed so that it can guide you through the process a few times. Experiment! Experiment! Experiment! Nobody will care if you hurt some pixels on your Photoshop layer. Delete the layer and try again. If it feels just too messed up then close down Photoshop without saving anything and start it from the top again.
Additional Resources
Thanks so much to Aaron Nace who joined me on this podcast episode and post. Aaron does a tremendous job of teaching Photoshop over at phlearn.com. He has a seriously good Beginner’s Guide to Photoshop that I can highly recommend. If you need help with Lightroom you can also check out his Beginner’s Guide to Lightroom course. You can buy either course for 20% off using coupon code “Taco20”!
Bonus Q&A
Question: What are the most important points to commit to memory and then build on from there. I find I learn something and then forget it again quite easily?
Answer: All of us have been there. There were so many times when we were learning Photoshop that we did something we really liked and then forgot how we did it the next time we wanted to do the same thing. The steps in this post is where you should start and should really get all of that committed to memory. Repeat these steps over and over until they are. Then learn selections, that will ramp up your Photoshop game tremendously. Learn keyboard shortcuts! Save your images out to the .psd or .tiff format so that the layers you used will be preserved in the file and you can go back and check out what you did later. Also, remember that there isn’t a “right” way to do something in Photoshop. There is always another way to do things.
Question: Are there certain tools that pretty much every photo can use? Or is there some easy to use tools that someone can start with, then progress to more complex tools and techniques?
Answer: Object removal is HUGE. We want to steer the viewer to our subject and removing distracting things improves a photo so much. Better to do that in camera, like get the garbage off the ground, but it happens to all of us that we didn’t notice something while shooting and need to take care of it in post. People will look at the brightest part of an image first as well, so using Photoshop to make the main subject in the photo the brightest thing can really help improve it. Layer masking is also huge here for controlling the brightness in the photo on the subject where you want to draw the eye.
Question: What are the steps you take in Lightroom before bringing it into Photoshop? Is any sharpening or noise reduction done before or is Photoshop the best place for that? Also what are the last steps before exporting a picture from Photoshop?
Answer: Deal with any exposure issues and white balance in Lightroom for sure. Broad lightening and darkening too, like wanting to darken the sky of a landscape a little. It is a tool designed to make those kinds of adjustments really easy and no reason to go into Photoshop to do those kinds of basic adjusments. Make lens corrections in Lightroom too. Sharpening should be the last step in Photoshop, just before exporting. Sharpen according to the output because sharpening doesn’t look the same for every kind of output. Export a JPEG version of the image (check out Exports For Printing, Ps JPEG Exports, and JPEG Compression Levels posts on this site) and save the file in a format that supports layers (.psd or .tiff). Too many times we have thought that we were done and really happy with a photo only to see it layer and see that there were some problems. If you only have the JPEG, you will be starting over.
Question: How and when to flatten or merge layers/groups?
Answer: The advantage of merging layers together is to save file size. Every layer you have will make the .psd or .tiff file you save a little larger. If you are one who has to save file size, like a photographer working from a laptop with very limited storage space, you may want to consider merging some layers together. If that is you, then merge similar layers together or where you are 100% sure you nailed things with a few layers. Never merge ALL of your layers together. At that point you may as well only have the JPEG of the image. Leave you background layer in tact and then you can consider merging a few layers together above it that are similar to each other.
Question: What are some basic tips or explanations about resizing, and/or prepping to print as compared to exporting from Lr. Do you sharpen again in Ps if you did already in Lr?
Answer: Aaron doesn’t really like sharpening in Lightroom and recommends doing that in Photoshop. It needs to be done at the output resolution by sizing the image to the resolution you are going to export and zoom 1:1 into the photo to judge the sharpening. You can go a lot harder on the sharpening for the web because the images are a lot smaller and you usually need to back it off quite a bit for printing where you have to have much high resolution files. Printing is a topic all its own. There is so much to it. We recommend finding a good print lab to partner up with and calling them to ask questions about things. It is a good test to see how their customer service is anyway in how they respond to you.
Question: I know there’s many types of blur filters in Photoshop but I have no idea what each of them do specifically. What are they and what are they used for?
Answer: There are a few blurs to recommend starting off with. If you want to replicate lens blur then you want the Lens Blur filter. Not perfect, better to get it optically in camera, but can do a pretty good job if you need it. Also check out a few of the blurs in the Blur Gallery (a newer feature in Photoshop). One of them is called Field Blur will allow you to blur different parts of the photo at different amounts. You can use Field Blur to add a blur to the edges of the photos and keep your subjects face perfectly sharp. For a general blur, use Gaussian Blur, but this is for something more like trying to blur a light to make it look like the sun. Have a goal first, then go search about the blur filters so that you can pick the right one to meet your goal.
Question: Why promote full Ps when most can get by with Elements, what’s wrong with Elements?
Answer: Nothing is wrong with Photoshop Elements, it is a little simpler interface to work with and supports a subset of features of full Photoshop. Most photographers want the features that are in the full version of Photoshop and with the Photographer’s plan from Adobe you can get both Lightroom and Photoshop for $10/mo. A few years ago the full version of Photoshop was expensive enough some photographers would see if they could get by with Photoshop Express and found they could do quite a lot with it. Today it isn’t very expensive so you may as well go with the full version and have all of the features.
Podcast: Download (Duration: 1:08:46 — 47.5MB) | Embed
Comments
I have a fairly quick SSD (M2) as my main hard drive that I install my programs/OS on and a 4TB drive I use for storage. I’ve noticed significantly faster speeds when I import in lightroom to the SSD instead of the storage drive. Is there a particular flow or setting that will allow me to import to the SSD, make my edits, than migrate to the storage drive? or do I need to do that all manually once I’m done editing?
Thanks!
@Andre, this is exactly what I do:
1) copy images from memory card to SSD on the computer using Finder on Mac or Explorer on Windows (not Lightroom)
2) import photos from SSD into Lr
3) do all my edits and exports
4) close Lightroom
5) move photos from SSD to slower and less expensive storage
6) open Lr and right click on the folder that now says the photos are missing and update the location to where I moved them.
Hi Jeff,
I really enjoyed the Photoshop discussion with Aaron. In the podcast your talked about printing and leaving it to the professionals to deal with profiles, sizing and sharpening. Can you possibly recommend a decent print service that provides this? I’ve thought about getting into printing on my own, but it sounds laborious.
Thank you for your time in advance!
Cheers,
Chris