Canon offers two ICC profiles specific to the printer for each type of paper. One has “1/2” in the name and the other has “3” in the name. The print quality setting you choose as you print determines which you should use. Use the “3” profile when the print quality is set to “Standard”. For all other print quality settings use the “1/2” profile.
What Does Changing the Print Quality of a Canon Printer Do?
The obvious answer is the right one. Choosing a print quality of “Standard” will print faster, use less ink, and lack some detail. The “High” print quality will print slower, use more ink, but has the most detail possible.
The non-obvious part of the answer is a little complicated but has to do with getting the very best results when printing photos. To understand that you have to understand the print quality scale.
The Canon “Print Quality” Scale
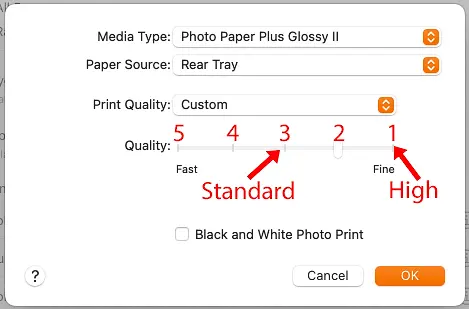
Even if you are experienced printing with Canon printers, it is very likely you have never seen or known about the print quality scale. You can see the scale illustrated in the printer driver if you choose a quality setting of “Custom”. The Canon printer driver for my PIXMA Pro-100 printer has a scale from Fast on the left to Fine on the right. The scale shown in the Canon printer driver for your Canon printer may look different from the image above, but they all use the same number scale behind the scenes.
The far left has a print quality value of 5 while the far right has a print quality value of 1. “Standard” (instead of “Custom”) corresponds to a print quality value of 3. “High” as a print quality corresponds to a print quality value of 1.
These numbers are important if you have software manage the ICC profile that will be used as you print. With Canon ICC profiles you have to make sure it matches the print quality you are using.
Matching Canon ICC Profiles to Print Quality
Honestly, most photographers shouldn’t care about the ICC profile being applied as they print. At least not when printing using everything Canon. Canon printer, Canon paper, Canon ink. Choose a profile of “Managed by printer” in Lightroom or Photoshop and the Canon printer driver will automatically apply the correct ICC profile based on the choices you make in the Canon printer driver. Easy peasy.
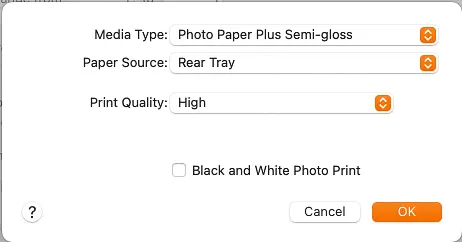
As illustrated in the image above, when you set the media type as “Photo Paper Plus Semi-Gloss” and print quality as “High” the Canon printer driver will automatically apply the correct “SG1” ICC profile and you don’t ever have to worry about what that “SG1” profile means.
This approach is foolproof. It is simple and produces beautiful prints, especially if you use a calibrated display to edit your photos. This is how I recommend most photographers print their photos if they use everything Canon (printer, paper, ink).
ICC Profiles For Non-Canon Paper
If you use non-Canon paper things get a little more complicated, but you don’t have to worry about the somewhat confusing Canon ICC profile names. For the best results you can’t use “Manged by Printer” with non-Canon paper in a Canon printer. You have install and use an ICC profile from your paper manufacturer. Fortunately, the naming of that profile is likely more obvious than how Canon has named their ICC profiles.
You will also need to find out from your manufacturer which Canon media type you should use in the Canon printer driver. While there is a way to add a media type to some Canon printer drivers, it isn’t available for all Canon printers and is pretty complicated. Not worth the hassle. Instead, most paper manufacturers will provide the ICC profile for their paper in your specific Canon printer and tell you which of the Canon media types to choose in the Canon printer driver.
I know, ICC profile and media type. Set in two different places. This can be a little confusing. Let’s go over a more specific example. Let’s say you are printing on “UltraPro Satin 4.0” paper from Red River. Hear are the basic steps to getting the best possible results printing on a Canon printer.
- Download and install the ICC profile for that paper specific to your printer. Red River provides great instructions and makes this pretty easy. If you can’t find an ICC profile from your paper manufacturer, might be time to find a new manufacturer.
- With the Red River ICC Profile installed, you have to choose that ICC profile in Lightroom or Photoshop. In Lightroom you go to the Print module and in lower right “Color Management” panel you will see “Profile”. Click on the double arrow there and choose the ICC profile from you paper manufacturer. If you don’t see it listed, choose “Other” and you should be shown a list of every ICC profile installed on your computer.
- Choose the media type in the Canon printer driver. As stated above, it is possible but not easy to get a media type defined in the Canon printer driver for your non-Canon paper. Instead of doing that, your paper manufacturer should tell you which Canon media type to choose in the Canon printer driver. In my case, with the UltraPro Satin 4.0 paper from Red River they told me to choose the “Photo Paper Plus Semi-gloss” media type. In Lightroom you do this by hitting the Printer button in the lower right of the Print module and then going into the “Media and Quality” portion.
Boom, beautiful print.
Unless you hit the bug that only seems to happen on Mac for the Pro-100. I have had it happen to me numerous times now. There seems to be an ICC profile issue of some kind and it produces prints with a green tint. I haven’t figured out what causes the issue, but the fix seems to be deleting and re-installing the printer in MacOS. Doesn’t happen on Windows and doesn’t happen if you don’t print from Adobe software. Adobe and Apple point at each other on the issue. I hope to figure that out someday. Or maybe I’ll upgrade to the PIXMA Pro-200 next time it is on one of their crazy sales.
Choosing the Right Canon ICC Profile
Again, I recommend most photographers don’t worry about choosing a Canon ICC profile in software for printing. If you are using Canon everything just make it easy on yourself and have the printer manage the colors so that it happens automatically. But to be complete, here is how to figure out which Canon ICC profile you should choose if you want to do that in your software and not have the printer manage it.
Let’s break down the naming convention Canon uses for their ICC profiles. Here are 2 of the 22 ICC profile names shown in Lightroom and Photoshop that were installed on my computer when I installed the Canon print driver for my Canon PIXMA Pro-100 printer:
- Canon PRO-100 <SG> 1/2 Photo Paper Plus Semi-Gloss
- Canon PRO-100 <SG> 3 Photo Paper Plus Semi-Gloss
Super confusing right off the bat. You bought Canon paper that is labeled “Photo Paper Plus Semi-Gloss” yet there are two ICC profiles with that in their name. The only difference between them is the “1/2” in one and “3” in the other. Turns it it gets a bit more confusing. Those are slightly friendlier names than what the ICC profile files stored on the hard drive of your computer are actually named. Here are the filenames corresponding to the two ICC profiles above:
- Canon PRO-100 series SG1.icc
- Canon PRO-100 series SG3.icc
I went into that detail because Canon documentation is pretty thin on how to understand either of these names, but they do provide a little help on the filename.
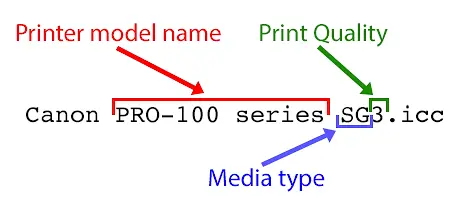
The Canon ICC profiles all start with “Canon” of course. Next comes the printer model name. For me that is “PRO-100 series” which is short for the Canon PIXMA Pro-100 I use. Next a 2-3 character code for the media type, or the type of paper. More on that in a moment. Finally there is a number that stands for the print quality you choose in your printer driver.
You can break down the slightly friendlier name that is shown in Lightroom and Photoshop in a similar way. All of them start with “Canon”, then the printer model name, followed by the 2-3 character code for media type. Then comes a number, or a couple of numbers that represent the print quality, followed by a friendly name for the media type.
You choose the Canon ICC profile based on the print quality you select in the Canon printer driver. Use the Canon ICC profile that has “1/2” in the name if you use a “Custom” print quality setting of 1 or 2 in the Canon printer driver. This is also the right choice if your print quality is set to “High”. If you are willing to sacrifice a little quality of the print so that you can print faster and use less ink, then you choose the ICC profile with “3” in it and set the “Custom” print quality to 3 or choose “Standard” in the Canon printer driver.
Comments
The main difference between the Canon 1/2 and 3 ICC printing is the level of color accuracy and vibrancy, with the 3 ICC printing providing a better overall print quality.