
The details of how I created a picture of a full moon that includes a foreground and looks more like a sunrise than a moonrise
The Creative Vision
Your chances of creating a good photo increase dramatically when you start out your shoot with a creative vision. Having a good idea of the image you want to create and then using the tools available to you just like a painter or a sculptor improves your chances of creating a compelling image.
You have tools like your camera, lighting, the exposure triangle, composition, timing, and post processing to help you make that picture and realize your creative vision. See them more like a painter sees his paints.
I will be the first to admit that I don’t always go into a shoot with a creative vision. Sometimes that creative vision doesn’t come until I am in the shoot and an idea will come of something unique and different to try. Sometimes it doesn’t come at all and in those cases I usually come away from the shoot with good but not amazing shots.
With this Fire Full Moon shot it was kind of a mixture of getting a creative vision during the shoot and before the shoot. You will understand as I get into the details and the thought processes that led up to the final image.
More Than Shooting The Moon
Shooting the moon is challenging. It is a really good exercise to test your skills and your equipment. I highly recommend any photographer who hasn’t given that a try to do so, even if you aren’t a landscape photographer.
However, I have been doing photography long enough shooting the moon alone is no longer something that gets me excited. I get really exited at the prospect of teaching others what it takes to shoot the moon but unless I got my hands on some new gear like a much longer lens (a focal length that is much bigger than 200mm) I have had my fill of creating photos of just the moon.
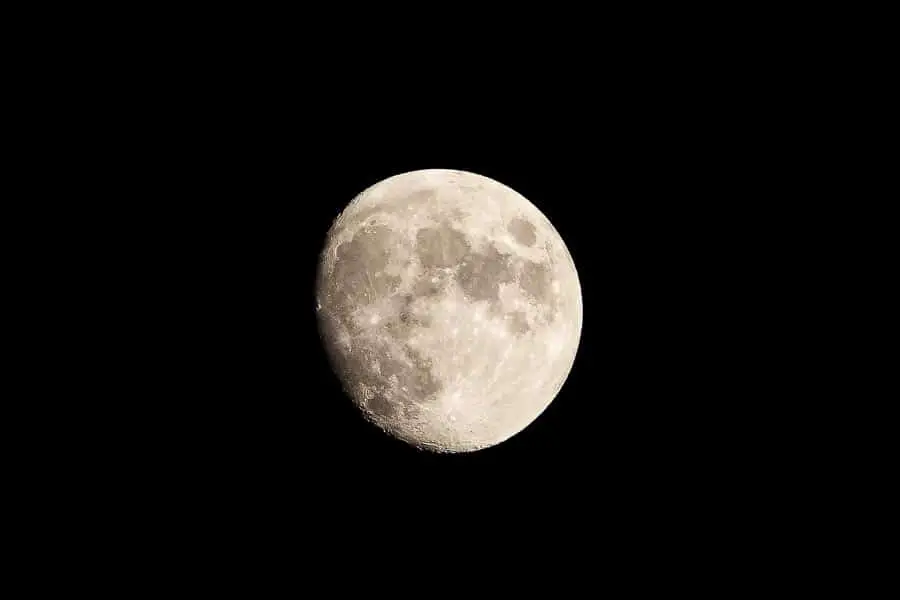
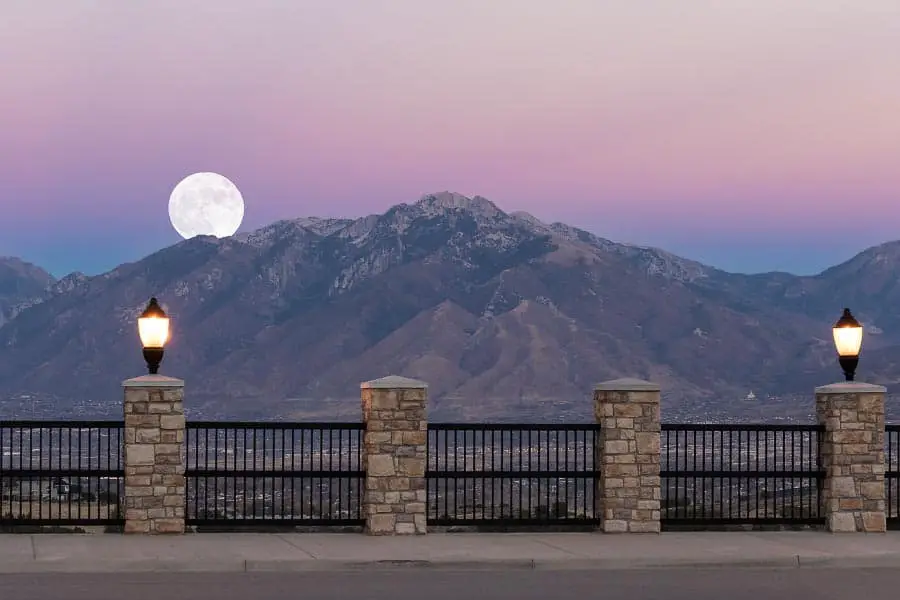
When a neighbor texted me and said the moon looked really cool one night and suggested I should go get a shot, I didn’t expect I was really going to care. Don’t get me wrong, I love that my neighbors know I love to get out and there and create images when mother nature puts on a show, so I am really glad they let me know when that is happening. It’s just that these days the moon shots that get me excited are those where I can include a foreground element. Something like this composite from a few years ago.
I knew the moon had risen quite a while before I got the text and my chances of getting a good shot with the moon and some kind of a foreground were pretty small.
I am so glad I took a look!
Fire Full Moon – First Attempt
The moon did indeed look really different here in Utah in early August 2020. Not because it was a super moon, I have had my fill of those as well (they really aren’t all that different from a regular full moon).
Utah has had non-stop forest fires for more than 4 months and the air is filled with smoke. It gives the moon an orange color, which I have seen before, but I found that this time all of that smoke added something even more important to make these shots of the moon different.
The smoke filled air makes the moonrise look more like a sunrise!
Problems
By the time I got out to take a shot that first evening, I discovered I had three problems.
- Timing. The moon had risen so far above the horizon it was going to be hard to create a nice composition with the moon and a foreground.
- Dynamic Range. The evening light had already moved well beyond the best time to take shots of the moon at Civil twilight (blue hour) and Nautical twilight. I was taking photos well into the Astronomical twilight and the dynamic range (the difference between the brightness of the full moon and the darkness of the foreground) made it impossible to create the picture I wanted in a single shot.
- Focus. It was dark enough autofocus didn’t work very well for the foreground, the camera did a lot of slow hunting if I focused on the hills around me lit only by the moon.
As I looked out at the scene I was actually surprised that the first problem wasn’t as bad as I had expected. I could still get the moon and a decent amount of a foreground in a landscape oriented shot.
However, that moon was moving fast, so I needed to decide on my exposure settings very quickly. I’ll describe how I solved the other two problems as I walk through my thought process on the exposure settings.
Exposure Settings Thought Process – Aperture
I always start my thought process for an exposure with what my aperture setting is going to be. This is a landscape shot and my goal with all landscape pictures is to have everything in the scene in sharp focus. It is easier to do that shooting on a crop sensor (or micro 4/3 sensor) over a full frame sensor where I can use a more open aperture and still get hyperfocal distance focus.
NOTE: Check out this article on hyperfocal distance focus to learn more about what it means and how you can use it.
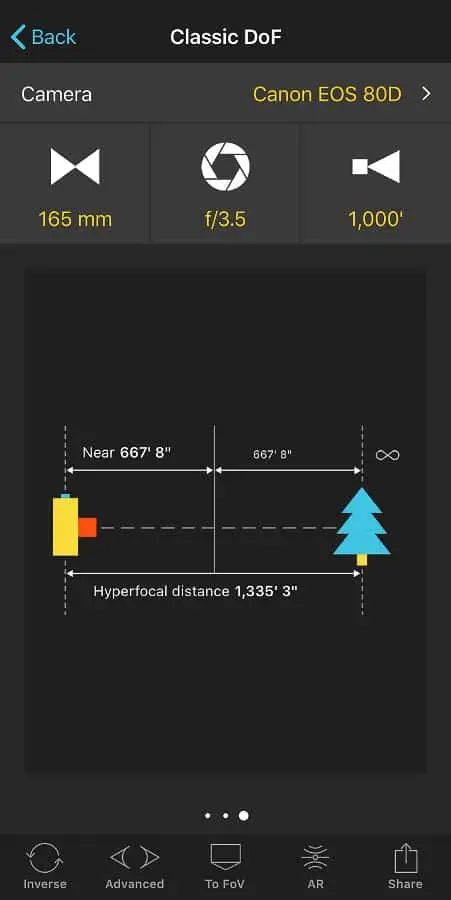
Experience shooting my camera (Canon 80D) with a long lens (Tamron SP 70-200 F/2.8 Di VC USD G2 A025) had taught me that I could get hyperfocal distance focus of the hills and the moon I wanted in the shot at an aperture of 8.0 without a problem.
I didn’t do it at the time, I needed to decide on my settings in seconds and start shooting, but looking it up now Photo Pills tells me that I get hyperfocal distance focus using the Canon 80D at 165mm and an aperture of f/8.0 when the subject I focus on is about 600 feet away.

Meaning if I set focus at about 600 feet from the camera everything behind that in the scene would be in focus and everything about 300 feet in front of that would also be in focus
The hills in my shot are much further than 600 feet away from me, so a stopped down aperture of 8.0 would definitely give me the focus I want. The problem with a stopped down aperture for this scene is that the moon is moving pretty fast and I had to make sure it wouldn’t start to trail across the sky by having a shutter speed that was too slow.
I hadn’t looked at it yet, but I was guessing that I couldn’t use a shutter speed much slower than 1 second and I didn’t want to have to crank up my ISO. I decided I would take a risk that opening up the aperture to f/3.5 would give me enough depth of field to have everything in focus.
Looking up the actual numbers in the PhotoPills app now, here is hyperfocal distance with the same gear and an aperture of f/3.5.
This tells me that if I focus on something that is about 1,300 feet away from me everything in the scene behind that focus point (like the moon) would be in acceptably sharp focus and everything 600 feet in front of that focus point would be in focus.
Again, the hills in my scene were further away than that, so it is good to see after the fact that the numbers work out to support the decision I made on aperture. A decision I made in less than 5 seconds.
Exposure Settings Thought Process – Shutter Speed
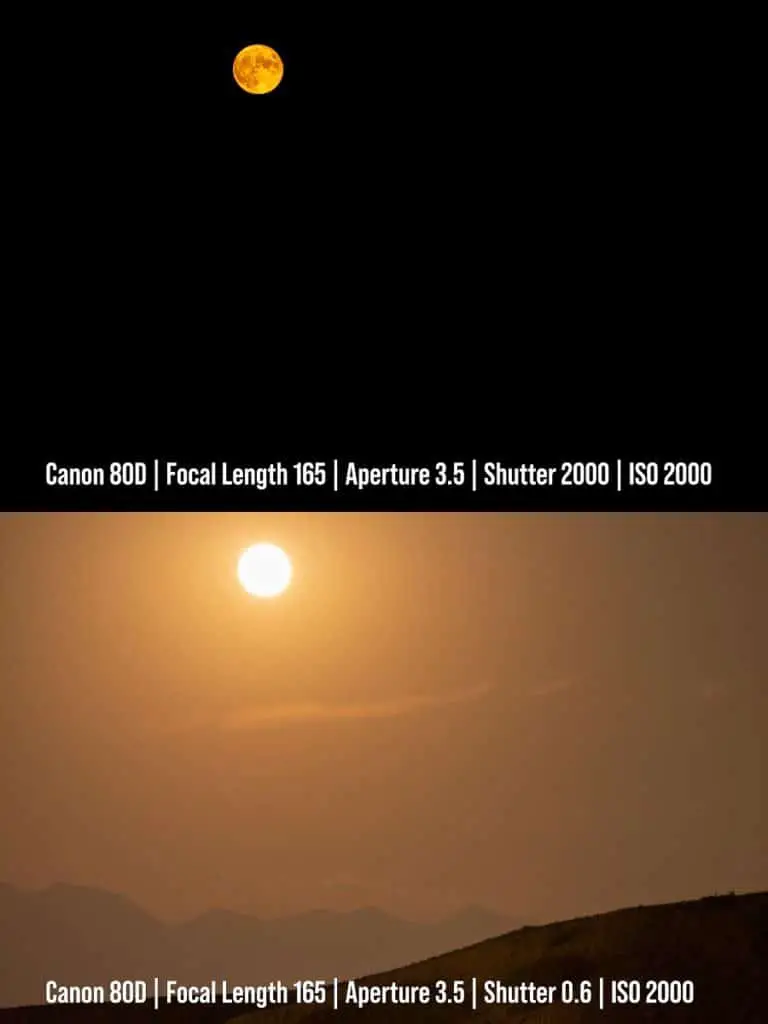
For shutter speed my main concern was having it fast enough to freeze the moon in place. I also had to think through my second problem at this point. I thought I could get everything in the scene in focus in a single shot, but I was pretty sure that I couldn’t capture details of the moon and the foreground in a single shot.
To be safe, I planned to take two shots at different shutter speeds and then blend them together on the computer using Photoshop. What shutter speeds should I use?
I had the camera on a good tripod, which allowed me to use as long a shutter speed as I wanted without worrying about camera shake. However, I also knew I couldn’t take a 30 second long exposure of the foreground.
The moon is full and bright. A shutter speed of 30 seconds would have made the scene look like day rather than night and would have the moon sort of streaking across the sky in a huge bright ball of light.
I figured I needed to get the foreground exposure first and then quickly change to a faster shutter speed to get my shot of the moon. I needed to know the longest exposure I could take of the moon and have it frozen in motion.
I opened up the Photo Pills app on my phone in the moment (not after the fact this time) to help me decide on my shutter speed for the foreground exposure.

This was the Spot Stars pill. No, it isn’t specific to the moon, but I thought I could get a good idea about what the slowest my shutter speed should be based on the information here.
I told the pill I was using the Canon 80D, a focal length of 165mm, an aperture of 3.5, and the worst possible case on the declination of 0 degrees (starts at the equator that move the fastest). The NPF rule then says that the slowest shutter speed I could use to freeze stars is 1.55 seconds.
The moon is really different from stars, so I thought I would try cutting the shutter speed in half as a starting point and decided on 0.6s for my shot of the foreground.
Exposure Settings Thought Process – ISO
The scene is so dark I knew that I wouldn’t be shooting with an ISO of 100. I had my camera set to spot metering mode (my camera is always in spot metering mode) so I decided to use that to get a starting point for the ISO.
I put the center of the frame (Canon cameras ALWAYS meter from the middle of the frame) on the sky near the moon. The light meter in the camera told me I would have a good exposure with an ISO value of 2,000.
I also took this moment to address the third problem I saw as I was framing up this shot. It is dark enough the autofocus system of the Canon 80D wasn’t working when I tried to focus on the hill. While I was metering for the sky, I also took a moment to use the moon to get focus using the moon, which it did very easily given the huge contrast difference between the bright moon and the dark sky.
An ISO value of 2,000 was higher than I wanted, and I trust the internal light meter of the camera less as my exposure get close to or over one second, but time is ticking as that moon climbs into the sky, so I decided to take a test shot and adjust.
I was surprised. The test shot actually looked good! It still looked like night time and the smoke made the scene look more like a sunrise than a moonrise! Very cool! That is not how it looked to the naked eye and my excitement level to create an image rose significantly!
In this case my test shot turned out to be the final shot for the foreground, now to hurry and figure out what I should use for the shutter speed for the moon.
Exposure Settings Thought Process – Shutter Speed For Moon
Now I needed my shot of the moon with full detail, which I knew meant I needed a faster shutter speed. Not knowing what that shutter speed should be, and wanting to give myself some choices really quickly, I enabled the bracketing feature on the camera. I set it up to take 3 shots 3 stops apart so that I could choose the one I liked the best to composite into the foreground shot.
I put the center of the frame right on the moon and increased the shutter speed until the light meter in the camera read 0 on exposure. It was at 1/250 of a second. I took my three frames and when I reviewed them on the back of the camera it looked like I had at least 2 good options.
Later, when I got things on the computer I liked that shot of the moon best with a shutter speed of 1/2000.
Post Processing
I did some adjustments in Lightroom Classic to both shots before bringing them into Photoshop to blend them. Here are the minor adjustments I made to the moon photo to bring out the most detail in the moon:
- Basic Panel: Contrast -17, Whites +14, Blacks -100, Texture +37, Clarity +17
- Detail Panel: Sharpening Amount 42, Radius 0.5, Detail 100, Masking 36. Noise Reduction Luminance 29, Detail 100, Contrast 50
Here are the minor adjustments I made to the foreground photo to make sure it still looked like night time and limit the highlights around the moon to the most defined circle I could instead of being a big ball of light:
- Basic Panel: Highlights -77, Shadows +24, Whites -100, Blacks +12
- Detail Panel: Sharpening Amount 76, Radius 0.5, Detail 100, Masking 0. Noise Reduction Luminance 46, Detail 100, Contrast 50
I selected both photos in Lightroom Classic and then right clicked and chose Edit In > Open as Layers in Photoshop (the most current version of Photosohp as of this article v21.2.1 has a bug on Mac where Open as Layers in Photoshop opens up the images in separate documents and doesn’t get them as layers in the same document). With both images in Photoshop, here is how I blended the images:
- I made sure the moon photo layer was on top of foreground layer
- I used the quick selection tool to select the moon and then the Select and Mask workspace to refine that selection a little
- I copied the selection of the moon to it’s own layer so that I could move it and position it exactly where I wanted it to be. The moon had moved a little in the 30 seconds it took me to take the foreground shot and then the moon shot.
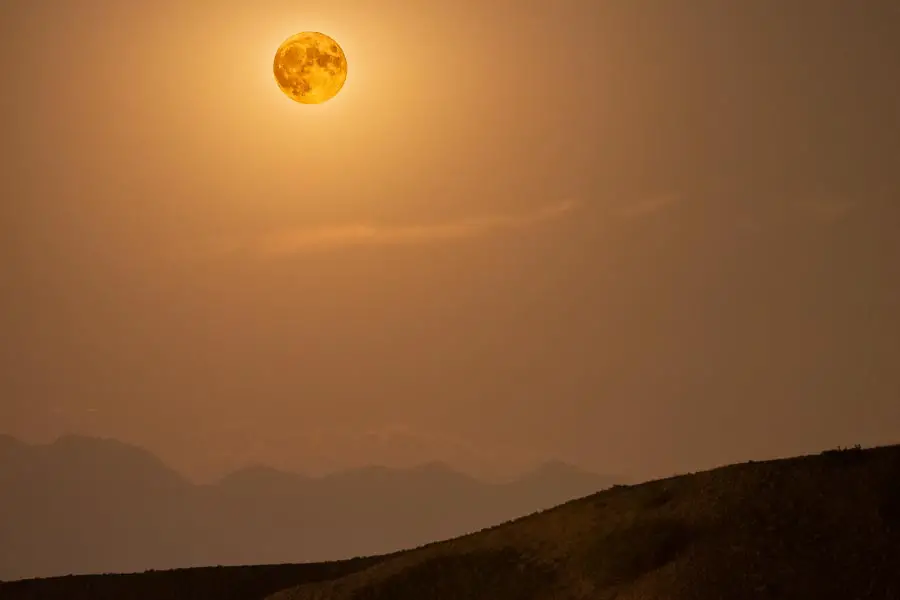
I have the two images aligned well and the edges look good, but the moon is far too detailed and dark here. It looks silly. That moon could never have been the source of light for the sky.
I needed to make an adjustment to the moon layer to make it brighter and match the scene better. I added a Levels adjustment layer to the moon layer and lower both the white point and the mid point to make the moon look more like I wanted.
Final Image – First Attempt
Fire Full Moon – Second Attempt
I was pretty happy with my first attempt. It took me a total of 9 minutes from getting the text from my neighbor to taking the two shots that I would blend together in Photoshop for the final image. However, there were two things I thought would make the shot stronger.
- Composition. The composition is pretty weak. The moon is too high in the sky. I wanted the foreground to play a larger role in framing the image and for that to happen the moon needs to be closer to the horizon. I could move the moon in Photoshop wherever I want it, something trivially done when there isn’t smoke in the air. In this case though, replicating the effect of the moonlight reflecting off the smoke is something I really wanted to capture naturally.
- Focus. Using an aperture of f/3.5 and then focusing on the moon meant I didn’t get the foreground in focus that was acceptably sharp to me. It wasn’t terrible, but if I was to try again I wanted to do a better job with focus.
I discovered later that I made a third mistake with the first attempt which I will cover later as I walk through the process of the second attempt.
Planning
The beautiful thing about shooting the moon is that if you miss something one night, you don’t have to wait very long to give it another shot. Well, most of the time that is true. If you want to truly have a completely full moon you have to wait a month.
This shot should be very close to the same the next night. I was fortunate in that my evening the next night during the hours of the moonrise were open. I knew I could plan to fix my first problem and set myself up with a stronger composition.
During my lunch break from my day job the next day, I used the PhotoPills app to find where the moon would be rising and what time I needed to be in position to create the image I now had a vision of in my head. More on how I used Photo Pills below.
This is why I said this shot was kind of a combination of getting a creative vision while doing a shoot and having one going into a shoot. I thought how much better the composition would be if I could have the moon just coming over the Rocky Mountains during my first attempt and now I could plan to make that happen the next night in my second attempt.
Different Camera Settings
Learning from the experience the prior night, I knew the moon was still going to rise into a very dark sky of a Astronomical twilight. Like my first attempt my approach for the second attempt still had to be a two exposure composite. One exposure for the moon and another for the foreground that I would blend together in Adobe Photoshop.
I liked the way I used shutter speed to quickly move from the foreground to the moon in my first attempt, but there were a few things I wanted to change. I didn’t like the depth of field I got from an aperture of 3.5 nor the noise in the image from shooting at ISO 2,000. I decided I wanted to stop down to f/8.0 in the second attempt and see if I could get away with a longer shutter speed for the foreground shot so that I could lower the ISO.
I also wanted to give myself more options as I went to blend the images on the computer, so I decided to use 3 shot 3 stop bracketing for both shots. This wouldn’t take a ton of time as the Canon 80D could take the three shots for me in the amount of time it takes for the shutter speed of all three shots to complete. Then I could choose whichever I liked the best for both the foreground and the moon.
Timing
It is incredibly easy to get a moorise time for your local area by opening up the Moon pill in the PhotoPills app and going to the right day.
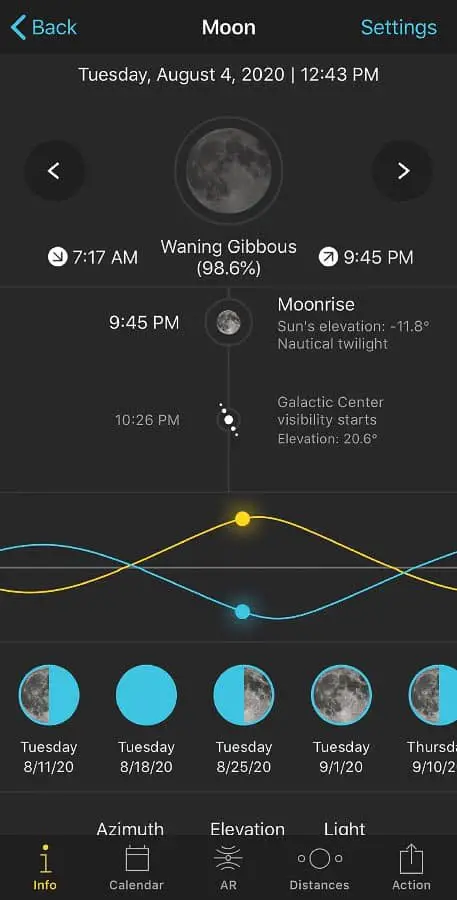
However, that Moon pill does not account for obstacles that may hide the moonrise. An obstacle like say a 10,000 foot mountain. To account for that you use the Planner pill and setup an obstacle pin so that you can get the degrees of elevation offset from your location pin (red pin) to the obstacle pin (black pin)
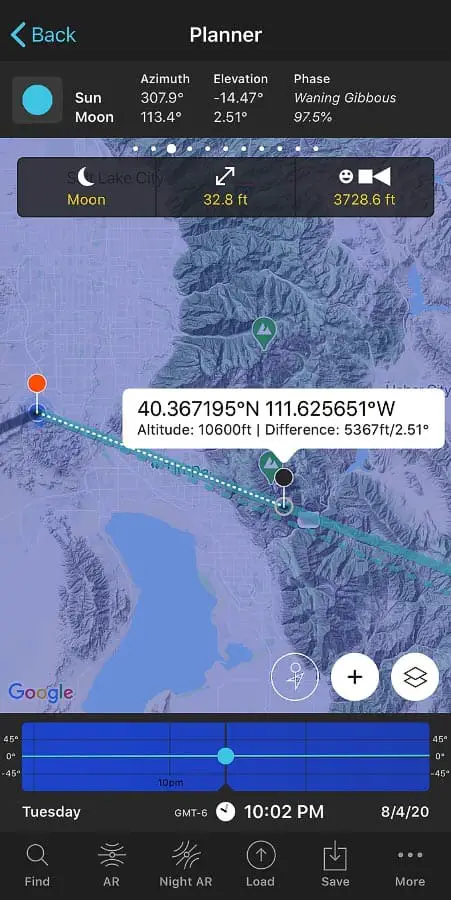
The obstacle pin tells me that there is an altitude difference from my location where I was going to shoot to the top of the mountain was 5,367 feet. More importantly, there is a 2.51 degree difference. Moving the time forward until the moon position was to be 2.51 degrees into the moonrise, PhotoPills predicted the moon should begin peeking over the Rocky Mountains at about 10:02PM.
PhotoPills is a great app that really helps me know where and when I should be to a place, but I decided I wanted to be in position to take the shots 30 minutes before the moon would rise over the mountain just to be safe. I had the time that evening and it meant I would be there for Nautical twilight where there should be enough light I could set focus on the hill before it got too dark for autofocus function correctly.
Convinced my plan would fixed both of the things I wanted to address from the first attempt, I set an alarm on my phone for when I needed to get out for the shot and went back to my day job.
Execution
I didn’t really need the alarm on my phone. This second attempt at creating the image I had in my head was in the back of my mind the rest of the day. As the time was getting closer I found myself checking the clock every few minutes to see if it was time to get out there and get ready. I finally decided to take a camp chair with me out to my site for the shot a full hour before the moon was going to rise.
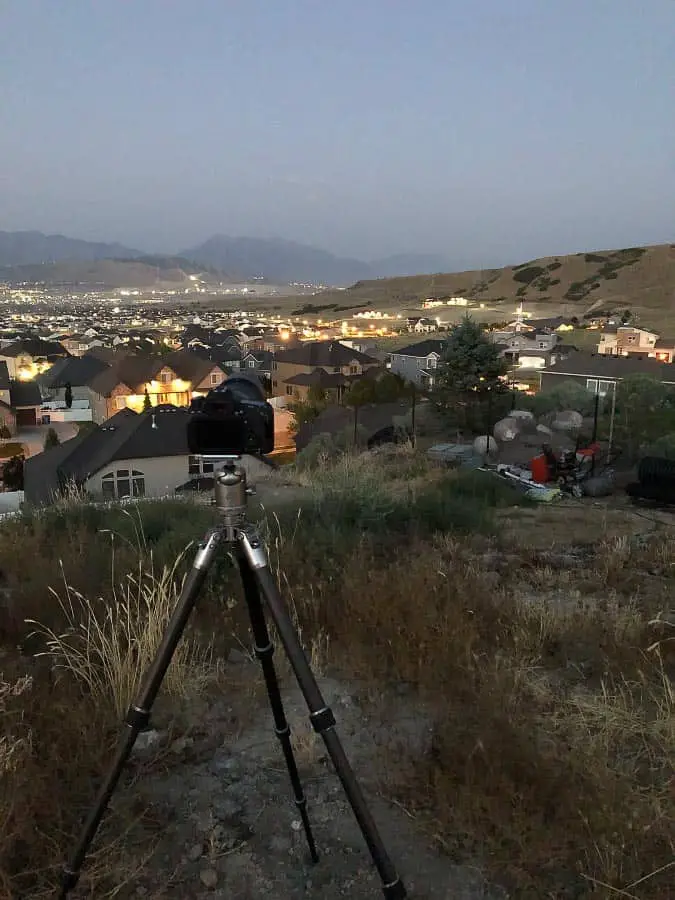
I got out the PhotoPills app again and used the “Night VR” feature in the Planner pill to check where it was the moon would be rising over the mountains and framed things up. I set my aperture to 8.0, my ISO to 800, and configured bracketing mode to take 3 shots 3 stops apart.
I didn’t know for sure what shutter speed I wanted to use. As I sat waiting for the moon to rise I realized this was another mistake I had made in my first attempt. I gave up too quickly on my first attempt.
Sure, the moon was moving pretty fast during that first attempt, but it was already up fairly high in the sky and there was no reason not to take a few more shots. I knew as I was shooting that first attempt I wouldn’t be super happy with an ISO of 2,000 and I should have experimented a lot more with other settings. I could have been better prepared for this second attempt if I hadn’t stopped shooting so quickly in the first attempt.
This is a mistake I make too often, even after teaching and preaching it on my podcasts. I tend to give up on shooting way too fast.
Sitting here waiting for this second attempt, I was far better prepared to get the shots I needed to create the image I had in my head, but I was going to be scrambling to land on exactly what settings I needed on my two shots.
Using an aperture of f/8.0 should provide better assurance that I will be happy with the depth of field. If I could actually keep the ISO down to 800 then I would be happier with the clarity and dynamic range of the foreground shot. The question was, could I get a shutter speed slow enough to keep those settings (aperture and ISO) and still freeze the moon? These kinds of questions could have been better tested out in my first attempt.
I felt confident I could set the shutter speed as soon as the moon started peeking out from behind the mountains using spot metering. Then I could switch really quickly between foreground and moon shots just like I had in my first attempt.
Still, I had time before the moon would rise over the mountain, so maybe I could try and guess at a shutter speed for the moon using the settings I liked best of the moon in the first attempt.
The shot of the moon I liked best from the first attempt used a shutter speed of 1/2000, so I again consulted the PhotoPills app to get a good starting point for shutter in my second attempt based off that. I used the Exposure pill to find equivalent exposures
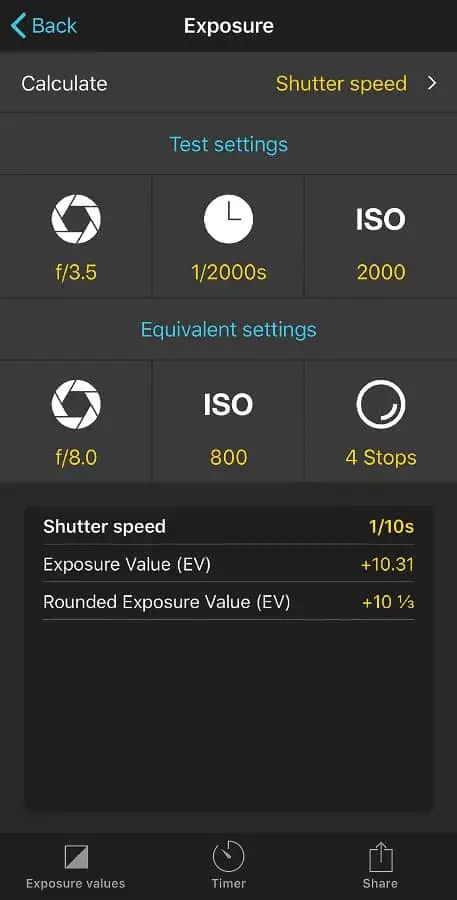
To get the equivalent exposure I needed a shutter speed of 1/10s. With 3 shot 3 stop bracketing enabled I would have 1/10, 1/80, and 0.8s exposures. I was worried that those shutter speeds might be too slow and wouldn’t freeze the moon. I decided to set my shutter speed to 1/60 of a second where 3 shot 3 stop bracketing would give me 1/500 and 1/8 and then I could adjust the shutter speed from there.
I also set focus on the hill as there was plenty of light to use autofocus. All that was left was to wait around for the moon to rise.
Showtime
Just like PhotoPills predicted, I saw the first peeking out of the moon over the mountain at a little after 10PM. Soon as I saw that happen, I clicked my shutter and got my three images.
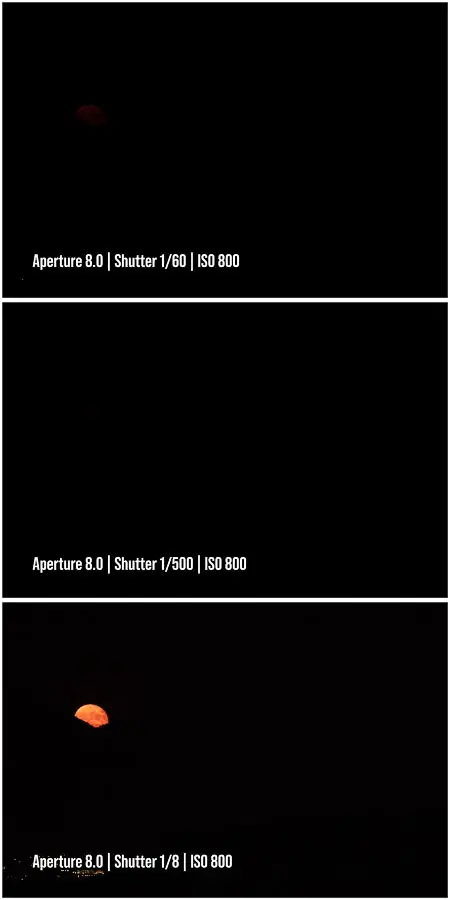
Yikes! I had done a terrible job at guessing on the shutter speed I would need. It was faintly visible in the 1/60s shot and not visible at all in the 1/500s shot. It was visible in the 1/8s shot but not nearly bright enough.
I wish I had just gone with the equivalent exposure I had calculated in Photo Pills and hadn’t second guessed myself on that. Better yet, I wish I had done some more shooting in my first attempt to see what kind of settings I could use.
Since that 1/8 of a second looked close to what I wanted for the moon exposure, but being really worried about freezing the moon, I decided to open up a full stop more on the aperture to f/5.6 and keep the shutter speed.
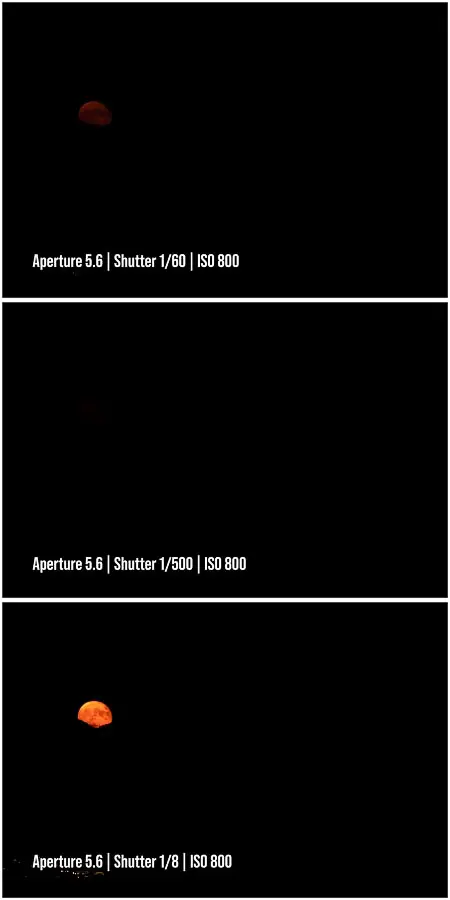
Uh-oh. A shutter of 1/8 and aperture of 5.6 is closer but I want it brighter still and I have a problem I hadn’t anticipated. My creative vision was to have that moon peeking over the mountains and in the 45 seconds it took for me to look at my shots, change my settings, and take the next set of brackets, it had almost cleared the mountains already.
Couldn’t worry about that, just had to keep going as fast as I could! I decided that since the moon had nearly cleared the mountains already I may as well try one more adjustment for the moon shot before going to the foreground. I thought I could probably go 1/3 stop slower on the shutter and try opening the aperture a full stop more.

Yep, I think I am happy with the moon exposure with that 1/6s shot. Now to quickly figure out the foreground exposure so that I can switch between the two as fast as possible.
Not really having any kind of a guess on what shutter I should try with the foreground, I decided to go with a 1s shutter and just see what three brackets gave me. There wasn’t time to really think through this given how quickly that moon was rising. I spun the dial on my camera to get to a 1s (1.0″) shutter speed and jammed the shutter button.
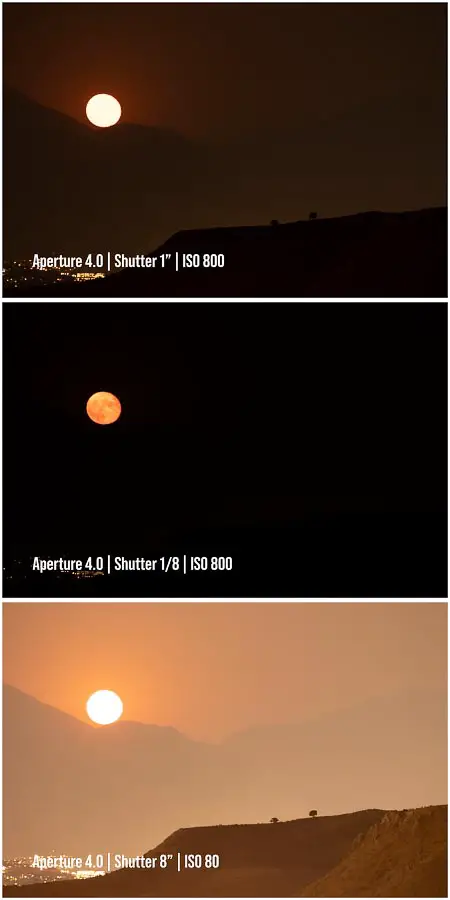
Oh, wow. I was really worried that an 8 second shutter would be too long and the moon would be streaking across the sky, but that actually looks like a really good exposure for the foreground. A little too bright, I didn’t want it to look like daytime, but I could deal with that in Lightroom to make it look like I wanted.
I also have that second exposure in the brackets where the moon is exposed like I want, though I was moving fast enough here I didn’t see that as I was shooting. What I did see was my creative vision of the moon still slightly behind the mountains was not going to happen that night in this second attempt.
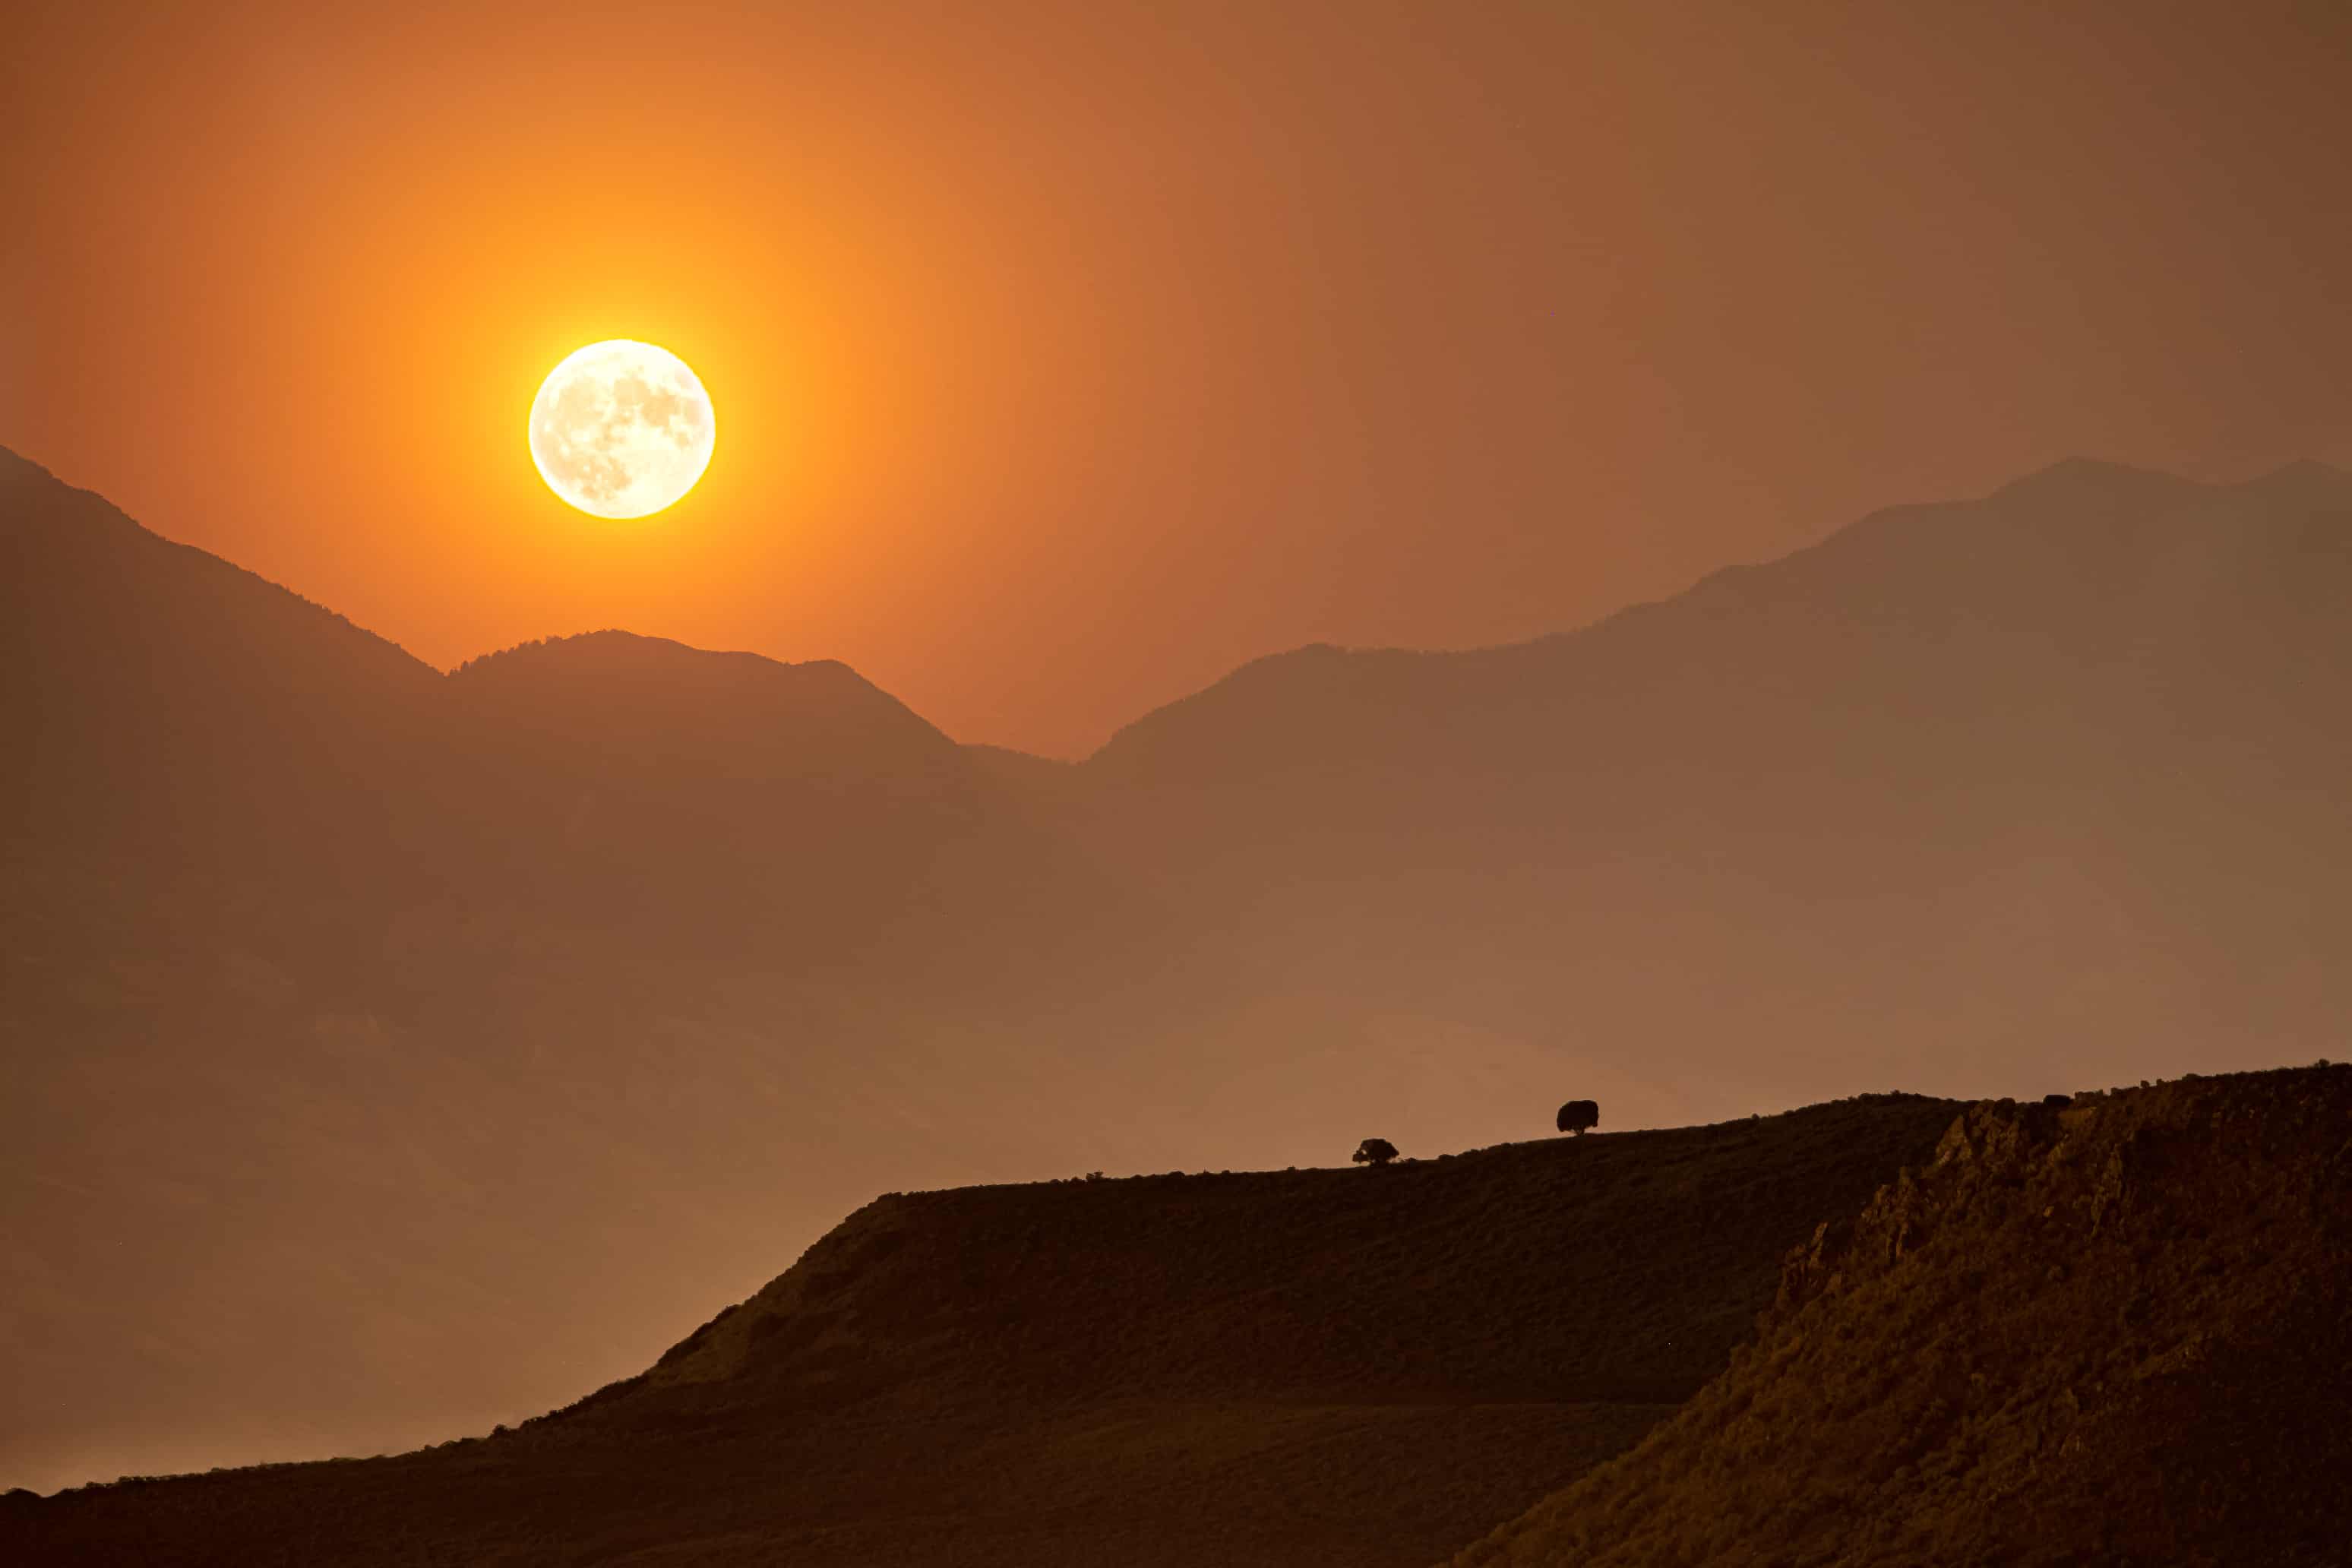
Still, as I looked at the image I thought it might be a really solid composition if I could balance the hill in the lower right with the moon in the upper left. I could see the rule of thirds applied to the scene.
Since taking my first set of brackets, a total time of 1 minute and 10 seconds had passed. I knew I wouldn’t have to wait long for the moon to reach the position I wanted to make that composition. Not wanting to waste that time I decided to practice switching from the moon shutter speed of 1/50s to the foreground shutter speed of 1s so that I could take my moon shot and then take the foreground shoot as fast as possible to limit how far the moon had moved between the two.
2 minutes and 20 seconds later the moon rose so that it was exactly where I wanted it to be for the new composition I thought I would like. I took the three bracketed shots of the moon and then went the 17 clicks of the dial to slow down on the shutter speed and took the second set of brackets for the foreground.
Learning from my mistakes the previous night, I also took more brackets of both for a few minutes just in case I ended up liking them better as far as composition goes or I had something like tripod shake or airplane trails.
Processing
I imported the photos from my second attempt into Lightroom Classic and then made minor adjustments to the foreground image:
- Basic Panel: Exposure -0.95, Contrast +7, Shadows -25, Whites +43, Blacks -15, Texture +44, Vibrance +15
- Detail Panel: Sharpening Amount 68, Radius 0.5, Detail 100, Masking 40, Noise Reduction Luminance 33, Detail 100, Contrast 0
I did decide I liked the middle exposure of the moon taking in the bracketed shots of the foreground the best (Aperture f/4.0, Shutter 1/8s, ISO 800), and I applied minor adjustments:
- Basic Panel: Exposure -0.20, Contrast +40, Shadows -99, Blacks -60, Texture +40, Clarity +17
- Detail Panel: Sharpening Amount 72, Radius 0.5, Detail 100, Masking 32, Noise Reduction Luminance 21, Detail 100, Contrast 0
Then I brought both images into Photoshop as layers and:
- Created a copy of the foreground layer and then removed the city lights in the lower left corner using a combination of the spot healing tool and the clone stamp tool
- Put the image of the moon over the top the foreground image
- Used the quick selection tool to select the moon
- Used the Select and Mask workspace to refine the selection a little
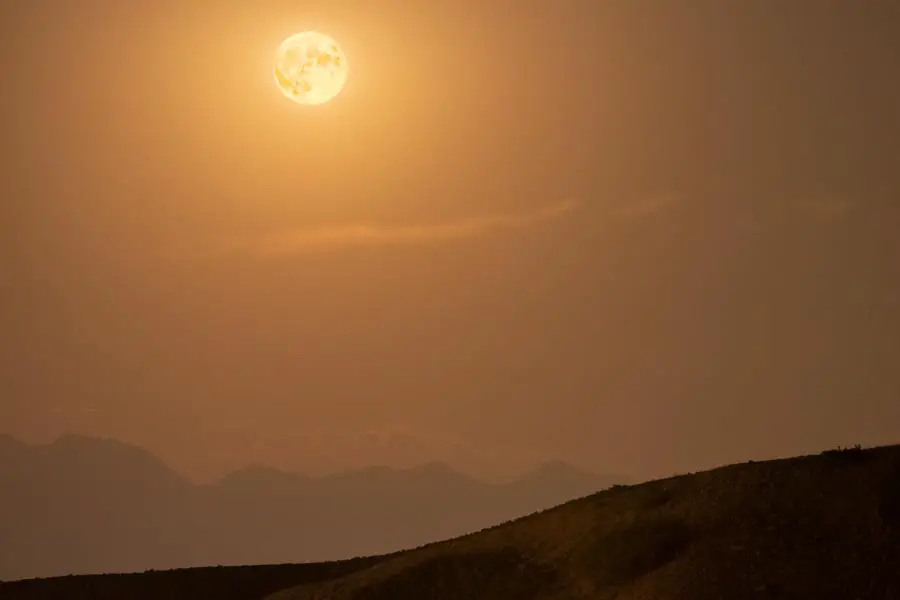
- Copied the selection of the moon to a new layer and I set the blend mode of that layer to Darker Color. Almost perfect
- Added a levels adjustment layer to the moon and changed the mid point until it looked like I wanted
Final Image
Reminders
- Photo Taco Discord Server! You have to create yourself a FREE Discord user and then remember to 👍 the rules in the “welcome-and-rules” channel to earn the Member role and actually post!
- Photo Taco Facebook group, ask to join and write “Jeff Harmon” as the name of the host.
- Follow the show on Instagram @phototacopodast or Jeff’s personal account @harmonjeff
- Follow the show on Twitter @phototaco or Jeff’s personal account @harmon_jeff
- Send email suggestions on show topics to phototacopodcast@gmail.com Check out the other podcasts on the Master Photography Network over at masterphotographypodcast.com
Podcast: Download (Duration: 1:09:14 — 48.8MB) | Embed
Comments
Yes, I would think it would be awesome if you did a episode on how to use the PhotoPills app!
I completely agree—it would be great if you did an episode on using PhotoPills!
Great episode – I like how your images turned out and have added “shooting the moon” as one of my 2021 goals.
I too would find a PhotoPills episode very useful. I downloaded the app several years ago, but have been somewhat intimidated with how to read all the data it gives me.