What Is Google Images Search?
Photographers are probably very aware of Google Images Search. For years photographers have seen Google Images Search as a really popular way for people to steal their images. It has been a big enough problem a lot of photographers have added special information to their website just to make it so that Google’s bots will ignore their images because they don’t want them to show up in Google Images Search.
It can also be helpful to photographers as you can drag and drop an image from your computer to Google Images Search and Google will happily show you other places on the Internet where it looks like that exact image is being used. A pretty decent way to find people infringing your copyright.
The reality is the image was probably stolen from Google Image Search in the first place. Google Image Licensing has been around for a few years now, but and update is coming that will help here and I want to make sure photographers know how to use it.
What is Google Image Licensing?
Back in the fall of 2018 Google introduced a new feature to their Images Search engine. If Google was provided with the right information, as an image was shown in a search result an “Image Credits” link would also be shown. When that Image Credits link was clicked, a popup would display the following information:
- Creator
- Credit Line
- Copyright Notice
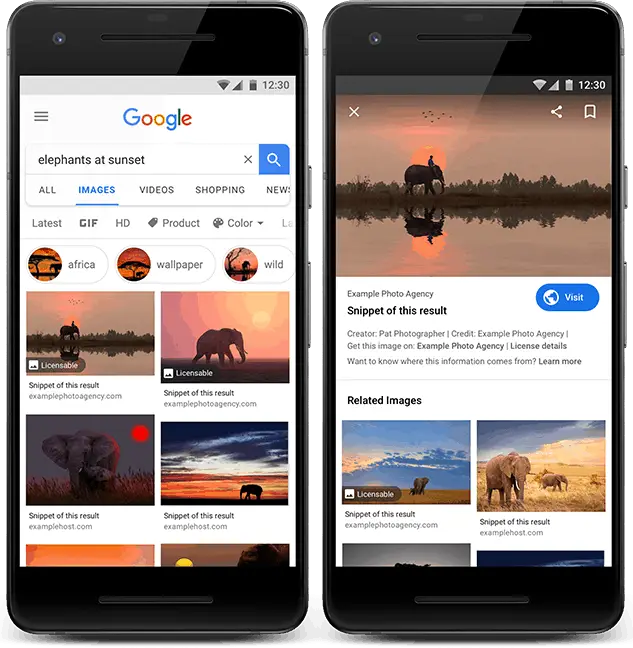
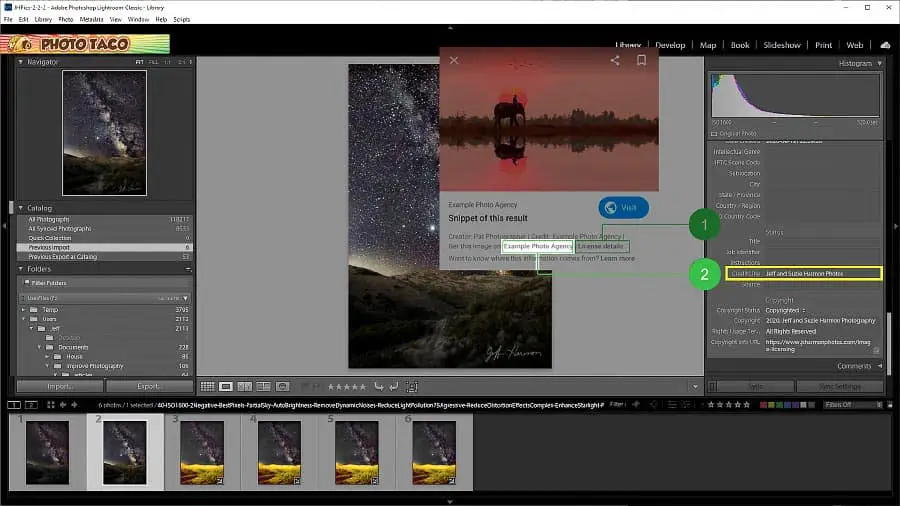
The idea being was that if your image showed up as a result in an image search, Google would help out the photographer by letting people know who created and owns the photo. Things have changed a little since 2018 and today that information is shown directly below the photo without requiring a person to click a link to see the ownership information.

What Is Changing With Google Image Licensing?
The interesting thing is that Google is working on changes to take this ownership information a step further. In 2020 they are rolling out a change to Google Images Search that will put a “Licenseable” badge over the image in the search results! A very clear indicator that the image is not something that can be used freely! Not only that, but when a person clicks on the image Google will clearly display the copyright owner and provide a link to detailed licensing information.


No, this isn’t a technical solution to prevent a person from stealing your images and doing what they like with them. But every little bit of information helps the honest folks stay honest. I am glad Google is headed this direction. The problem is, this won’t happen for photographers automatically.
How Photographers Give Google Licensing Information For Their Images
Google is quite literally built on a foundation of bots that roam the Internet every moment of every day. So, no, there isn’t a registration form or process you go through to manually provide licensing information like you do with the Copyright Office. I don’t think we would want that anyway.
Google offers four different ways photographers can provide licensing information for their images. Three of them involve HTML you can put around an image on a web page. I am not going to cover those HTML methods here as most photographers don’t know how to do that.
The method I think photographers really need to pay attention to is using the metadata features of your photo editing software to embed this information in your image. If that sentence made no sense to you, fear not. I will guide you through what to do in Lightroom. Exactly the same fields I walk through in Lightroom are available in Photoshop as well via the “File > File Information” dialog box.
The Five Licensing Metadata Fields Google Requires
Google has provided really good, but technical, documentation on how to provide their bots licensing information for images. Let’s go over them and how you can set them in Lightroom Classic (this can’t be done in Lightroom Desktop, the non-Classic version).
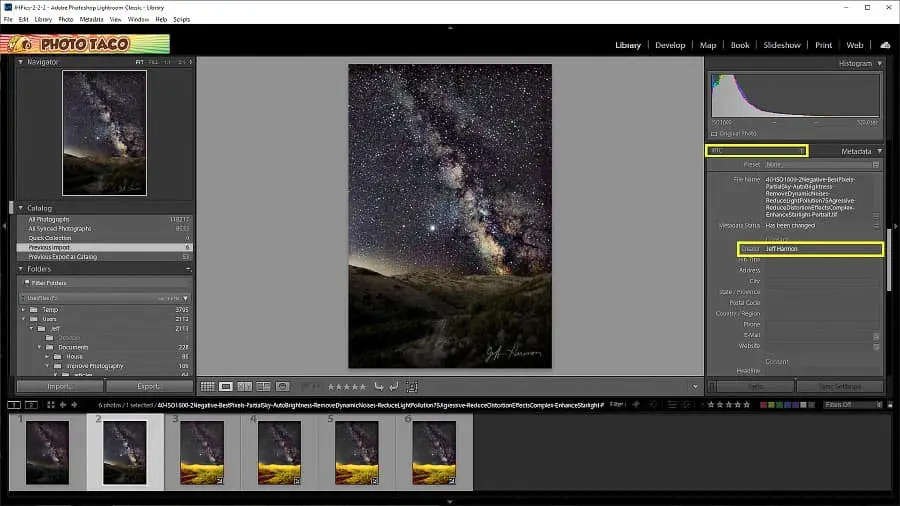
To set the stage, you need to be in the Library module of Lightroom and you need to use the Metadata panel in the lower right.
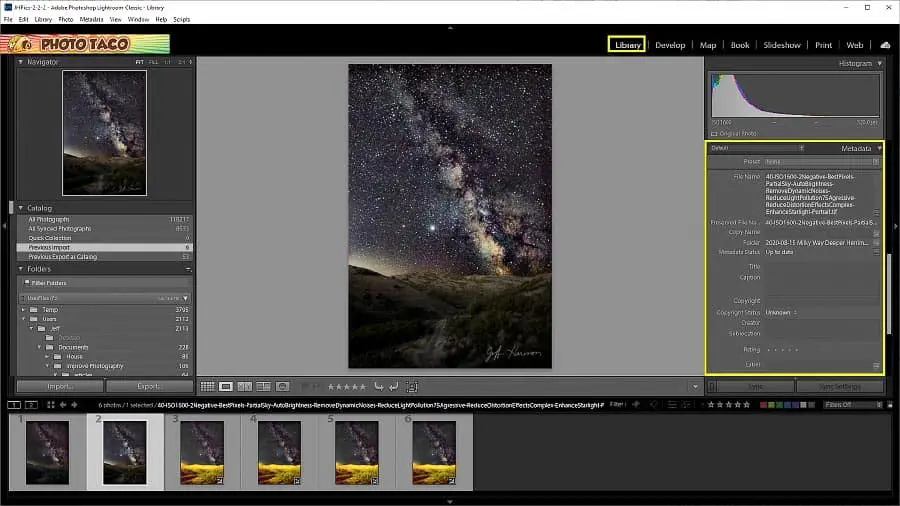
Creator Field
Photographers should provide this field with a value of the creator of the image. In most cases that is probably your first and last name. In some cases it may need to be a company you work for.
To set this in Lightroom Classic change the drop down box to the left of the Metadata panel to “IPTC” and fill in at least the “Creator” field. You may want to provide more information here too, like an email address and website for the creator of the image, but Google will only use the Creator field.
Credit Line
For most photographers this should be the name of your photography business. This is the field Google will use in the number 2 field above in the example snippet for a Google Images Search result.
NOTE: This field is limited to 32 characters for some uses.
To set this in Lightroom Classic, leave the drop down of the Metadata panel at “IPTC” and scroll down to the Status section where there is a Credit Line field
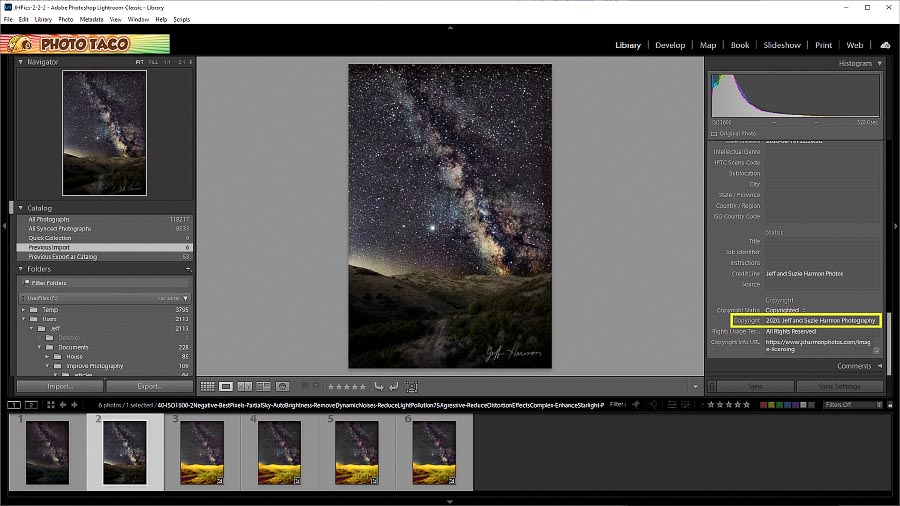
Copyright Notice
This should probably be the copyright symbol, followed by the year, followed by your photography business name. It is the information for claiming the intellectual property for the image and should identify the current owner of the copyright with associated intellectual property rights.
NOTE: Here is how you create that copyright symbol. On Windows, press and hold the Alt key and enter 0169 on the numeric keypad (doesn’t work with the normal numbers at the top of the keyboard). On Mac, press Option+G.
To set this in Lightroom Classic, leave the drop down of the Metadata panel at “IPTC” and scroll down to the Copyright section where there is the Copyright field. In addition to the Copyright field I recommend photographers also set the Copyright Status to Copyrighted, and the Rights Usage to “All Rights Reserved” but Google won’t care about those fields in Google Images Search.
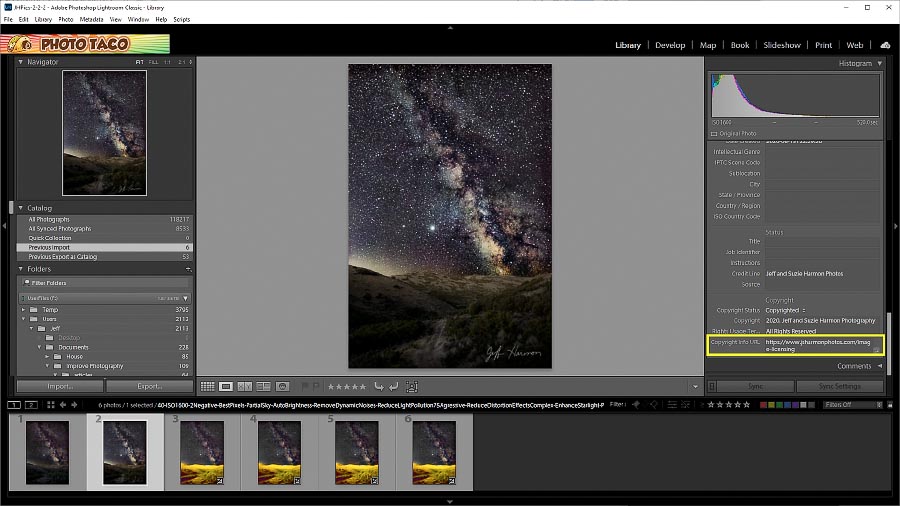
WebStatement
This is a critical field as this one has to exist in order for the coveted “Licenseable” badge to be placed over the top of images in Google Images Search.
This field MUST contain a fully valid URL (must start with https:// or http://) and should lead to a web page showing a license and potentially other copyright information. If you haven’t done so already, photographers should create a license page at their website that can be used here. Make sure it is something like “https://myphotowebsite.com/license”.
To set this in Lightroom Classic, leave the drop down of the Metadata panel at “IPTC” and scroll down to the Copyright section where there is a Copyright Info URL field.
Licensor URL
This field is also critical as this will trigger the display of a “Get this image on: Company Name” link in the Google search results preview.
This field MUST also contain a fully valid URL (must start with https:// or http://) to a web page that tells the person how to acquire a license for the photo shown in Google Images Search. It can be exactly the same value as the WebStatement field.
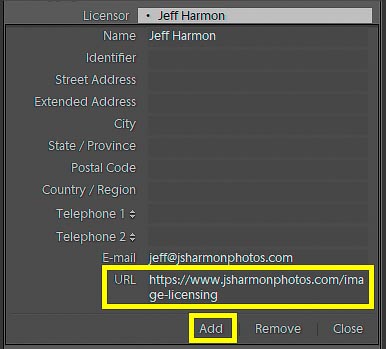
To set this in Lightroom Classic, change the drop down of the Metadata panel to be “IPTC Extension” and scroll down to the Rights Section and click the “-” next to the Licensor field
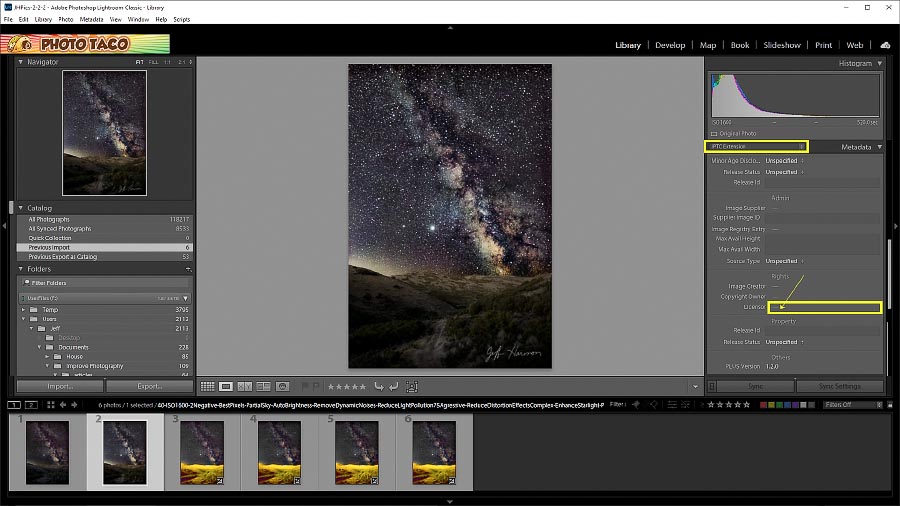
This should open up some new fields. Google only cares about the URL field here, where you need to have the full URL to the web page that tells people how they can license your image. Then you click the Add button.
Save Metadata Preset
To make sure your images have the metadata Google requires for this new Licensing Information show up in Google Images Search, you should save it off as a preset so that you can easily apply it to any image in Lightroom Classic.
To do that, go back to the top of the Metadata panel and click on the Preset drop down just below the title bar then the Edit Presets…

You should see a popup window that has a lot of sections of potential preset information. In order to make sure this preset will embed the information Google requires for their licensing information feature to work with your images.
You must make sure the fields highlighted in yellow are filled in with values similar to what I am showing here AND that the checkbox to the right of the field is checked.
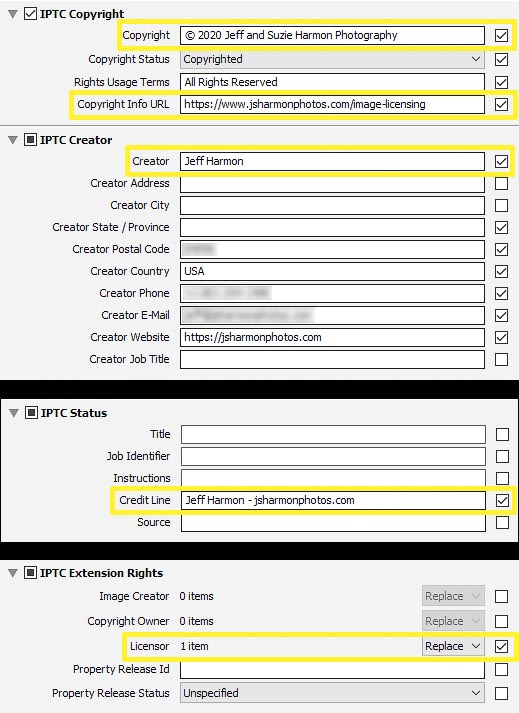
It is probably a good idea to fill in more of these fields than those highlighted in yellow for people or other services, Google just doesn’t care about them. Also keep in mind that you don’t want any fields that are specific to an image to be in your preset. Only check the boxes of the things that are the same for ALL of your photos.
NOTE: Pay particular attention to that Licensor field at the bottom. It needs to show that there is 1 item there and you can’t add that item from this screen like you can do with all the other fields. You have to add that item through the Metadata panel in the Library module as I instructed above.
With the highlighted fields setup, you can click the Done button. This should bring up a dialog box that asks if you want to save your changes as a new preset. Click Save As and then provide a preset name.
Using Your Google Licensing Information Preset
There are two ways you can use the metadata preset you just created to make sure your images have the information Google requires embedded in them before you share images on the Internet.
Lightroom Classic Import With Metadata Preset
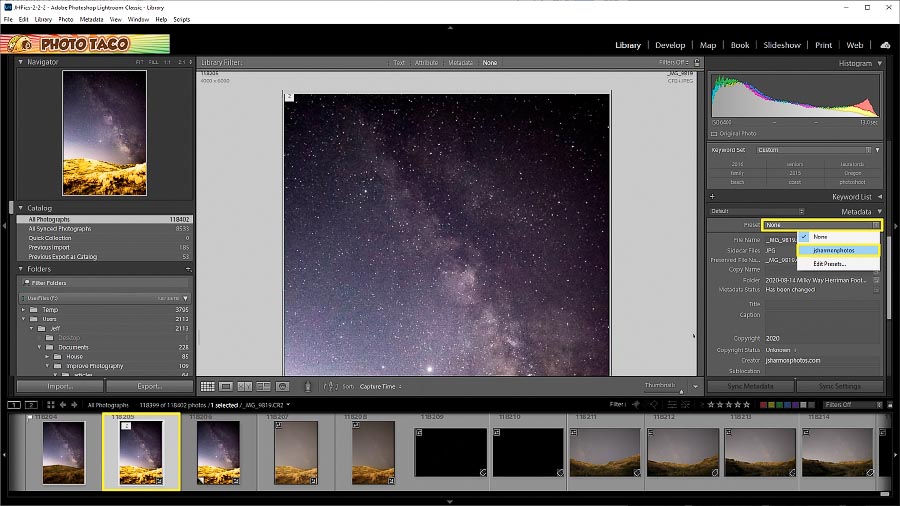
The first way to use your preset is the method I recommend all photographers use. I recommend they do this with every import of images into Lightroom. As you bring up the import dialog in Lightroom Classic, there is a panel on the right hand side called Metadata. You click on the drop down in that panel and you choose the preset you just created.

Once you have chosen that preset and completed an import, Lightroom remembers that you applied that metadata preset and will keep it selected for the next import. Exactly the behavior you will want to make sure that every image you import into Lightroom will get those 5 fields Google requires for their image licensing feature to work.
Lightroom Classic Apply Metadata Preset To An Existing Photo
What about all of the photos you have already imported into your Lightroom Classic catalog that don’t have this important metadata applied to them?
Adobe has you covered. The second way to use the metadata preset is to apply the preset to existing photos using the Library module. First let’s walk through how to apply the metadata preset to a single photo and in the next section we’ll go through how you could do that for all of the photos in your catalog.
You apply a metadata preset to a single image by selecting the image in the filmstrip (the line of photos show at the bottom of the screen) and then choosing the preset in the Metadata panel on the right hand side.
Lightroom Classic Apply Metadata Preset To All Existing Photos
The first step to applying the metadata preset to all of the photos in your catalog is to apply the preset to a single image. Pick one of the images in your filmstrip and apply the preset to it using the steps just above.
Next, in the Library module, click on All Photographs in the Catalog panel on the left and then press CTRL-A or COMMAND-A to select all images.
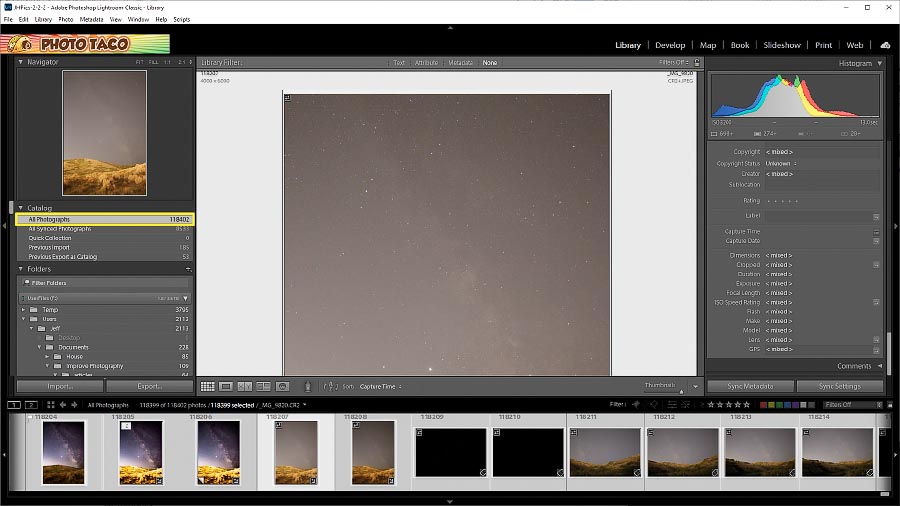
You may have to wait a minute for Lightroom Classic depending on how many photos are in your catalog. You will notice that the borders around all of the photos are either light gray or very light gray. The photo with the brightest gray border is the “most-selected” photo.

This “most-selected” photo is going to be the source of metadata information we are going to sync to the rest of the photos with a slightly darker grey background that are selected photos.
Next you click on the Sync Metadata button. A dialog box should appear that has metadata fields you can now sync from that “most-selected” photo to the other photos that are selected.

You check the boxes to the right of the field you want to sync. Remember that this information is going to be applied to EVERY photo in your catalog. Be careful that you only check the boxes of the fields you want synced to all of the photos in your catalog. Safest is to only check the boxes of the 5 highlighted fields as those are the fields Google cares about.
Click the Synchronize button at the bottom of that dialog box. You will see in the upper left a status bar showing that Lightroom Classic is working on writing that metadata to all of the files that are in your catalog.
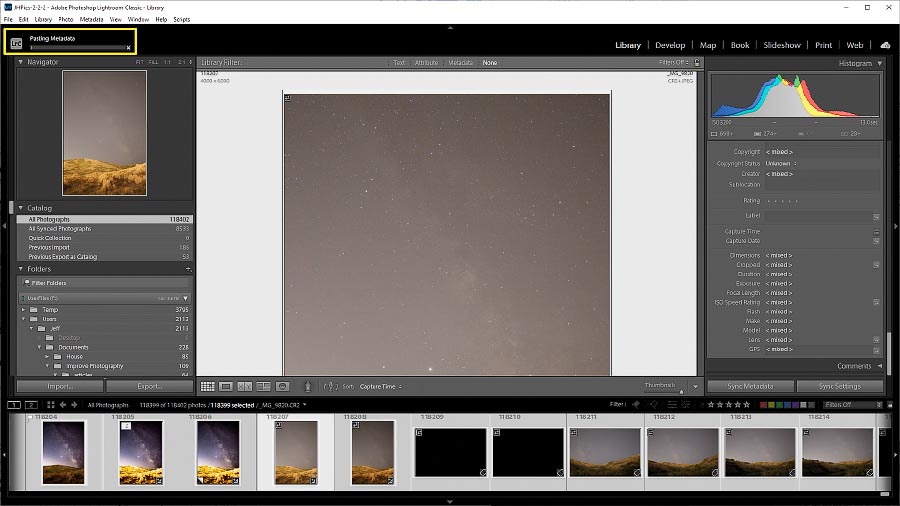
When I synced metadata across my entire catalog as a test, it took about 85 minutes for the 118,399 photos that were in my catalog at the time. This process requires a lot of writes out to your photos on your hard drive. If you have really fast drives for storing your photos this may go faster for you, if you have old and slow magnetic spinning drives it may go faster.
Exporting Images From Lightroom With Google Licensing Information
If you have followed this guide your original photos now have the image licensing information embedded in them. That is really good, but you have to take some care with the Metadata section when exporting your images from Lightroom Classic or all of this work won’t do anything.
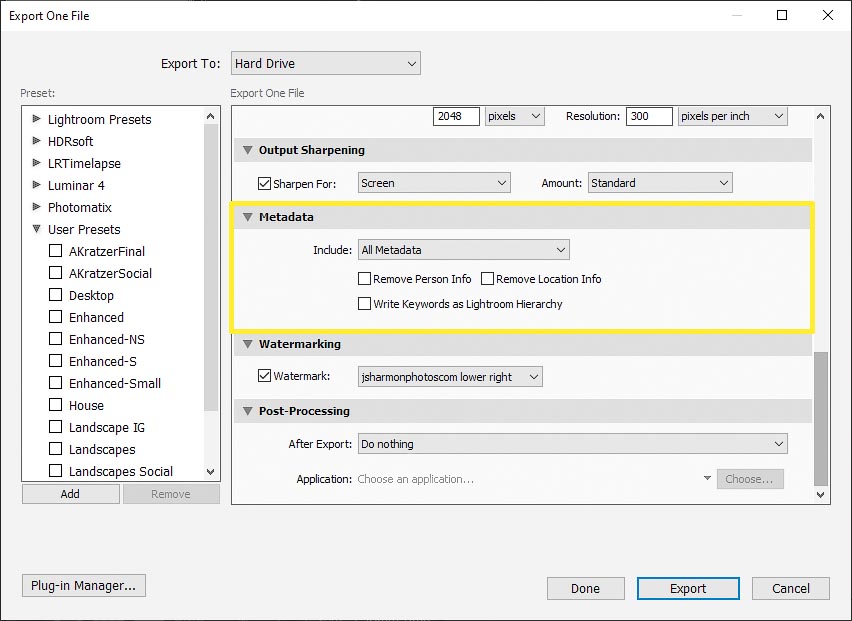
I tested every combination of options with regard to metadata that Lightroom Classic offers as photographers go to export photos. It is safe to use every option except “Copyright Only” and “Copyright & Contact Info Only”. That includes the “Remove Person Info” and the “Remove Location Info” checkboxes when they are available.
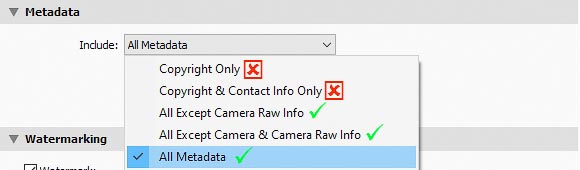
Those two options drop several of the fields Google needs for all of this to work.
Validate The Google Licensing Information Metadata In Your Images
If you have followed this guide then the images you export out of Lightroom will have the necessary information in them for Google to show licensing information with your image as it shows up in Google Images Search.
If you want to make sure, the easiest method is to use the IPTC Photo Metadata tool. In option A of the tool you can point the tool at the URL of a specific image, which is a good way to see if your website hosting that does your portfolio will show these tags to Google.
In option B you can check an image you have exported from Lightroom to see that everything looks good.
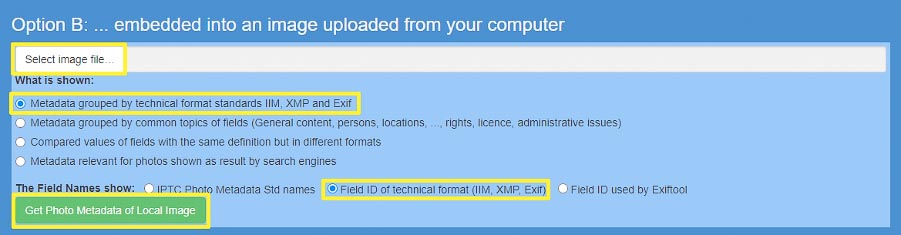
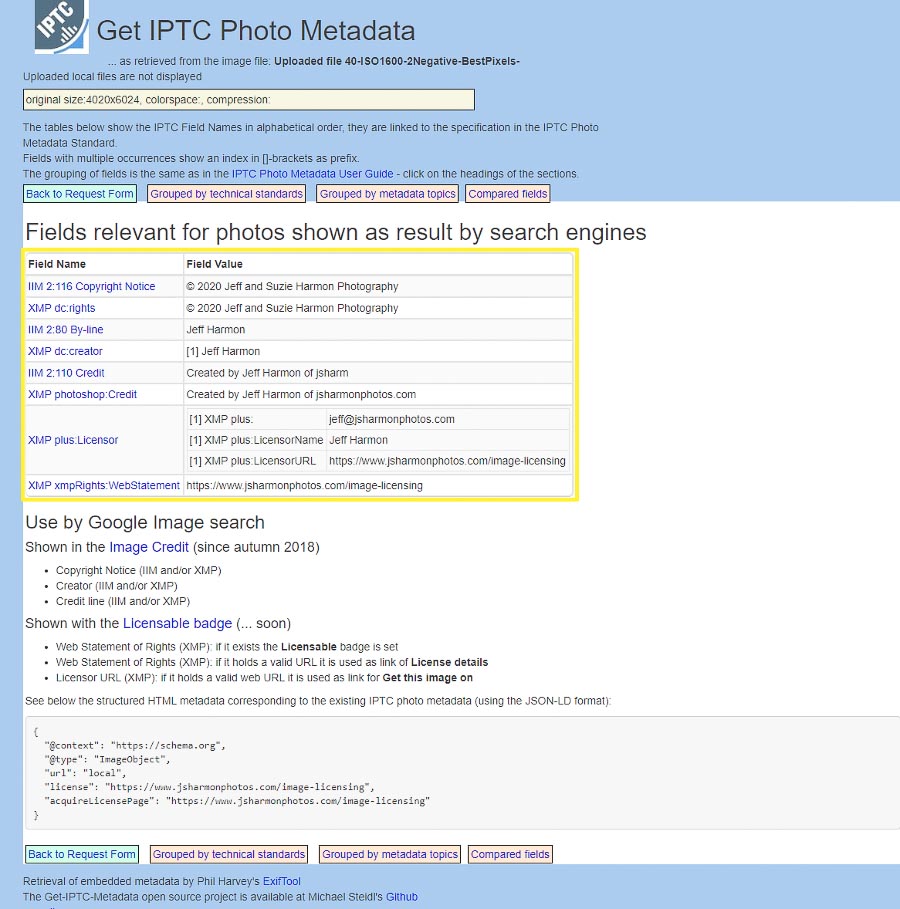
Select the image you want to check, set the options as highlighted, and then click the Get Photo Metadata of Local Image button. You should see something similar to the following.
You can also use the excellent exiftool utility from Phil Harvey. It is a command line utility with no pretty UI but you can do it on your computer and not have to upload your image to IPTC.
Here is the command you can run to see the image tags:
exiftool -X -XMP-dc:Creator -XMP-photoshop:Credit -XMP-dc:Rights -XMP-xmpRights:WebStatement -XMP-plus:LicensorURL .
If you executed the command correctly you should see something similar to the following:
<rdf:RDF xmlns:rdf='http://www.w3.org/1999/02/22-rdf-syntax-ns#'>
<rdf:Description rdf:about='./_MG_9818-AllMetadata.jpg'  xmlns:et='http://ns.exiftool.ca/1.0/' et:toolkit='Image::ExifTool 12.04'  xmlns:XMP-dc='http://ns.exiftool.ca/XMP/XMP-dc/1.0/'   xmlns:XMP-photoshop='http://ns.exiftool.ca/XMP/XMP-photoshop/1.0/' xmlns:XMP-xmpRights='http://ns.exiftool.ca/XMP/XMP-xmpRights/1.0/' xmlns:XMP-plus='http://ns.exiftool.ca/XMP/XMP-plus/1.0/'>

<XMP-dc:Creator>Jeff Harmon</XMP-dc:Creator>
<XMP-photoshop:Credit>Jeff Harmon</XMP-photoshop:Credit>
<XMP-dc:Rights>© 2020 Jeff and Suzie Harmon Photography</XMP-dc:Rights>
<XMP-xmpRights:WebStatement>https://jsharmonphotos.com/image-licensing</XMP-xmpRights:WebStatement>
<XMP-plus:LicensorURL>https://jsharmonphotos.com/image-licensing</XMP-plus:LicensorURL>
</rdf:Description>
Comments
Incredibly helpful, Jeff, thank you!
Wow, so useful and easy to follow, big thank-yous.
Great article and information. Thank you. I ran into one roadblock and wonder if you can advise if it matters. My licensor field preset shows “2 items”. One is the required. The other is blank. After adding the first one, I clicked add and it added another one which I left blank. It shows as “unnamed” in the metadata. I can remove it from an individual image, but the not from the preset. If it doesn’t matter I will just leave it. If it matters, can you help me remove the unnamed version?
Thank you.
Are you seeing this in Photoshop?
I had the same issue- you don’t want to click the “add” button. If you do it will add another licensor. To get rid of the extra one(s) you have, highlight it, and click remove.
Jeff- this was amazingly helpful! I had a friend of mine who does SEO for a living help me when I set up my site, and she knew none of this. I hope you don’t mind… I borrowed the verbiage of my Image Licensing page from yours. I’ll change this shortly, but just wanted to put something up while I figure out exactly what to write. Of course, if you find this unacceptable, please let me know and I’ll take it down immediately.
No worries. Can use it and leave it permanently
Wow! This is so helpful and well done Jeff! I don’t know if you always go into this much depth on a subject but it was well done, easy to follow and so valuable to any photographer wanting to help get their work out there for sale.
You’ve made a difference!
Larry
Jeff
Did you take down the image licensing page on your website? I was hoping to see what it looked like so that I could set mine up similarly…thanks
I still have it here: https://www.jsharmonphotos.com/image-licensing