
Basic instructions on how to get started creating stunning team and individual (T&I) photos for sports teams!
What is Volume (T&I) Sports Team Photography?
Volume sports team photography, sometimes called T&I (Team and Individual) for short, taken to another level. Sure, you can use flashes and create some decent images of sports teams using their field/court as a background. This is not that. This is delivering stunning images every mom/dad/athlete is going to gush over and delivering them extremely quickly so that you can do this for as many teams as possible.
Those that are really good at this kind of photography can take the photos in a couple of hours and deliver them to their dozens of clients from the shoot within a week. That is the goal, executing to make that goal is the challenge. The more time you spend on the shoot, the less likely you are to have it be a profitable activity.
Here are some tips on one way a photographer can get started into this business, including how to quadruple your potential for income.
Speed Up Sports Photography With Single Click Extractions
There are two keys to making money at sports team photography. The first is creating compelling images that every member of the team will buy. The second is doing that very quickly. The speed of delivery isn’t just to strike while the iron is hot with the team, though that helps. The speed allows you to do this type of photography for as many teams as possible. Build a relationship with a team and you can have a good source of income every sports season.
In order to make this work you need to combine a good in-camera setup that includes great lighting with software that can extract the athlete from the background with a single click. That’s the goal. Clean, believable extractions in a single click. It is possible. Let’s start with the in-camera/lighting first.
Should Sports Team Photographers Use a Green or White Screen?
If you have ever tried to extract a model from a background, you know it can be extremely difficult and time consuming. How can you accomplish this with the speed needed? What can you do in-camera and with the lighting to create images where the athletes can be extracted with a single click?
The more complicated the background, the harder it is to extract a model, which is why T&I photographers who create stunning images and make good money choose to use a simple, solid color background. The question is which color to choose.
There isn’t clear agreement among experienced T&I photographers. Beyond my own experience, I have spent a lot of time in Facebook groups consuming information from those who excel with T&I and the debate of green vs white backgrounds comes up very frequently.
The majority seem to favor the use of a green screen, though there is a vocal minority who swear by white. I have done team photos for the local High School basketball teams for several years now. In preparing for that first shoot I tested using both white and green. Either option can work technically, but let me share the pros and cons I have seen for both.
Initially, I could not get green to work well for me. No matter what I tried with lighting and software I always had green edges in the model extraction. Green “spill” (the green seems to spill onto everything) on the models is the biggest negative to using a green screen background. You can’t get “close” to perfect with an extraction using a green background, it must be perfect.
White is far more forgiving. If you can’t quite get all of the white out of the image, it is super easy to sell that white as belonging in the final image. You can get “close” with white and have the result be spectacular. On the other hand, it is much harder for software to automatically tell the difference between the white of a background and the white that will be on pretty much every model you shoot.
My experience has been that you can’t reliably get single click extractions from a white background, whereas some software is absolutely amazing for single click extractions and automation with a green background. Your lighting and in-camera work has to be extremely solid, but it is possible with green and not so much with white.
I was firmly on team white for my sports photos for several years, until the shoot I did here in early December of 2020. After seeing so many experienced T&I photographers rave about green screens combined with the right lighting and software, I finally got serious about attacking a green background workflow. I am never going back for sports team photography. I am firmly on team green screen for T&I photography, though I still may choose white for single model extraction work.
Recommended Green Screen Width and Height For Single Click Extractions
There is no room for mistakes with green screen photography. A slight miss on your equipment or lighting setup, and you are going to have a lot of extra work to make the extractions believable. Time is always money, but making a mistake with a green background that phrase may be more true than in other photography workflows. You need to start with good green screen equipment.
One of the things you need to consider is the size of the green screen you are going to use. This depends heavily on the final images you intend to create. Are you going to use full body extractions of the athletes in your final images? Maybe only knees up? Or even less and only head and shoulders? Are you going to build a memory mate from the extractions or use a more traditional shot with all of the team members in their gym or on their field? Do you intend to capture the athlete in more of an action pose?
To give yourself the best possible chance for single click extractions, you need to use as little green screen as possible. The less green there is in the shot, the less chance there is that green light spills onto your athlete. You need to surround whatever part of the athlete you are going to use in your final image by at least a few inches, but do so with as little green screen as possible.
Two guidelines to keep in mind when deciding on the width and height of your green screen:
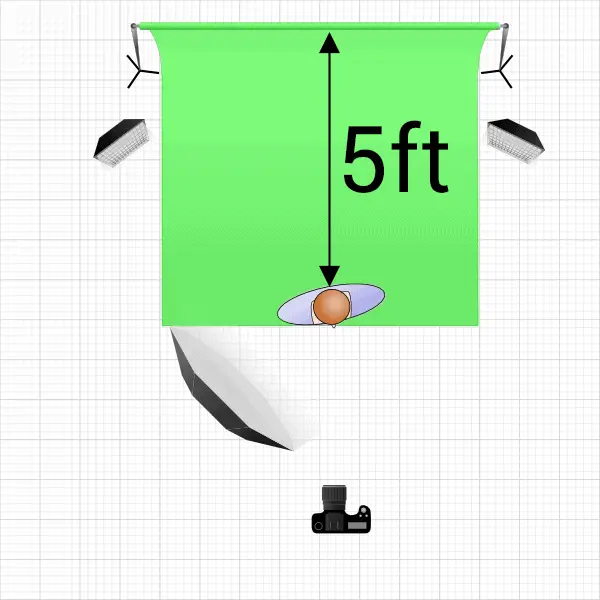
- Position the athlete at least 5 feet away from the green background
- If you are going to put green on the floor have as little green screen as possible in front of the athlete.
Following both of those guidelines made a massive difference in my experience shooting with green screens and getting excellent single click extractions. These two guidelines help reduce the chance of having a shadow from the athlete on the green screen and limit the green spill on your model. Don’t just take my word for it, check out this video that does a great job showing you the impact of not following these guidelines.
Consider the final image you are going to make and then start by deciding the width of the green you will use. If you are only going to use the head and shoulders in your final image, you can probably get away with a 5 foot wide (maybe smaller) green screen. 5 feet wide may seem like a lot for a head and shoulders shot, but when you put the athlete 5 feet away from that background, that 5 foot wide background becomes much smaller.
If you are going to use knees up, or maybe as much as ankles up in a static pose, you may be able to go with a 5 foot wide screen but need one that has more height to cover the athlete. If you are going to try and capture the athlete in an action of their sport by having them do the action you need a wider screen. Something more like 9 feet or wider.
In considering the height, make sure to consider the second guideline. A big mistake I made when I first tested shooting with green screens was putting far too much green on the floor in front of the model. You almost give yourself no chance at getting believable extractions when you have several feet of green in front of them. It is fine to have more width than you need on the green screen, but not the height. DON’T PUT GREEN IN FRONT OF THE ATHLETE ON THE FLOOR!
If you are going to do full body extractions you need a background with enough height to cover the top of the athletes head by a good 6 inches or more (might they jump in an action shot?). Then you have to add 5 more feet of green from the background stand to the toes of your athlete.
For teenagers/adults you likely need a green screen that is between 12 and 20 feet in height – depending on the tallest athlete you are going to shoot. If you are shooting younger athletes that won’t be as tall you can decrease that of course, just don’t make the mistake of having a lot of green in front of the athlete.
Recommended Green Screen Equipment For Single Click Extractions
I am using the Impact Chroma Sheet Background – 10 x 12′ ($60) on a 13’ Impact Pro Backdrop Support Kit ($225). It works well, especially with it being 10 feet wide, but there are some other options I would choose over this now that I have some experience shooting sports teams on a green screen. As you can see by the sample images from my most recent shoot in this article, I am very happy with the results, but this is not the setup I would recommend if I was buying today.
A really good option to get started into T&I photography is the Westcott 5×12′ X-Drop Wrinkle-Resistant Backdrop Kit, Chroma-Key Green Sweep ($140). This is the setup I have seen recommended over and over by professionals who are wildly successful with T&I photography. At five feet wide this is a little more restrictive on how you can shoot the athletes, but the setup of this stand is super simple/fast making it easier for a single person to get the job done and the material doesn’t need any kind of ironing.
To be honest, the wrinkles in the green screen don’t end up being a big deal – so long as you position the athlete using the guidelines above and light things properly (see below). The Impact Chroma Sheet I am using wrinkles easily, but I didn’t do anything more than stretch it tight to the backdrop stand using inexpensive clamps and it wasn’t an issue for extremely fast and accurate single click extractions. Still, I would prefer having even less chance for extraction issues with the wrinkle resistant material in the Westcott.
Another option is the Westcott 9×20′ Wrinkle-Resistant Backdrop, Chroma-Key Green ($140) with the Flashpoint 13′ Background Support System ($100). This is very similar to the setup I am using for a similar investment but with the advantage of the wrinkle-resistant material. The backdrop stands are harder to set up than the X-Drop, but still very doable by a single person with a little more time and it is quite a bit bigger. Bigger gives you more flexibility with shoots.
With any of these green backgrounds you will also want some good green screen gaffers tape to keep the portion that the athletes will be stepping on from moving around. Even if you don’t have the athletes do an action move in front of the green screen, when you have 30 to 100 athletes going in and out of the screen it will get moved a lot if you don’t secure it. I like the Datavideo 1.88″x82′ Chroma Key Gaffer Tape, Green ($20).
Just to be thorough here and recognize the T&I pros who are still firmly on team white screen, the one they almost always point to is the Lastolite HiLite, 5×7′ Collapsible Disc Background ($390). Ouch, a very expensive solution, but those who use them swear by them as being the best way to get composites. You can also consider the Westcott 5×12′ X-Drop Wrinkle-Resistant Backdrop Kit, High-Key White Sweep ($140) or the Westcott 9x20Ft Cotton Background High-Key White W/13′ Background Support System ($200).
Lighting a Green Screen For Sports Photography
Lighting a green screen for stills is very different from lighting a white screen. One of the mistakes I made for a long time was putting light on the green screen. It sounds strange I know, but where you want to light the screen if you use a white background (I aim for blowing out the background to pure white), you want to do everything you can to avoid putting light on the background when it is green.
You also need to do all you can to make sure your model is well lit like you would with any portrait setup. Those two objectives, lighting the athlete and keeping light off that green background, are tricky to accomplish at the same time. The guideline to keep the athlete 5 feet from the background reall helps to accomplish both objections. Your lighting needs to be good on the hair and the rim of the athlete. Having good lighting on the hair and the rim helps give the software more distinction between the green you want to remove and the other colors you want to keep and is crucial for single click extractions.
There is a 5 light setup that is heavily recommended by the professionals doing T&I photography. It is well proven. I have even seen some who have gone so far as to have massive vinyl prints made so that they can be laid on the ground with the markings for where everything goes with their 5 light setup.
Maybe I will graduate to the 5 light setup someday, but for the shoot I just did, I didn’t have 5 lights to use and wanted to keep it a little more simple. I used a 3 light setup and it went beautifully.
I set up two Godox AD200 ($300 a piece, branded Flashpoint when sold through Adorama) lights in two Fotodiox Pro 12x80in Strip Softbox with Bowens Speedring ($140 a piece). One to the right of the model and one to the left of the model. To avoid getting light from these strip softboxes on the background, I set them behind the model so that they were only about 2-3 feet from the background and aimed them away from the background but towards the model. I had them high enough to make sure the hair on the taller athletes would be covered, plus I wanted to have as little light on the green covering the floor as possible.
These lights provided both the hair and rim lighting for the model. It did the job beautifully, but boy is that equipment expensive, right? It was hard for me to make that investment in lighting, but it is worth the investment. The Godox/Flashpoint lights use big lithium batteries that allowed the flash to cycle extremely quickly throughout the 2 hour shooting of 33 athletes without breaking a sweat. I never had to wait for the flashes to be ready while I was shooting. When I got home and put the batteries in the chargers, they had consumed only about 25% of the battery power. I could have gone for 8 hours and shot 100+ athletes.
I also used a third light as a fill light. Most photographers would probably call this a “main” light, but the purpose of this light was to fill in the front of the model that the two lights in the softboxes behind the model didn’t reach. This was a third of those powerful Godox AD200 lights inside a Godox 47″ Octagon Softbox with Bowens Mounting ($35). I positioned the light just left of the camera and as far from the camera (closer to the athlete) as I could get it without it being in the frame. The height was above the head of the model so that it could be pointed down toward the model at about a 45 degree angle and not hit the background.
Lighting athletes is a little different than lighting a normal portrait. With athletes it is desirable to have harsher shadows so that the muscles can be seen more prominently. The strip softboxes on either side of the model were set to provide a lot of light to shine on the hair and the outer rim of the athlete, with that octagon softbox at the front just filling in the middle a little bit.
Camera Settings for Sports Photography Green Screen Shooting
Camera settings for shooting with a green screen aren’t very different from the settings you would use for portrait shooting. I always recommend arriving at your settings for your camera by starting off with the aperture.
You may think you need to blur that green background as much as possible by using as wide open an aperture as you can to aid in the extraction, especially if there are wrinkles in your background. That was something I thought would be pretty critical to single click extractions. As I mentioned earlier, the wrinkles in the background are surprisingly unimportant and blurring the background shouldn’t be your primary consideration here when deciding on your aperture.
You are about to remove the background, hopefully with a single click, so it doesn’t really matter the depth of field for the background like you normally consider with portraits. You MUST get the entire athlete in focus, but you shouldn’t be overly concerned with trying to blur that background.
One good argument against using the widest aperture your lens is capable of is that it is almost certain you get better sharpness at least one stop down from wide open. I have done a lot of testing of my Tamron 24-70 f/2.8 G2 lens and have found that images are sharpest at f/3.2, with apertures of f/4.0 and f/5.6 also being sharper than f/2.8. That makes it easy for me to choose an aperture slightly stopped down so that I can get the highest possible sharpness of my athletes.
You also should consider the impact aperture has on your flashes. The more stopped down the aperture, the high power is needed for your flashes. Aperture controls the strength of the light from your flash, shutter controls the strength of the ambient light. If you stop down the aperture to f/8.0 or more you may need flashes at 100% power and that means more draw on the batteries and longer recycle times.
With an aperture decided on, next is to consider your shutter speed. You want to limit how much the ambient light (light from the room without your flashes) lighting the green screen. Remember, we want to keep light off of that green screen, though the ambient light isn’t likely to cause a lot of spill from the green screen.
My goal with the background is to have the meter in the camera tell me that the green screen is 1 stop underexposed. I know I am going to get a little spill from my flashes on that background and it has worked out really well for me to approach it this way. Use the meter in your camera with the flashes off and with your aperture decided use your shutter speed to get to one stop underexposed.
It isn’t just about getting that green screen 1 stop underexposed, you also need to consider if you are going to attempt any sort of action shots with the athletes. If so, you need to find a happy balance between a shutter speed that is under the max sync speed of your camera and an aperture that has sufficient depth of field to keep your athlete in sharp focus.
I shot these examples with an aperture of f/4.0, shutter speed of 1/200, and ISO 100 on my Canon 80D crop sensor camera. The settings are going to be highly dependent on the environment you are shooting in. I knew I wanted a higher shutter speed because one of the poses we planned to take was an action shot of each athlete. I also knew I wasn’t going to shoot at f/2.8 in order to get the most sharpness out of my lens. I got the green screen metered to 1 stop underexposed with these settings and then I had my wife stand at the edge of the green screen while I dialed in the power of the lights so until I was getting the results I wanted.
Poses For Sports Team Photography
There is so much to consider as far as posing goes. I have seen posing cards created by some T&I professionals that they have laminated copies of so that they can have the athletes look at them while they are waiting for their turn of the shot and so that it can be used as a reference to instruct the athlete what to do when they get their turn in front of the camera.
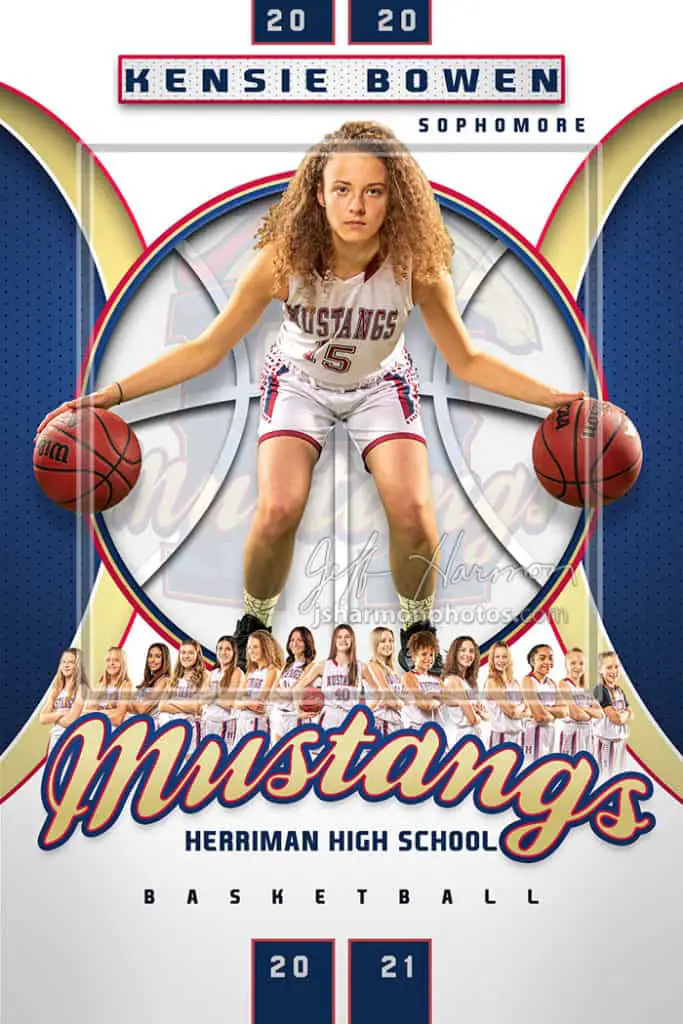
There is so much to this I am not going to go into great depth here, maybe that should be another episode. Instead, I’ll tell you what it was we did. We knew we needed three poses of the athletes in order to build a memory mate image of the team using the individual photos and then we wanted to give each athlete the flexibility to do one action shot. This meant four poses of each athlete, and getting that action shot usually meant at least two or three frames before we got what they were looking for.
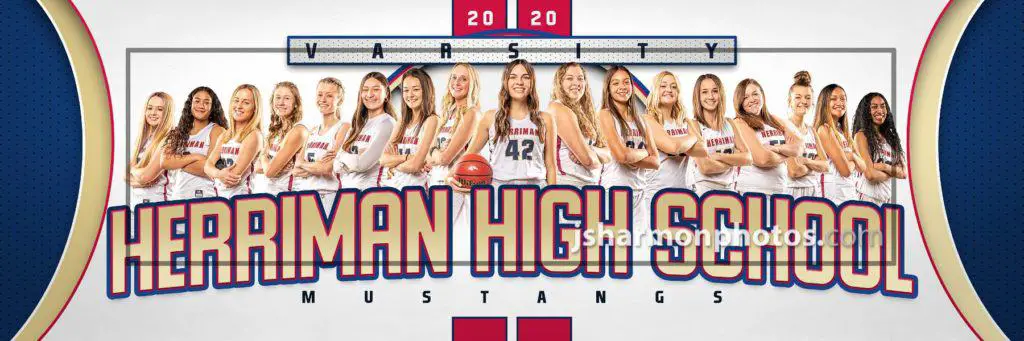
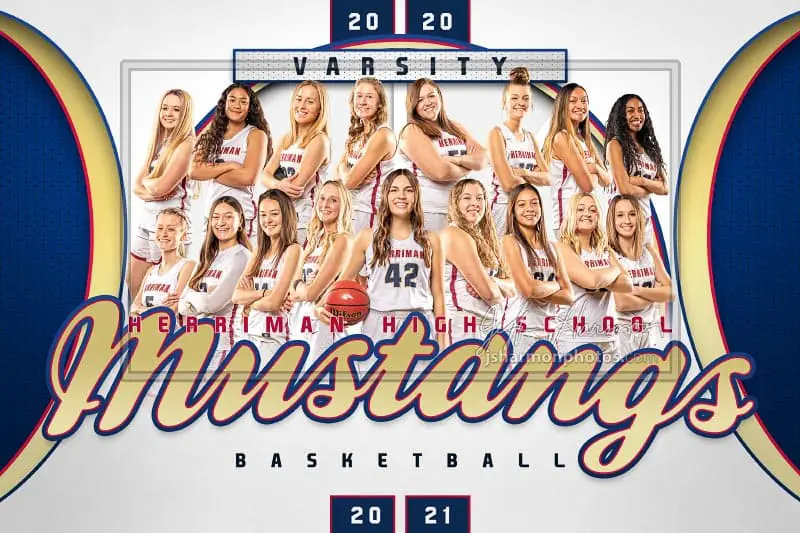
The three poses for the memory mate team image we wanted to create meant we needed each athlete with their shoulders square holding a basketball under one arm and the other arm angled to the hip (for female athletes) and then two other shots with their shoulders angled right and left with their arms folded. This would allow us to stack the athletes and create a really great memory mate insert into a template that has an incredible wow factor.
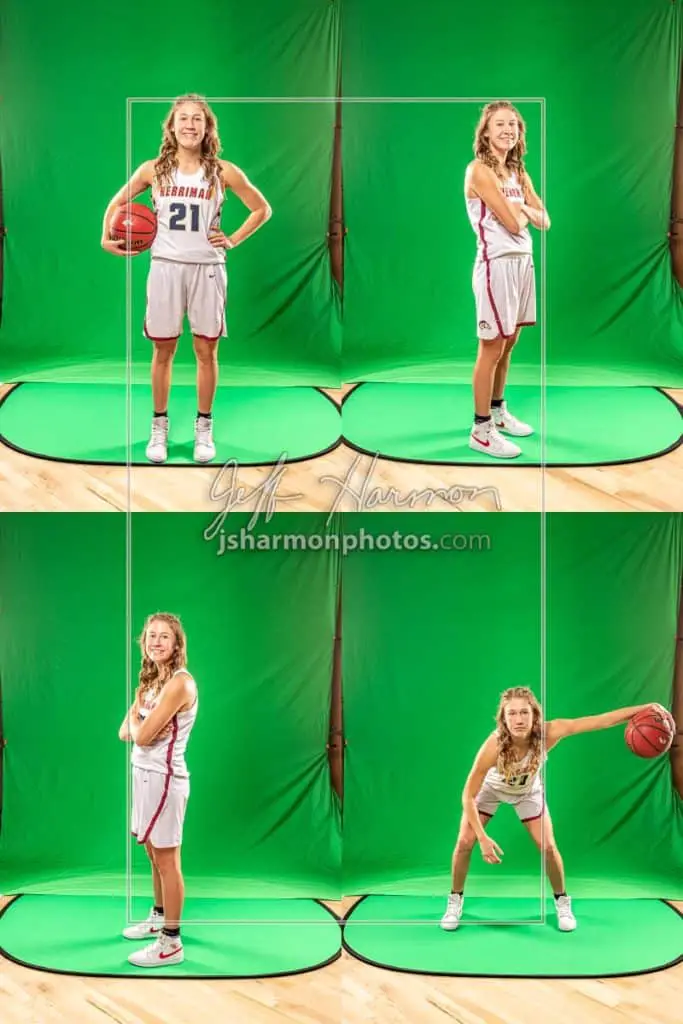
Those poses were super simple to have the athletes do. It was really only one frame per pose in most cases and we would have that done in about 10 seconds or so per athlete. The pose that was much harder was the action shot. Most of them didn’t know what they wanted to do for the shot, which meant they stood there with their toes on the edge of the green screen for a couple of minutes trying to think of what they wanted to do.
Something to consider as you are doing T&I photography is how long the shoot itself is going to take. The athletes are usually all there together, especially if you are going to take one of the more traditional team photos with all of the athletes together in one shot. The athletes all have to arrive at the same time and it will mean that whichever athlete is last for their turn in front of the camera is going to be waiting a long time.
In this shot we created photos of 33 athletes. Getting a few traditional team photos and then those four poses of all 33 athletes took nearly two hours. I think we could set expectations a little better with what poses we were going to do since we really had to repeat the instructions of what we were shooting to every athlete, but I don’t think it would have reduced the time of the shoot significantly. This is something you should think through and set the expectations with the team appropriately.
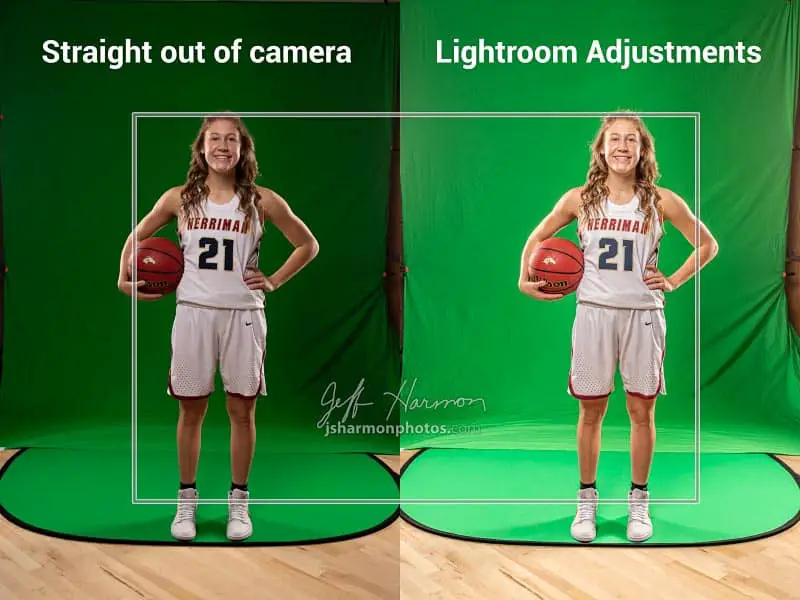
Lightroom Classic Adjustments Preparing For Single Click Extractions
My first step to post processing these images was to bring all 418 of the raw images into Lightroom Classic to apply a few adjustments. Now let’s be clear, these adjustments should be as minimal as possible! Remember that critical to the ability to make money doing T&I photography is making the post processing work as minimal as fast as possible.
Still, if you shoot raw (and I highly recommend doing so even for T&I photography), you have to take them through a raw processor. You should plan to only do global adjustments like those in the panels of the develop module that will be applied to every green screen image, staying away from adjustments unique to an image like those you would make with an adjustment brush.
If you are using Lightroom Classic I recommend you start by hitting the Auto button in the Tone portion of the Basic panel for getting a good starting point for those sliders. For T&I photography I think you will also want to add some Texture and Clarity under the Presence portion of the Basic panel. Then you should adjust the sharpness and noise reduction in the Detail panel and enable the Remove Chromatic Aberration and Enable Lens Corrections checkboxes in the Lens Corrections panel.
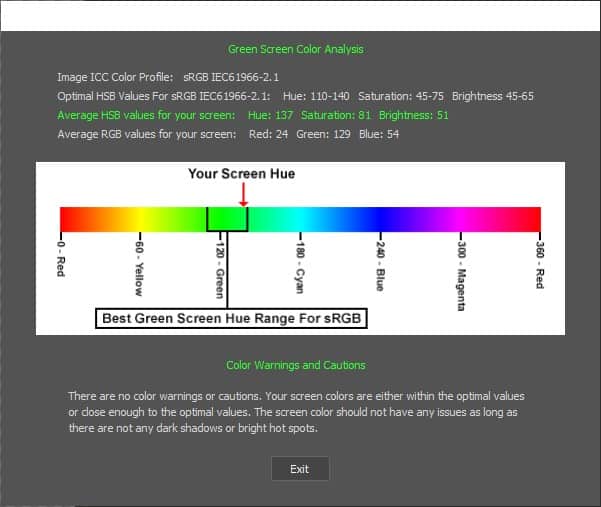
Once you are happy with the global adjustments on your first green screen photo, before you sync those adjustments to the rest of the green screen photos you should do a Screen Color Check using the Pixnub EZ Green Screen filter in Photoshop and adjust the saturation and luminance of the green to optimal values.
Pixnub EZ Green Screen Single Click Extraction
We are finally ready to see if all of the work done has resulted in a single click extraction. There are lots of green screen plugins and applications you could try out there, but this is one place where everyone in the T&I world seems to agree unanimously with a clear winner being the EZ Green Screen plugin for Photoshop from Pixnub.
To be clear, Pixnub has not sponsored this podcast or post. I paid for the software and used it to process my shoot without contacting the company and letting them know I was doing so. I also tried out a number of other applications/plugins to see it compared with EZ Green Screen. Plain and simple, there is no comparison. This is THE software to use for green screen extraction.
I am not going to go through how to use all of the features of the software here, that is well covered in some well done tutorials Pixnub has on their YouTube channel. You definitely should check out those videos before attempting your extractions so that you know how to use all of the features.
There were a couple of things I needed to relay here that I didn’t see covered by those tutorial videos. First was using adjustments in Lightroom Classic to make sure the saturation and luminance of the green in your images falls into what EZ Green Screen looks for. As mentioned above, there is a Screen Color Check function of the plugin that you can use to do this.
Here is an example where I took my original photo with only the Auto Tone adjustments done in Lightroom Classic into Photoshop and used the EZ Green Screen filter and the Screen Color Check feature to see a warning that the brightness of the green screen was a little low.
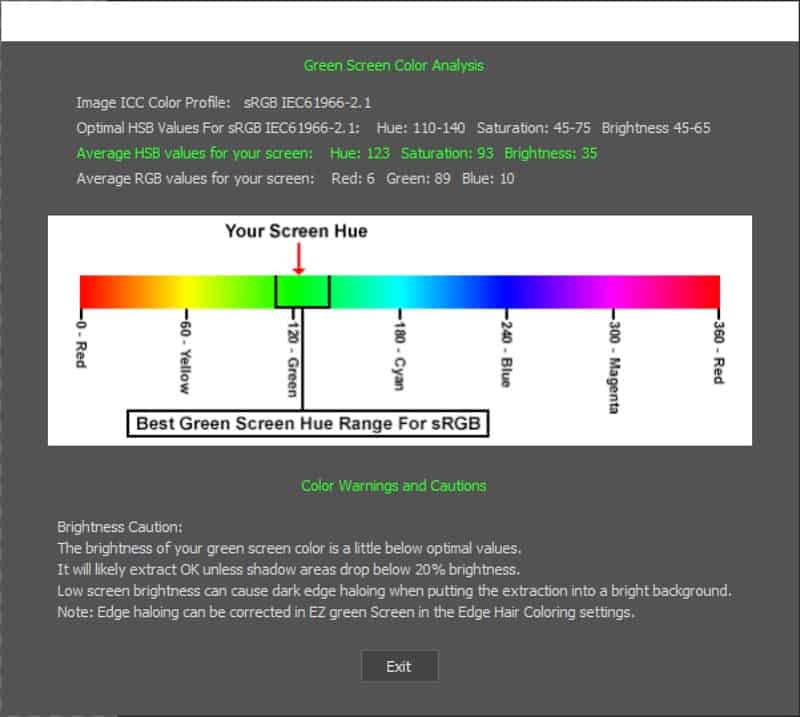
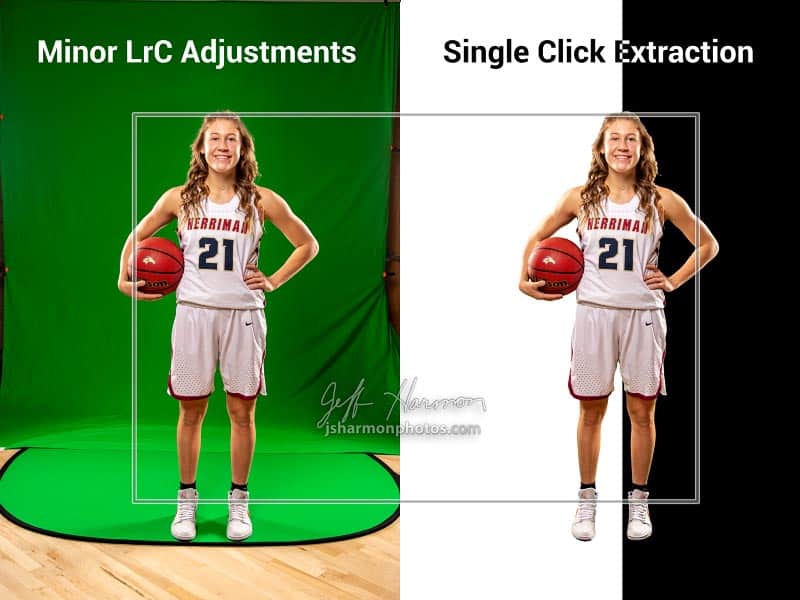
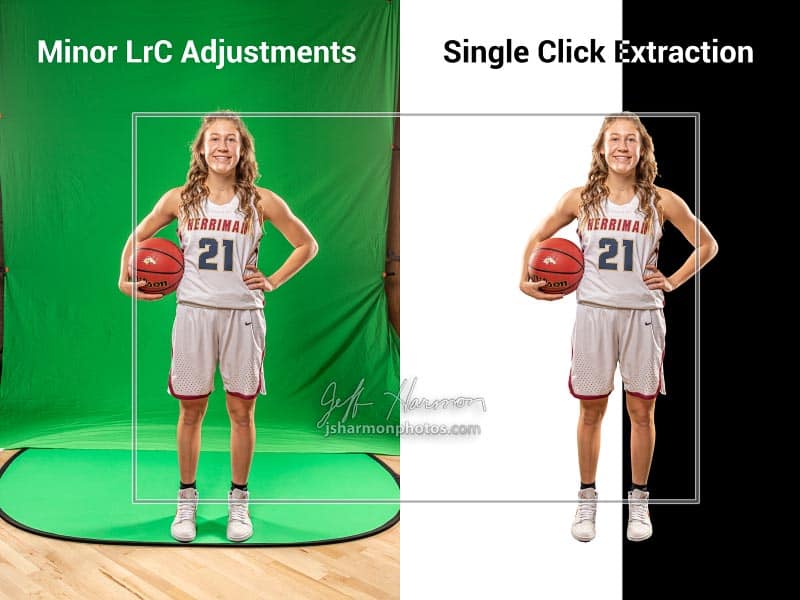
Even with the green not being in the perfect brightness range, the single click extraction did an amazing job! Not perfect, but almost usable. I put the extracted image over a white and black background so that you can see how it looks on both as I have seen plenty of extractions look good on one and terrible on the other.
I could have gone back to Lightroom Classic made more adjustments, and then round-tripped from Lightroom Classic to Photoshop to use the EZ Green Screen filter, but that costs a lot of valuable time. Instead, I just created layers in Photoshop and applied various changes in the HSL panel to the hue/saturation/brightness of the green in the image until Screen Color Check in EZ Green Screen said all of the values looked good.
Once I dialed in the green color so that EZ Green Screen was happy with it, I synced the global adjustments from the one image I was working on to all of the other green screen images from the shoot. Then came the second thing I didn’t see covered in the tutorial videos from Pixnub – how to get the images from Lightroom Classic batch processed.
Pixnub is purely a Photoshop plugin. It doesn’t have any stand-alone application and therefore you can’t do the extractions directly from Lightroom Classic. You can ONLY run the EZ Green Screen tool from within Photoshop. You have some adjustments you have made to your images in Lightroom, so the best way to go from Lightroom to Photoshop and batch process them using EZ Green screen is to export the green screen images out of Lightroom.
You could export to JPEG, and EZ Green Screen will happily process those images, but I recommend you export out of Lightroom Classic to TIFF files. TIFF files will retain full resolution and raw capabilities of the images, the only difference is they will now have the global adjustments you made in Lightroom. That will take some time of course, so select all the images in Lightroom Classic and do the export command and then go do something else for a little while.
When you come back, you can now launch Photoshop and apply the EZ Green Screen filter to all of those TIFF images in batch mode. Again, this is going to take some time, and you don’t want to do anything else with your computer while this is happening, so push the button and go find something else to do. On my computer (4.2GHz Core i7, 32GB RAM) this took about 30 seconds per image.
Killer Sports Photography Templates and Automation
The last step in this crazy T&I photography process is placing your extracted images into a great template. I have tried to create my own templates and it is clear to me I am a better photographer than a designer. My designs are acceptable, but not great. At least not when I compare them to some of the greatest designs I have seen – those available from 3rdcreative.
Not only do the templates have a jaw-dropping design, each template comes with multiple designs on the same theme. You get portrait and landscape designs, as well as designs that are made for different print dimensions. This can be a huge money maker for you as you can drop your extracted images into all of them and make it impossible for parents/athletes to decide which they want to buy, forcing them to buy them all.
Even better, you don’t have to drop your extractions into the templates yourself! These templates are specifically designed to work with another incredible Photoshop plugin from Pixnub called Sports Photo Automation (SPA). The SPA plugin is only available to those who pay for a subscription to their Platinum Club, but it is well worth the cost of doing so to automate this part of the process.
You point SPA to your extracted images, the template you want them inserted into, and (optionally) a CSV file that maps the image name to the player’s name, and all of the images will be put into the template for you! It takes some time, but not time that you have to actively be sitting there waiting for it to finish. Full automation. Put your extracted images into every template you get when you buy a background design from 3rdcreative and you can make 4x the money.
I was able to put 37 of the images into a template in a little under 20 minutes, without my having to do anything. SPA put the name of each athlete into the template (from the CVS file) and changed the size of the name to fit. This would have taken me hours to do manually.
Comments
Thank you for the info!
Jeff: Big fan, I mention your podcast on the Photoshop Family site now (you and Victoria), now that they’ve broken Lightroom with V.10, I tell them to check with you and her (and Dave Hamilton’s The Mac Geek Gab podcast) before upgrading anything!
I do have some feedback on your Lifetouch remarks. I was hired, after a 25-year Mac IT career, mostly in NYC, by Lifetouch at the age of 64, so not a teenager, like you said. It was my first pro photography job, and the training there (at least here in Chicago), is pretty darn good! A 5-day training on Senior Portraits, a 2-day Sports Portraits training, and various other training sessions (like Commencements, and Sports) and none of the people in either group were fresh out of high school (a few college graduates, yes). The guy in charge of Lifetouch’s Sports Portraits here, Mitch, has been a photographer (and photo store owner) all his life, and took the best headshot of me that I have. No, they don’t typically do fancy “cutting out the background” editing that you do so well, but painting an entire company with one brush does them a disservice. BTW, they were bought by Shutterfly in 2018, so that’s who’s responsible for their quality now, and they have many satisfied customers. Anyway, their training took me from a beginner pro to a confident pro, who now shoots for the Chicago Sky (WNBA), Windy City Bulls (G League), and is President of The Garden Photographic Society (at Chicago Botanic).
Ahh, good to know. I really didn’t know anything except the complaints I see from the volume T&I photographers. I tried to cut them some slack by talking about how they definitely meet a significant need. Just do it very differently. I will correct that.
Hey Jeff, I was looking to get into a couple of these groups on Facebook. Any you would recommend?
The one I found most helpful to getting started was this one:
https://www.facebook.com/groups/volumephotographers/?multi_permalinks=1736701516499991
Amazing info! Is this possible in a gym with the lights on? Or do you black out for photo day? Also, could continuous light be used instead of flash?
Hi Jeff, great write up. Question, have you had any issues with the green screen and pixnub extraction where the player uniforms are green?
Thanks for the great write-up, Jeff! I truly enjoyed reading what you shared.