Canon launched their image.canon service earlier in 2020 and has integrated the service with Google Photos, Lightroom (not Lightroom Classic), Google Drive, and Flickr. How does this work and is this something photographers should get set up? Let’s get into it.
What Is image.canon?
Canon released an initial version of their image.canon service in February of 2020. The idea of the service is one that enables a wireless workflow for photographers who use Canon cameras. It is NOT an image backup service. It is also NOT a cloud service that directly shares a group of images with family and friends.
Canon has positioned the service as a simple way to enable their cameras to send images through a WiFi connection to any number of “connected” cloud services. They will make sure their cameras can be configured to talk to their image.canon service and then the image.canon service will talk to other cloud services the photographer can configure.
As of August 2020 the connected services supported by image.canon are Google Photos, Google Drive, Lightroom, YouTube (for video), and Flickr.
How To Set Up image.canon
The image.canon cloud service is free for photographers who own one of 27 supported Canon cameras. Unfortunately, the setup includes the need to connect one of those supported cameras to your computer.
Don’t worry, I’ll walk you through it. The first step to using the image.canon service is to sign up for a free account.
Create A Free image.canon Account
Head over to https://image.canon/st/en/get-connected.html, click on the Getting Started in the upper right, then choose Create Canon ID

Canon offers to let you use your Google, Facebook, or Apple ID to simplify setting up your account. Choosing one of those options is the easiest, but I worry about the privacy of doing that and prefer to sign up myself with an email address. You can pick whichever you like best.
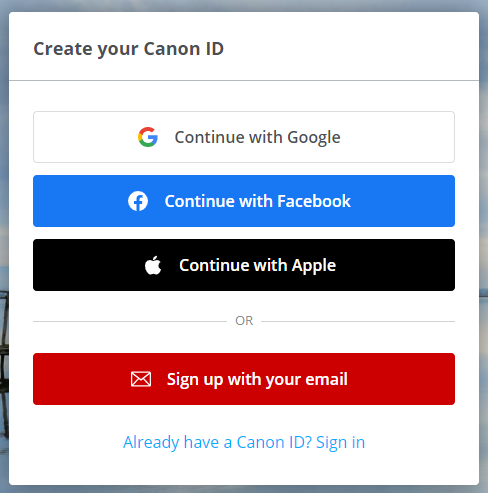
A quick confirmation that you want to connect your Google/Facebook/Apple account (or go old school like me and provide your name and email with an email validation loop) and then you have to accept the terms of service.
I read through the Terms of Service specifically to see what kinds of rights Canon may say they have with your images once they are uploaded. You can take a look at the details in the Things To Be Aware of section below, but I think the terms properly protect the rights of the photographer.
Register Your Supported Canon Camera With image.canon
Next you have to register your supported Canon digital camera with the service. Canon is serious when they say that this service is only available to people who have purchased a Canon digital camera. You don’t just say you have one, or even provide a serial number. You literally have to register the camera using their EOS Utility.
Unfortunately, this doesn’t seem like a really simple step to me. Good thing I have you covered. You will see something like this on the website after you created your login.
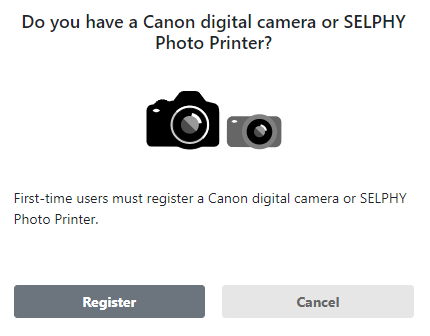
Click the Register button and you should see a page that has a few screenshots of the EOS Utility. At the bottom of the screen the page says to click on the Next button after you have registered the camera and it even warns that this registration process takes so long you will be logged out before you are done.
How To Install the EOS Utility Required to Register Your Camera
The goofy thing is that if you don’t already have the EOS Utility they didn’t think to provide any instructions on how to download it. If you don’t have the EOS Utility installed yet, here are the basic steps:
- Go to the EOS DSLR and Mirrorless page
- Choose your camera
- Click on the big red “GET PRODUCT SUPPORT” button
- Click on the “Drivers & Downloads” tab
- Find the most current version of ‘EOS Utility” (version 3.12.30 for Windows in August 2020)
Installing the EOS Utility is pretty straight forward from there. Once installed, you have to connect the camera to the Utility. Some of the camera models support connecting your computer to your camera wirelessly, but those instructions are going to be more than I want to go over here. Plus, a USB wired connection tends to work better than WiFi.
Connect Your Camera To Your Computer Using EOS Utility
After installing the EOS Utility you should have a new EOS Utility Launcher app in your system tray on Windows or your menubar on Mac.

You are also going to need the right USB cable. The USB connection on Canon cameras has changed over the years and if you can’t find the cable that came with your camera you should check out the “Connect Camera to Computer” section of my article about the EOS Webcam Utility Beta.
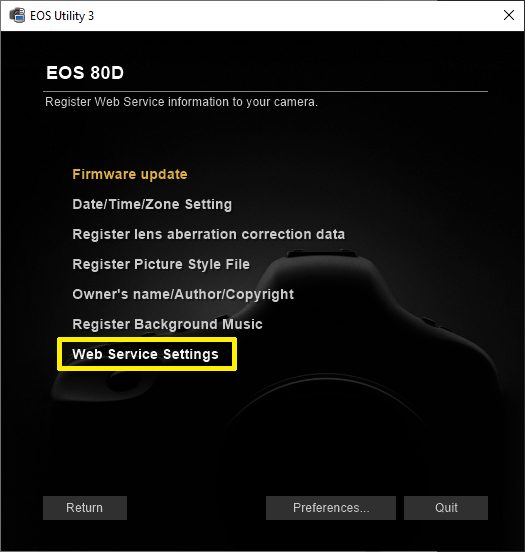
With the EOS Utility Launcher running and your camera connected via the USB cable, turn your camera on and the launcher should start the EOS Utility 3 software with a screen that looks something like this.

This is also the first image that you have on that page that Canon was showing you as the instructions to register your camera with the image.canon service. Click on the Camera Settings button. You should next see this screen where you should click on the Web Services Settings button.
On Windows I had to allow the application to do a few little updates before being presented with a screen that looks like this.

Don’t be confused that the service is called “CANON iMAGE GATEWAY” here. That was an older name for the image.canon service you are trying to use now. You will need to put in the username and password you used to create your Canon ID in the previous step.
It’s a little crazy, but Canon even warns you that the CANON iMAGE GATEWAY service is going away soon. You can ignore that for now. Hopefully their software utilities will be updated to have the right information soon. The important thing is that you have a screen that looks like this.

Click on the image.canon web service on the right, then click on the arrow in the middle to add it to the left. Hit the OK button
Validate Your Camera Is Registered With The image.canon Service
Now you should have that specific camera registered to use the image.canon service. You can go back to your browser where there are the far less detailed screenshots showing you how to do this process. Click on the Next button at the bottom of the page and you will see the sign in screen again. Sign in.
If you did everything correctly you should see a page that looks something like this.

Send A Photo From Your Camera To image.canon
My excitement for this service was quickly brought back down to reality when I learned how it is that you get images from your camera to the image.canon service. Let’s walk through it and then I’ll explain.
Setup Wireless Upload to Web Service
I thought the way this should work would be to have the camera talk to a phone and then your phone would upload the image to the image.canon service. That isn’t how the image.canon service works, though that is ALMOST how the Canon Connect app works.
Instead, the way you get a photo from a supported camera to the image.canon service is through the Wireless Communication settings. Unfortunately, the way to do this is different between supported Canon cameras.
The good news is that Canon has web pages that do a decent job of providing instructions specific to each camera. Start by going to https://image.canon/st/en/index.html and scroll down until you see the big red “Select camera model” button.

Choose your camera from the list of cameras and you should see instructions that are pretty helpful to getting this setup. As an example, here is how I did it on my Canon 80D.
Before you get started, you need to decide how you are going to get your Canon camera connected to the Internet. Most photographers want to use the image.canon service while shooting away from a home or business WiFi connection and will use their phone for this. If you do want to use your phone, turn on the hotspot first.
Next, start on the first wrench menu and choose Wireless Communication settings

Then choose Wi-Fi function

Then “Upload to Web Service” (the icon that looks like a globe)
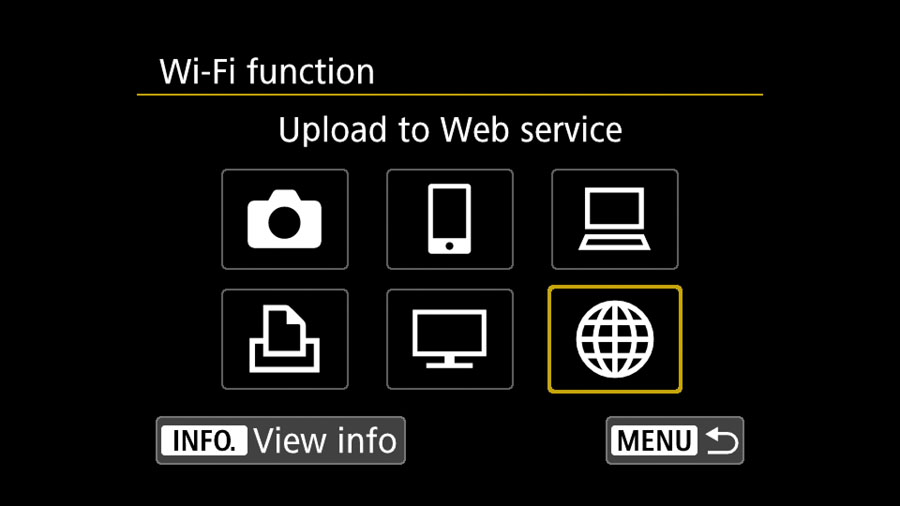
Even if you have created a wireless configuration setup for connecting your phone to your camera or your desktop to your camera, if you have never created a wireless configuration for “Upload to Web Service” then you will have to do that now.
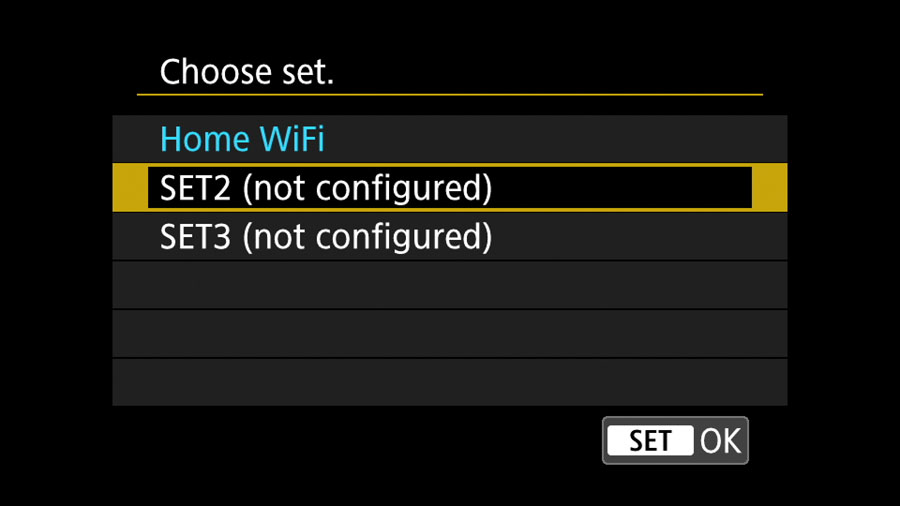
In this screenshot you can see I already created a configuration to connect to my Home WiFi, so now I am going to show you how to connect it to your phone. I am creating that configuration to have the camera use my phone for the Internet in the SET2 slot, but you can choose SET1 if you haven’t done one yet.
At this point the camera searches for WiFi networks that are available. Choose your phone (or your home/office WiFi if that is how you want the camera to get to the Internet).

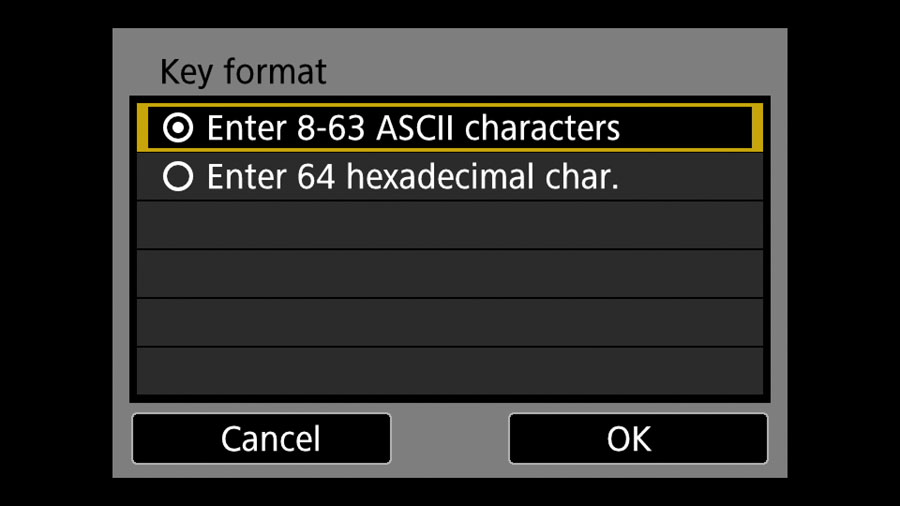
Unless you know to do otherwise (rare), choose “Enter 8-63 ASCII characters” for the WiFi password
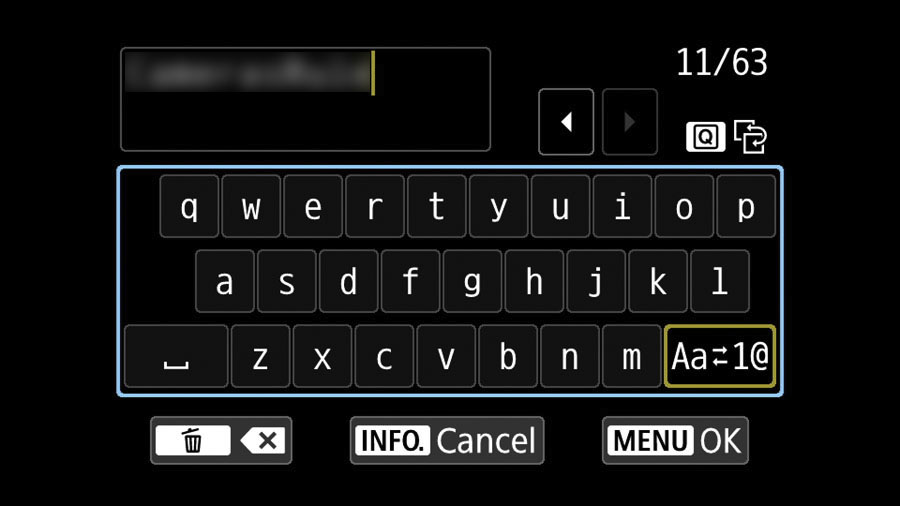
The Canon 80D has a touch screen interface that really helps to make entering your WiFi password tolerable. If your camera only allows you to use buttons on the camera to move around then this is going to take a while. Type in the password to your WiFi connection your camera will use to connect to the Internet. When finished, hit the Menu button on the camera.
The camera will attempt to join the WiFi network using the password you provided.

If you managed to provide the correct password using that terrible entry method (it usually takes me 2 or 3 tries) you will know it works when you see this next screen. Unless you know otherwise (rare) choose Auto setting and hit OK.

If you see this screen you know that you have successfully configured your camera to use a WiFi connection to get to the Internet. Now your camera is using the image.canon profile you put on the camera using the registration process above and is attempting to connect to the service with your Canon ID credentials.

If you next see a screen that shows one of your photos on your memory card, you have successfully configured everything so that you can send a photo from your Canon camera to the image.canon service!

Send Photo(s) To image.canon
At this point the way to send a photo to the image.canon service should be the same for all supported Canon cameras. Picking up where we left off with the camera allowing you to scroll through the images stored on your memory card, you can see that at the bottom of that screen there is an instruction that says you can press the SET button to send images to the service.
Scroll to an image you want to send to the image.canon service and then press the SET button. You should see a screen like this.

Even if you camera is setup to shoot raw only, for most cameras (see the list in the Things Photographers Should Consider section below) you can only upload a JPEG of the photo. By default the camera is also going to resize your image to a smaller version. With my 80D it was the S2 size (1920×1280), it may be different for the Canon camera you are using.
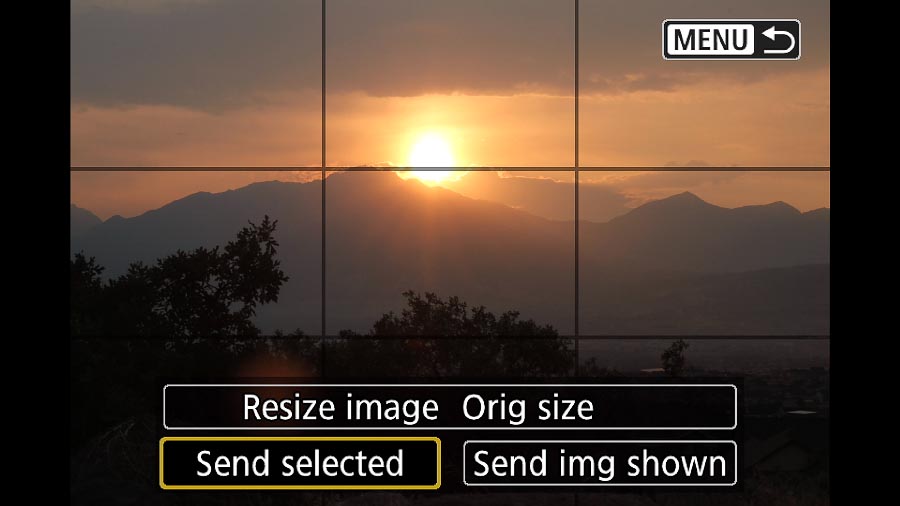
If you want to change the settings to send a full resolution JPEG (again, most cameras won’t send raw to image.canon) then you can scroll up to that Resize image button and when you click on it you should see something like this.

Choose Orig size and now your camera will send a full resolution JPEG image to the image.canon service. You should see a screen like this.

Now your choice is if you want to send a single photo or multiple photos to the image.canon service. If you want to send a single photo, click the “Send img shown” button. If you want to select multiple you hit the “Send selected” button. I’ll come back to the multiple images, here is what you see next if you hit the “Send img shown” button.

Wait for a few seconds (or a little over a minute) for the camera to use the WiFi connection and send the image from your memory card to the image.canon service. If it all works, you will see this.
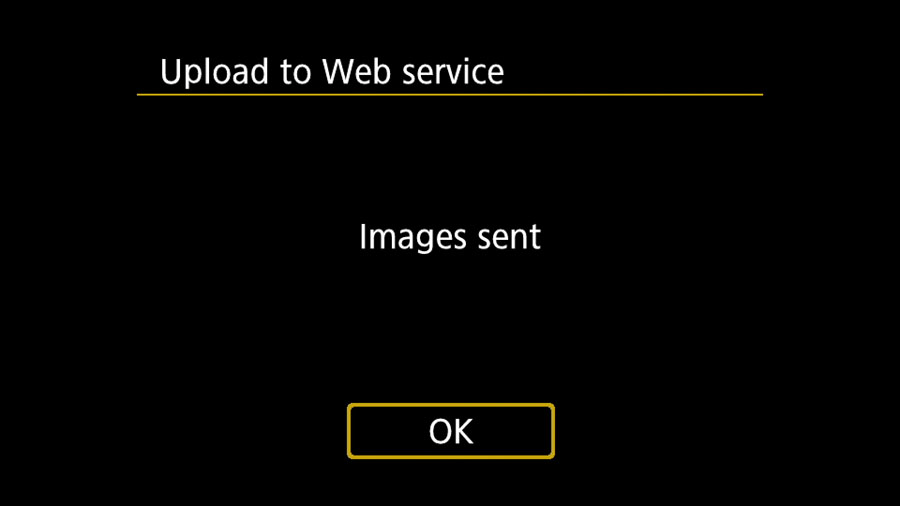
As soon as the upload is completed, the camera disconnects from the WiFi. If you want to send more images, you have to connect to the WiFi again. That sounds terrible, but it really isn’t too bad since you created a wireless configuration for it. Just a couple of clicks in the menus.
That need to connect again is probably why Canon allows you to select multiple images. Canon says that they aren’t limiting how many photos you can send to image.canon, though they reserve the right to manage their network and cloud storage should there be a technical reason to do that.
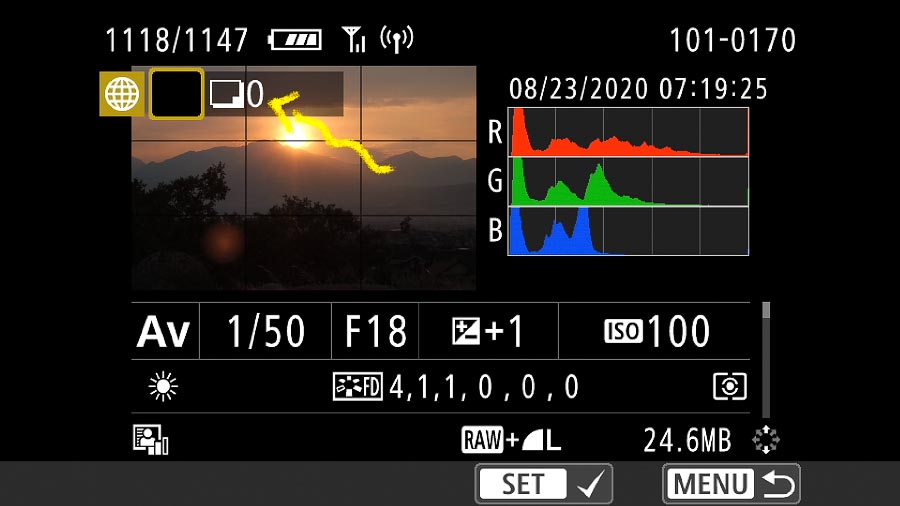
Let’s go back to selecting multiple photos for upload. Back to the screen where you had the two send buttons, you choose the “Send selected” button.
You should see a screen like this that shows you have zero images selected in the upper left and an instruction at the bottom that says you press the SET button to select an image.
Scroll to an image you want to select and press the SET button. You should see a screen like this.
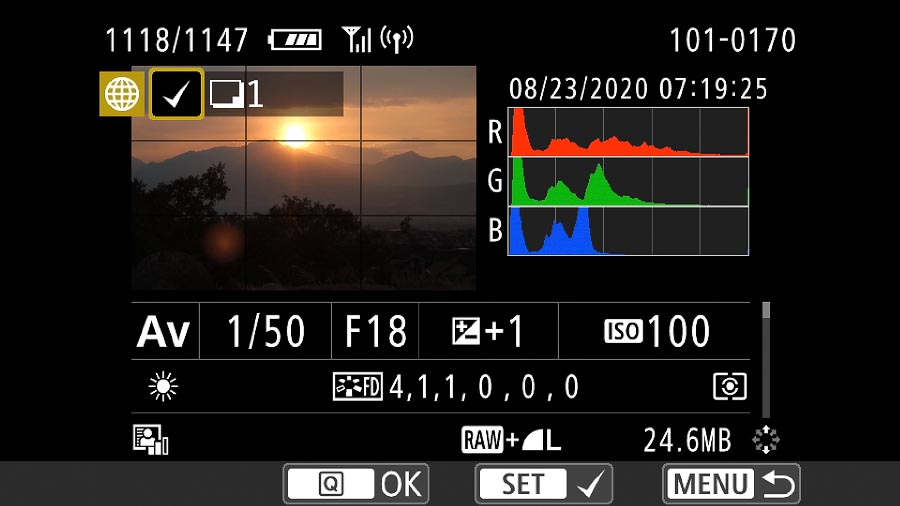
Notice the upper left of the screen has changed to show a checkmark indicating this photo has been selected and the zero has changed to 1. You also have a new instruction at the bottom telling you can hit the Q button when you are done selecting photos. Now you can scroll to another image, hit the SET button, and see that it adds it.

When you are done selecting images you want to upload to the image.canon service, hit the Q button. You should see a screen like this.

This screen is telling you that you how many photos you are going to upload to the image.canon service and how it is going to resize the image.
You can click on the Resize image button if you want to change between the Original resolution or something smaller. Now hit the Send button and very similar to sending a single image you should see a screen like this:

And finally the same screen that indicates all went well.

Camera To image.canon Transfer Times
I did a lot of testing with the camera configured to use both my iPhone as a WiFi hotspot and my home WiFi connection to see how long it takes to send an image to the service.
Predictably, the home WiFi was far more consistent than the iPhone hotspot connection. I saw a HUGE variance in transfer times when I connected my Canon 80D camera to the Internet through my iPhone hotspot. At one point I waited for 15 minutes as the camera retried 3 times to send a single image using the iPhone WiFi hotspot, and it still didn’t finish.
I don’t think I can blame Canon for this. The transfer rates and connection stability was really good with my home WiFi. It was clear to me that part of the problem is the iPhone X doesn’t provide a stable WiFi connection. I had a few problems with the camera not connecting to the hotspot or disconnecting from the hotspot in the middle of things.
iPhone WiFi hotspot stability aside, I mostly blame the huge variance in transfer times I saw on the 4G LTE service from my carrier. Not going to name the carrier because I don’t think it is a challenge specific to them. None of the carriers do a great job of covering me in my area.
The point is, the transfer times for uploading an image from your camera to image.canon are going to vary widely if you use your phone as the WiFi connection.
Here are the rates I got in my testing, throwing out the obvious outliers when the iPhone connection was not working well.
| Image Resolution | Average Image Size | Connection Type | Connection Speed | Average Time |
| S2 (1920×1280) | 500K | iPhone 4G LTE | 15 Mbps | 8.6 seconds |
| Original (6000×4000) | 6MB | iPhone 4G LTE | 15 Mbps | 25.2 seconds |
| S2 (1920×1280) | 500K | Home WiFi | 15 Mbps | 8.7 seconds |
| Original (6000×4000) | 6MB | Home WiFi | 15 Mbps | 22.6 seconds |
Accessing Your Images On image.canon
You directly access your images stored in the image.canon service in two ways. You can use a browser on the computer or you can use the image.canon app on your phone.
Accessing image.canon In A Browser
Accessing your images stored in the image.canon service using a browser on your computer is pretty straight forward. You go to https://ihub.image.canon/ and you will see a sign in screen. Sign in using your Canon ID credentials.
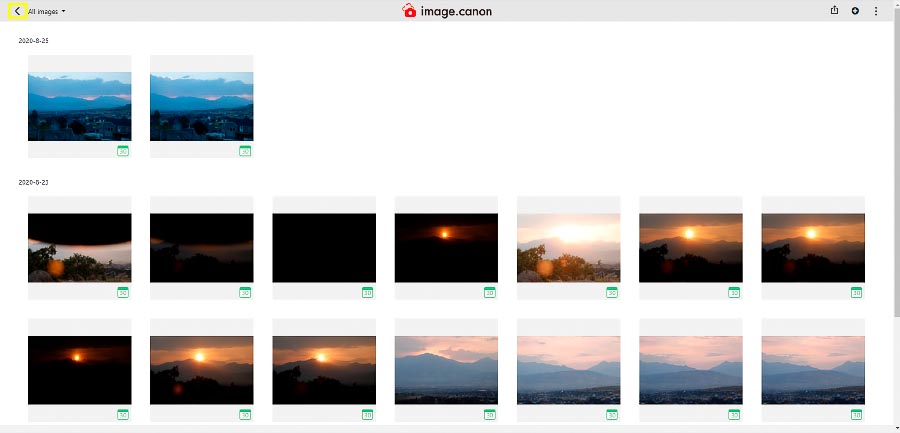
After singing in, if you have sent images from you camera to the image.canon service, you should see a page like this.
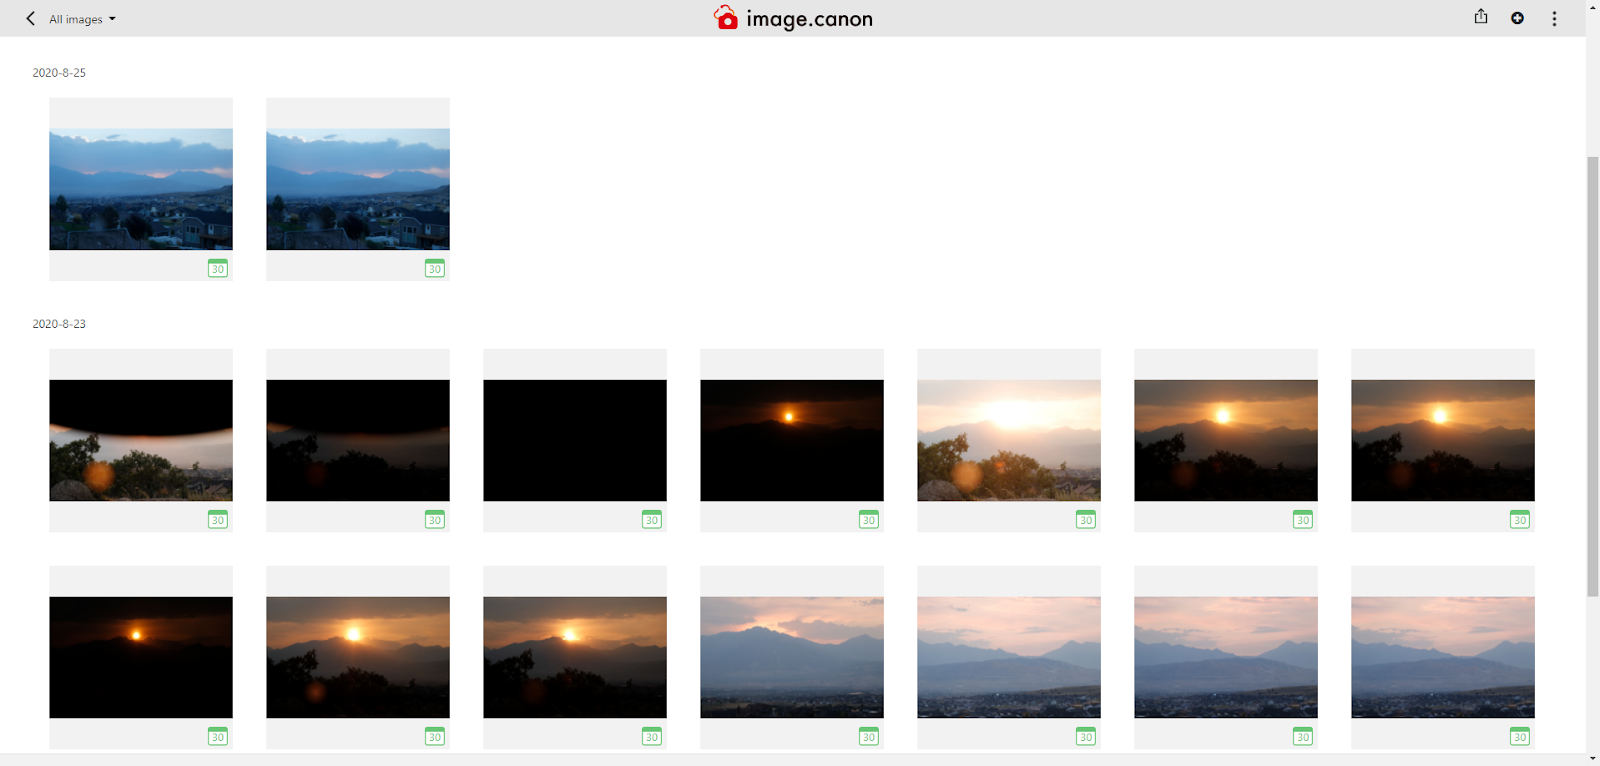
This page shows 220×146 pixel thumbnails of all the images you have uploaded to image.canon. The images with a green calendar icon in the lower right are those that will stick around for 30 days before Canon deletes them automatically. More on that automatic deletion in Things To Be Aware Of section below.
If you click on an image you will be taken to a page with just that image.

In the lower left corner you see that same green calendar icon indicating this image will be deleted 30 days after it was uploaded. You can right click on this image and save it to your computer, but it will not be either the full resolution or the smaller version (S2 in my examples) of the image you sent from the camera.
Instead, you will get an image that is 2048 pixels on the longest edge. Nothing really changes much if you click on the Open Image button at the bottom middle of the page.

The image is shown without anything else on the page, and you can right click on it to save it, but you will get the exact same image that is limited to 2048 pixels on the longest edge.
The way you can download that image you uploaded from your camera is to go back to the page that has all of the small thumbnails of your images, and choose the little box icon with an arrow pointing up that you can find in the upper right hand corner of the page.

Click on the Download item in the menu that appears.

That should change the page to look something like this.

There are little circles in the upper left of every image. You click on that circle for the image(s) you want to Download. As soon as you do that for one image the Download button at the bottom of the screen will turn orange.
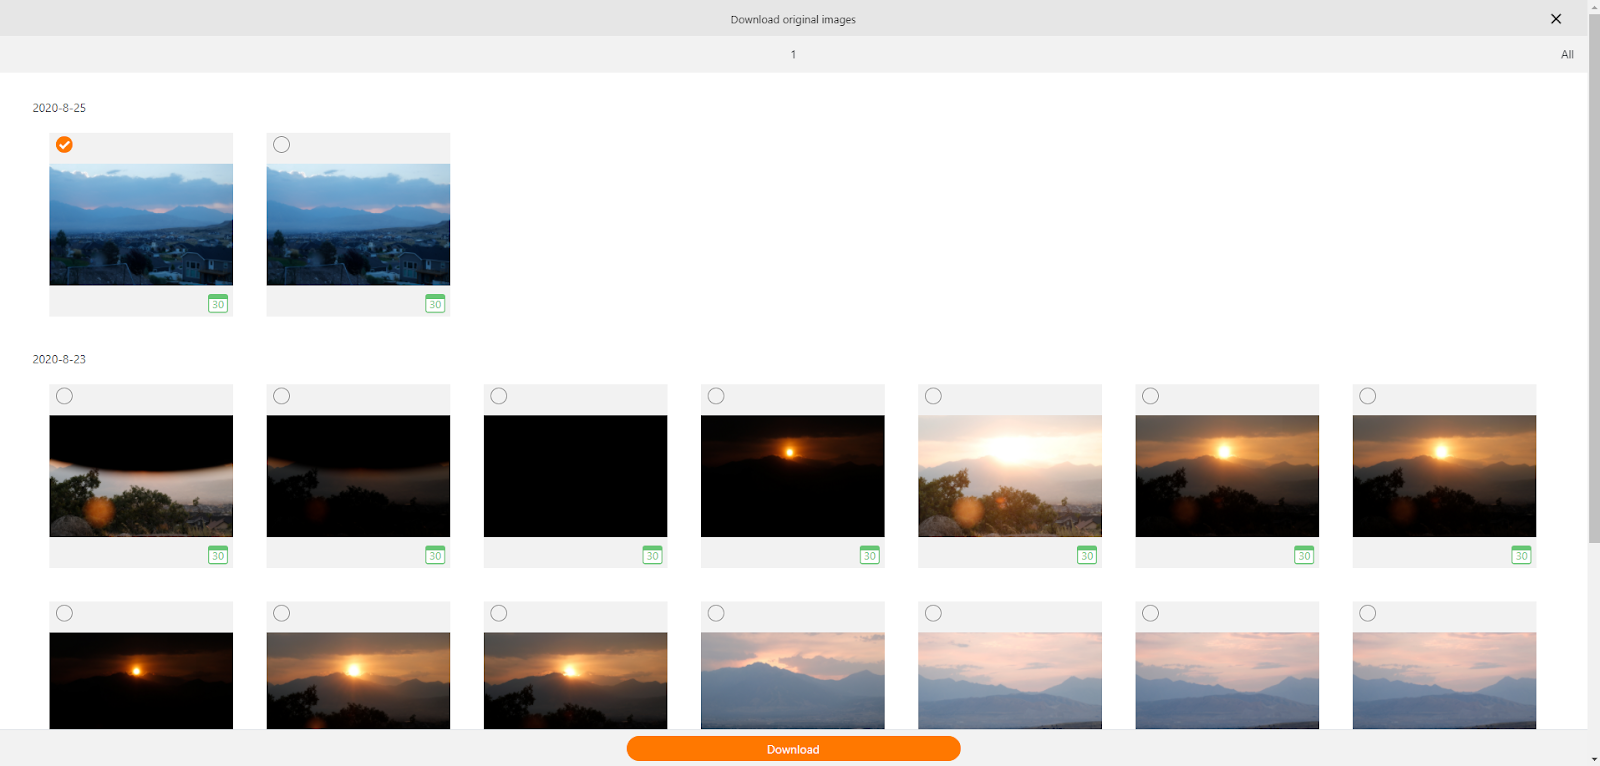
You can pick as many photos as you want. When you are done selecting photos, click the orange Download button. You will see a little pop-up window in the middle of the screen showing progress as the higher resolution photos are pulled from the service and put into a zip file.

When the progress bar is done, your computer will download the zip file that the image.canon service created for you that contains the high resolution version of the images you selected.
You can delete images the same way, selecting those you want to delete and then hitting the orange Delete button at the bottom of the screen. NOTE: When you delete an image from the service, it is gone forever from image.canon.
Finally, if there are images you do want to save beyond the 30 days when Canon will automatically delete them, you use the “Store in 10 GB” menu option and select the images you want Canon to keep forever. As the menu name implies, you only get 10GB of storage where Canon will not automatically delete your photos. As of August 2020 there is no option to buy more storage.
Accessing image.canon On A Smartphone
Start off by downloading the image.canon app to your smartphone. There is an app for iOS and Android.
Open up the app and you should see this screen.
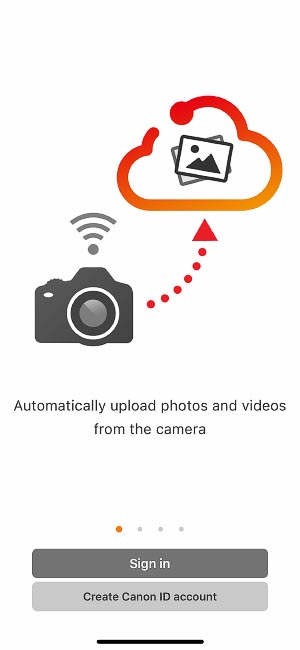
If you have followed this guide you already have a Canon ID to use and you should just hit the Sign in button. You should see a sign in screen that looks very similar to the one you see in the browser.

After signing in, you should see a thumbnail view of all your images stored in the image.canon service that is very similar to the page in the browser.

Again, there are the green calendar icons on the images indicating that 30 days after they were uploaded to the image.canon service they will automatically be deleted.
Like in the browser, you can click on an image to see just that image.

From here you can hit the Action button in the lower left and you have a lot more choices of actions you can take with the image than you get in the browser.
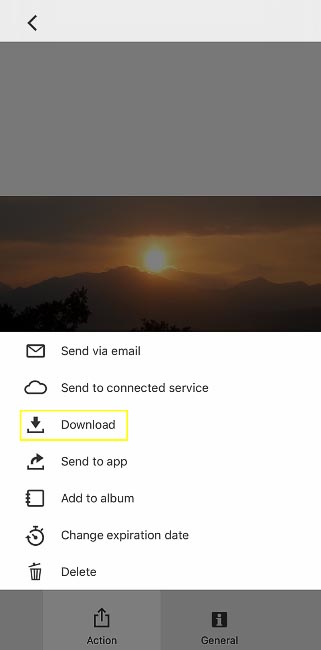
We are going to focus on the Download option here. If you hit Download the app will save the high resolution version of the image to the camera roll of your phone.
If you go back to the screen that has all of the thumbnails of your images and hit the Action button at the bottom of the screen you will see the same menu.

If you hit Download then, like in the browser, the images all get little circles in the upper left corner and you can select the images you want to download.

Select all the images you want to download to the camera roll on your phone and hit the orange Download button at the bottom of the screen. This puts the high resolution images on your phone.
Transferring Images From image.canon To Other Cloud Services
When I first heard about the image.canon service I was really excited at the prospect of having the photos on my camera go straight into my Lightroom Classic catalog wirelessly. I had this vision of pressing the shutter button and having my images just float through the air back to my computer in my home office.
That isn’t what the image.canon service enables. At least not yet. Which is actually fine for me because the connectivity just really isn’t there to support that kind of a workflow here in 2020. I want raw files and with how difficult it still is to get JPEG files sent over the Internet through a smartphone connection that isn’t going to be coming anytime soon.
That said, Canon has done pretty well with what it can here in 2020 by integrating with some common cloud providers. You have to configure the integration in the image.canon service and you have to have an account with the cloud provider. I think this is easiest to do from the browser, but you can do it from the phone as well.
The idea of image “transfers” is that once you set up the integration between image.canon and one of the supported cloud services, you can easily send a copy of an image from image.canon over to that service. Even better, with the flip of a switch, you can have that happen automatically!
To set up these integrations you have to go to the settings of the image.canon service. Again, you can do this in the browser or in the smartphone app, I think it is easiest in the browser. After signing in, you click on the left arrow button in the top left corner of the page
That should show you a screen I have already shared, but this time we are interested in the integration boxes on the right side of the page.
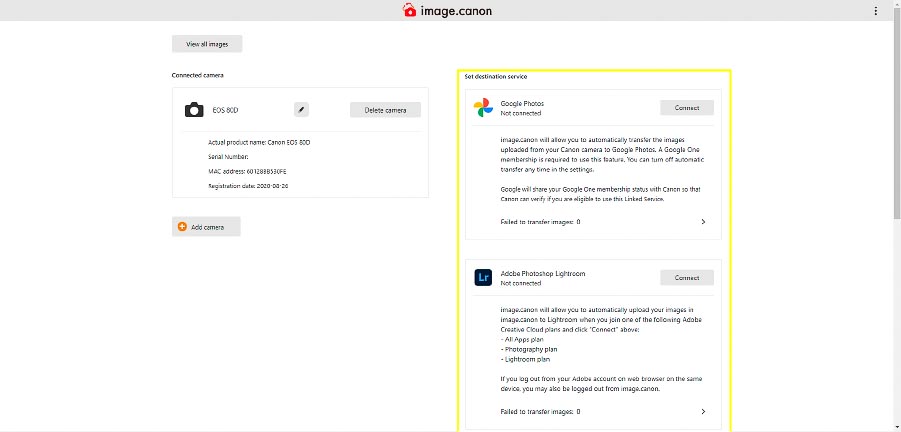
Let’s go through them.
Transferring Images to Google Photos
First up in the list is the new one that was just recently added in August 2020. The image.canon service became an official third-party integrated with Google’s Photo service. Once connected, this allows you to transfer images from image.canon to your Google Photos account.
Though there is a major catch. Read the information about what it takes to integrate with Google Photos.

“A Google One membership is required to use this feature.” Play sad-trombone here. You have to pay for Google One account to use this integration. Here are the plans that are available here in August 2020.

Granted, the Google One service is pretty inexpensive at just $20/year for 100GB, but I feel like I am dying a slow death by subscriptions. Even though I am a heavy Google services user, I pay for enough cloud storage with other providers. I don’t need this one.
As I am not a subscriber to Google One, I can’t show you how it works to integrate with the image.canon service, but it should be pretty similar to the process used in the others below.
Transferring Images to Lightroom
This is the one I was really excited about. My imagination of how the image.canon service should work was the photos floating in the air back to the Lightroom Classic catalog on my home computer. Not how it works, but let’s start with the requirements for the integration.

The thing to point out first is that this is the newer Adobe Photoshop Lightroom application, not the Adobe Photoshop Lightroom Classic application. This integration only works with the cloudy version of Lightroom that looks and functions on your computer just like it looks and functions on your phone. Check out this article where I detail the differences between Lightroom Classic and what at the time was called Lightroom CC.
Most photographers have to choose between Lightroom Classic and Lightroom (cloud-service) as they sign up for the Adobe Creative Cloud. Here in 2020, Adobe pushes you to Lightroom (cloud-service) over Lightroom Classic. If you have Lightroom (cloud-service) you can set things up so that any image you upload to the image.canon services automatically ends up in your catalog. You can’t easily make this happen if you use Lightroom Classic.
Note: It is technically possible to transfer images from image.canon to Lightroom Classic. First, make sure you have a folder defined for cloud syncing (click on the cloud icon in the upper right). Next open Lightroom (cloud-service) and sync. Then open Lightroom Classic and sync. You will see the full resolution JPEG image put into the folder you specified be used to sync. If your camera supports raw send to image.canon, a raw will go to Lightroom (cloud-service), but Lightroom Classic will only get a JPEG.
For those that use Lightroom (cloud-service), let’s go through how to set that up. First you click on that connect button in the upper right of the box above. You should see an Adobe sign in screen like this.

Put in the username and password you use to sign in to your Adobe Creative Cloud subscription and then you should get asked to confirm that you want to allow the image.canon service to have some limited access to your Adobe Creative Cloud service.

If you are comfortable with granting image.canon that access, click the Allow access button. If you are not, you can’t use this transfer service. If you complete this successfully, you should see this in the image.canon settings page.

By default the “Automatically transfer images from camera” switch was enabled for me as shown above. With it enabled, every image you send to image.canon from your camera from this point forward will automatically put the image into your Lightroom (cloud-service) catalog.
I don’t use Lightroom (cloud-service) on my desktop computer almost at all because the features haven’t caught up to Lightroom Classic and because the Adobe cloud storage requirements do not work for me.
However, I do still have access to the application and tiny amounts of Adobe cloud storage. I was able to validate that it is as simple as opening up Lightroom (cloud-service) on my computer and the image I uploaded after enabling this integration was there.
Transferring Images to Google Drive
Here are the requirements for setting up transfers from image.canon over to Google Drive.

Seems pretty straight forward. No subscription or special plan requirements! Completely free, now we are talking.
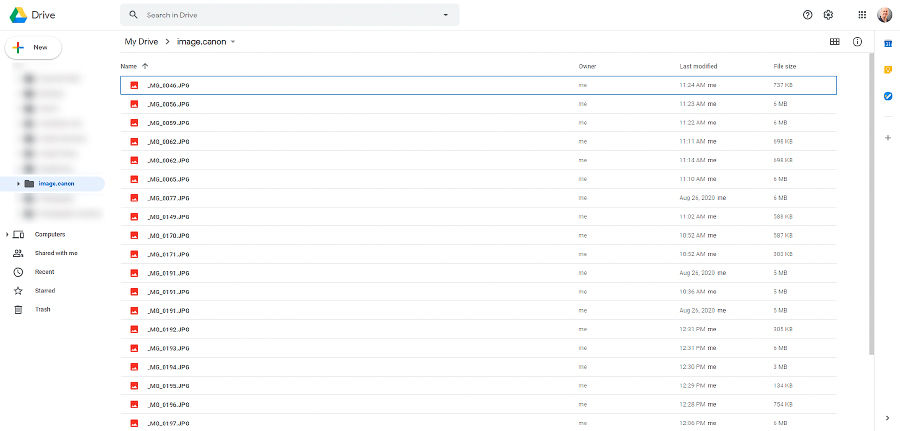
Unfortunately, I have to warn you that every image you transfer from image.canon over to Google Drive counts against your storage. It doesn’t matter if you have the camera resize the JPEG to a smaller size before sending it to image.canon, even a file that was 134KB counted against the storage of my Google Drive.
This is also NOT Google Photos. Google Drive and Google Photos are separated enough if you set up the integration to Google Drive you won’t see your images in Google Photos. To make that happen you need that Google One subscription and set up that integration to Google Photos as mentioned above.
If you are good with that, and having your images automatically end up in Google Drive will be beneficial, hit that Connect button in the upper right and you should see a screen that asks you to login to the Google account you want to connect (or to pick among the Google accounts you are already logged in with). Then you should see the screen where you have to allow image.canon the permissions to integrate with your Google account.
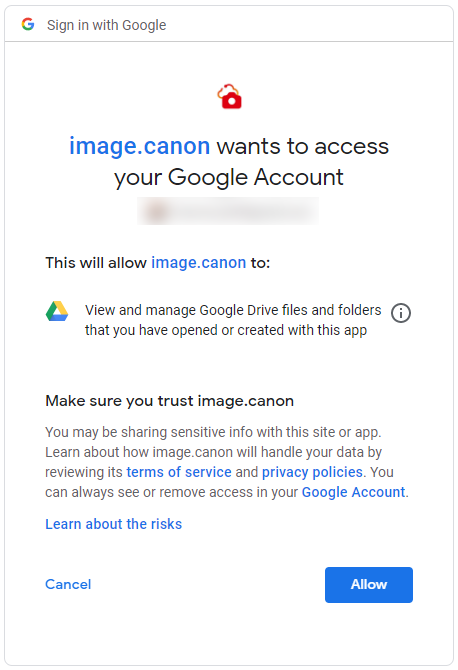
If you are OK with the permissions you have to allow, click the Allow button. A few seconds later you should see the Google Drive settings updated to look like this.

If you want your images automatically transferred from the camera to Google Drive, enable that switch.
I validated that after enabling that switch every image I uploaded to image.canon was copied into a new “image.canon” folder in the Google Drive of the Google account I signed in with.
Transferring Images To Flickr
Here are the requirements to integrate image.canon to Flickr

Not much to it. No special account needed. Hit the Connect button in the upper right and like you expect you will be asked to login to Flickr with the account you want to integrate with image.canon and if you want to allow the following permissions

If you are good with those permissions, hit the “OK, I’LL AUTHORIZE IT” button. If everything was done correctly, you should see this in the settings of image.canon
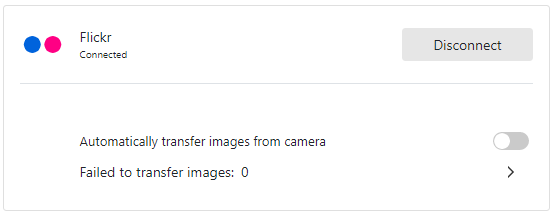
Again, if you want to have the photos you upload from your camera to image.canon to automatically get copied into your Flickr account, enable that “Automatically transfer images from camera” switch. It is disabled in the image above.
I validated that after enabling the automatic transfer every image I uploaded to image.canon was copied into a new “image.canon” album in Flickr.

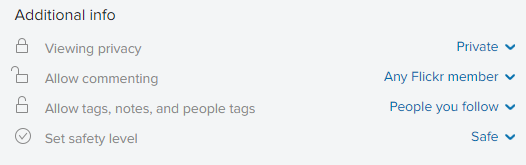
It is also helpful to know that the image was by default made “private”
Like Google Drive, this all works without a Flickr Pro subscription. Just be aware that every image you transfer to Flickr using image.canon counts against the number of uploads you can make in a month on the free account.
Things Photographers Should Be Aware Of With The image.canon Service
Now that you are set up to use the service, we need to go over a few things I haven’t seen covered very widely in the media about the image.canon service. You should check out Canon’s FAQ page for the image.canon service, but I want to highlight a few things here. First up, the storage workflow.
Limitations Of image.canon Cloud Storage
I already covered a lot of these things above, but there are the things you need to keep in mind as you use the image.canon service.
- An unlimited number of Images can be stored for free on Canon’s servers
- The images are only stored for 30 days. 30 days after the image was uploaded to the image.canon service, Canon will automatically delete them.
- Images deleted by you, or by Canon after 30 days, cannot be recovered.
- As of August 2020, the following cameras DO NOT support sending raw files to image.canon, only JPEG
EOS 5D Mark IV / EOS 6D Mark II / EOS 6D / EOS 80D / EOS 70D / EOS 77D / EOS Rebel T7i / EOS Rebel T7 / EOS Rebel T6s / EOS Rebel T6i / EOS Rebel T6 / EOS Rebel SL2 / EOS 200D / EOS 800D / EOS 750D / EOS 760D / EOS 1300D / EOS 1500D / EOS 2000D - You can manually select a few images to stay in image.canon for more than 30 days. That space for permanently storing images is limited to 10GB. There is no option to buy more storage in image.canon
- Image thumbnails you see in the browser are limited in size to 2048 pixels on the long edge. If you want to get the higher resolution images out of the image.canon service to your computer you need to use the Download functionality described above.
All of those restrictions on storage mean image.canon does not allow you to come home from a shoot and start editing your photos without having to do the import process. At least it doesn’t mean that for me. I want raw files and the connectivity limitations of the service aren’t yet good enough to support a raw workflow. Plus, I use Lightroom Classic, and image.canon doesn’t work with Lightroom Classic (see below).
Intellectual Property Rights With image.canon
It is always important photographers look specifically at who owns the image and what the cloud provider can do with the image once it is uploaded to the cloud service. You can check out the full terms of service at https://image.canon/st/en/term-of-use.html but here is the part to pay attention to.
“A Member retains ownership of his or her Image. By uploading Image to the Service, a Member grants Canon (including its affiliated companies and third party service providers and business partners) right and license to copy or otherwise use, on a worldwide basis, free of charge, the Member’s Content for the purpose of (a) providing the Service, (b) improving the Service, and (c) improving and developing current and future Canon products and services, including supporting one (1) or more trainable datasets used in AI engines. The right and license continue until relevant Content from the Service is deleted.”
The wording in bold may look a little concerning at first, but I read it as Canon saying they can use your image for troubleshooting purposes if you upload it to the image.canon service. To me it is clear this does not give them the right to use your image for any other purpose – including marketing/advertising (very common with cloud services).
I think they are just covering the possibility that they may have to use your image to troubleshoot problems with the service.
The image.canon Service Does Not Sync To Lightroom Classic
It is worth pointing out again that as of August 2020 the image.canon service does not easily sync images to Lightroom Classic. You can set up the integration of image.canon to transfer images to Lightroom (cloud-service), but that is very different from Lightroom Classic.
It is technically possible to make this work, but it isn’t super simple. Buy the PDF version of this page to get that detail.
Adobe told us many years ago that they wouldn’t be adding any new cloud syncing capabilities to Lightroom Classic when they released their newer Lightroom (cloud-service) application. They have held true to that and you can’t use image.canon with Lightroom Classic.

Get the 58 page PDF of this article with high quality images for only $1.99!