Jeff and Greg Benz discuss the what, why, and how of RAID for photographers.
What Is RAID Storage?
RAID is a way to make a few hard drives work together to look like they are all one drive to your computer that can be very fast and more reliably than a single drive.
We try hard here on Photo Taco to take a deep dive into technical topics and explain them in terms that are easy for beginning photographers to understand. We have quite the challenge set out in front of us to make that happen here with RAID because it is incredibly technical and can be extremely complicated.
RAID has been around since the early days of spinning hard drives. Those spinning drives have two problems. They are really slow and they are prone to break. I feel like I break everything. I think I have had no less than 5 hard drives crash on me. You think that as computers continue to improve that someday we won’t have to worry about these kinds of things but that just doesn’t seem to really be happening.
Hard drives are like ticking time bombs. They will fail. Period. Not a matter of how well you care for them. They are going to fail. You need to plan for it and be ready for them to fail.
Engineers a while ago figured out that you can solve these problems by chaining them together. The speed part is pretty obvious, putting a whole bunch of drives together you can see where if you pull data from all of them at once that is faster than asking a single drive for data.
The redundancy piece is maybe not as obvious. RAID systems can be configured so that your data files are copied to multiple drives so that if/when one of those drives fails you won’t lose your data. You don’t have to suffer through any downtime either because a single drive can fail and everything can go on as normal.
As you configure RAID you sort of have to choose between how much storage you are going to have vs how much redundancy there is in the system so that you can survive a drive failure. You can think of RAID as a system that kind of auto-backs up your data across multiple drives so that a single drive failure doesn’t mean you lose any data. However, this is NOT a replacement for backup. You still have to implement a 3-2-1 backup solution and you should think of a photo being on the RAID system as being only a single copy of your photos.
What Does a RAID System Look like?
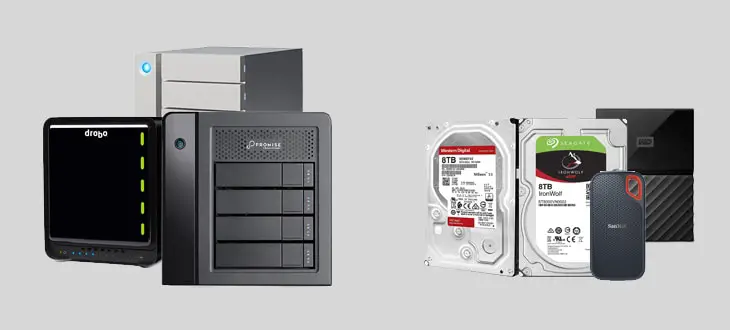
A raid system is a hardware device, called an “enclosure”, that is large enough to plug in four or more 3.5” desktop hard drives. It is designed to be in an office, nor something that is portable.
RAID devices connect to your computer. They are generally the size of a shoebox. They are kind of big and heave and not really intended to be mobile in any way. There are some small types of RAID systems out there, like the Drobo Mini where the enclosure is meant for smaller and lighter SSD drives, but most are fairly large and intended to be put in an office space and left there.
These things will usually have a little bit of heat around them because when you have multiple hard drives powered on they produce some heat. A good enclosure will deal with that heat with some cooling usually with fans sending it the back. Not only are the enclosures really built to stay in an office space, the drives you put them are not really designed to be moved around on a frequent basis.
As we are talking about RAID systems here for photographers, even if a photographer is frequently out and about creating and editing photos, these are systems that stay at the office and you plug into when you get back from your travels.
Why Would a Photography Want RAID Storage?
A photographer would be interested in RAID storage at the point where their library of photos is so large it doesn’t fit on one or two external hard drives.
Photographers should seriously consider investing in a RAID system as soon as they outgrow an external hard drive. I have talked previously on the podcast about storage walls that photographers run into. I think every photographer gets stopped cold by running into two storage walls and then they scramble to figure out what to do about it when they hit them.
First Storage Wall
The first storage wall they run into is filling up their internal drive. Here in early 2019 this may not be as prevalent as it once was because most computers now come with an internal drive that is pretty small. Really it is funny to me as a technology guy that I am saying 256GB of storage isn’t too much, but really for a photographer that isn’t much.
Even 1TB of internal storage in a computer today (which is pretty large and most likely you don’t have this much space) is going to get used up pretty quickly. A 32GB memory card is really common for photographers to use in their cameras and if you are lucky enough to have 1TB of internal SSD storage in your computer you would fill that up after dumping a full 32GB card to your computer only about 20 to 30 times. It doesn’t take a lot of shooting to fill up an internal hard drive on most computers today.
There are a few options to overcome this first storage wall of filling up the hard drive in your computer. The very best, though somewhat expensive option is an external Solid state drive (SSD). They are coming down in price enough that they are really good options. They are super fast (especially through a USB-C/Thunderbolt 3 connection) and more reliable than spinning drives when you want to use them on the go. They are also small and light and you can find a lot of options that don’t have to be plugged into an outlet now, it is a feature you should look for called “bus powered” so that it is powered by the connection to your computer. Super handy.
My very favorite external SSD for photography and a lot of other purposes is the SanDisk 2TB Extreme Portable external drive. It is blazing fast, you can edit photos and video from it no problem through the super speedy USB 3.1 connection. It is AMAZING!!!! The problem is it is nearly $400 for the 2TB. You could go down to 1TB for about half the cost and half the storage, but there are other options if that is feeling too much.
Even more reasonable to overcome that first storage wall is the WD 4TB My Passport Portable External Hard Drive that runs about $100. It isn’t as fast as the SanDisk Extreme Portable, but the USB 3.0 connection provides enough speed to make editing in Lightroom functional. Best price to performance for photographers just getting started for sure and a fantastic way to overcome that first storage wall. Just remember, this is a relatively temporary fix. Something to buy you some time until you can afford to get into RAID. That second storage wall is coming and when you hit it you have to go RAID to truly overcome it.
If you don’t want to buy either of the solutions linked to here, there are a couple of things you should look for as you decide on an external drive to buy. Best speed will come from a USB 3.1 (USB-C) or Thunderbolt connection. USB 3.0 is going to be the bare minimum. The drive type being SSD is the fastest option too, but to save money make sure it runs at 7,200 RPM (do not use 5,400 RPM or below).
RAID is a pretty good jump in cost. Probably have to plan on spending at least $1,000 for RAID. You can very easily get to the $3,000 price range to buy the enclosure (more on this later) and the hard drives to go in it. To solve the problem of that first storage wall you don’t jump to RAID immediately, that just doesn’t make a lot of sense. You probably have a photo library that is less than 1TGB in size at that point and to go straight to a RAID system where you will probably have about 30TB of storage available to you is overkill.
Before leaving this fist storage wall, I also want to mention that you also need to think seriously about backup at this point. You need to implement a 3-2-1 backup system to reduce your risk of losing a photo to almost none. Don’t buy just one external drive, buy two. Use a utility like bvkup2 on Windows or Carbon Copy Cloner on Mac to replicate the photos on one drive over to the other. Then consider an online backup service like BackBlaze (I LOVE LOVE LOVE BackBlaze and I have tried nearly all of them) to cover any disasters that might happen between those two drives. I have a related episode called ULTIMATE Guide to Backup for Photographers that you should check out for more information on 3-2-1 backup.
Second Storage Wall
Now for that second storage wall that photographers slam into when you they fill up that external drive. Now you could get a second, third, fourth or more external drives, but I don’t recommend that approach. It becomes difficult to organize things and be able to find photos when they are spread out over multiple drives and it is tough to make sure you have them all backed up appropriately.
I highly discourage photographers from playing the game of using multiple external drives over RAID. Yes, it is far less expensive, and as a hobbyist photographer myself I am willing to do a lot of work on my own in order to save money. However, the trade off in this case is simply not worth it.
Lightroom is built to catalog every single photo you take so that you can always find and use them. When you have your photos dispersed over multiple external hard drives it becomes hard to organize and manage them, no matter the labeling system you are thinking you will use. Just don’t do this!.
Hard drives also do not store terribly well. They can break just sitting on a shelf, so don’t plan for that to be your long term storage plan or one day when you really need a shot from that drive you may find it doesn’t work anymore when you plug it into your computer.
Plan for and go to the RAID option when you hit that second storage wall.
RAID Storage to the Rescue
A better way to solve this problem photographers face with that second storage wall is a RAID system. It is a more expensive solution for sure, which is why you only go to it after you have gone to a good external drive. It is also more technically complicated than the very simple way you plug in an external hard drive, but both of those cons are outweighed by the pros such a system can provide.
Across all of your storage needs for photography, even with solving that first storage wall, there are 5 things to think about with storage solutions:
- Size. Obvious need here.
- Speed. How quickly can the data be accessed read and write to and from the drive?
- Reliability. How robust is it against failure?
- Portability. How mobile is the storage?
- Cost. How much does it cost?
You have to balance all five of those things. In overcoming that first storage wall with a single external drive, but these come into play far more when choosing a RAID system. In particular, you are going to have to choose a balance between size and reliability. But let’s go through some of these in a little more detail.
Size: There are some RAID systems that provide less storage, but I don’t recommend even considering them. Skip the 2 drive RAID systems, you want one that holds a minimum of 4 drives. With such a RAID you can get 20 to 45TB or more. This is why you go to RAID to overcome the second storage wall.
Speed: Something you have to really look for in your external drive, but in RAID as long as you use Direct Attached Storage (DAS) you are going to get phenomenal speeds. DAS means that the RAID system is attached to your computer through a USB/Thunderbolt cable, not a network connection or through WiFi. Those kinds of systems that connect through an Ethernet cable or WiFi are called Network Attached Storage (NAS) and you do not want to edit photos from a NAS connected RAID system. They simply aren’t fast enough.
Reliability: Like speed, this is a massive advantage to RAID in that if you configure it correctly you can have your data survive if one of the hard drives in your RAID fails. That’s right, you don’t lose your data if one of the drive fails. However, and this is super super important to take away from this article, RAID is absolutely not a replacement for backup. More on this below.
Portability: This is something you give up with RAID. These devices are not small. They are not light. You have to plug them into a wall outlet. You aren’t going to be dragging you RAID with you as you travel. At least not the RAID being talked about here and I don’t recommend those RAID systems out there that are meant to be portable, just use that SanDisk Extreme Portable for that.
Cost: Yep, going to take some investment here. $1,000 is kind of the entry level and you can get into multiple thousands of dollars without much trouble but there is really no other way to make large amounts of storage available to hold your ever expanding photo library.
How Should Photographers Configure RAID Systems?
Photographers should NEVER EVER use RAID level 0 or 1. Get a RAID that uses at least four drives, have a cold spare. Use RAID 5 if cost, speed, and/or storage space is most important. Use RAID 6 if protecting data is most important.
Number of Drives In Your RAID
The first thing to talk about with configuring a RAID is the drives you put in them. You are asking the device to make a bunch of hard drives all look like one, and even though some of the RAID devices (Drobo being the one who MOST markets this feature) will let you use any number of disks of any storage size things will work best if you have at least four disks in the RAID and they are all the same storage capacity.
I recommend a minimum of four hard drives. You can buy RAID systems that use fewer drives, but you won’t get the benefits of speed and redundancy you want with any less than four. You can add more disks to the system if there are more bays in the device, which is great, just plan to really not use the RAID for a while after you do that because it has a lot of work to do in order to make that new disk part of the system.
You also want to make sure you have a cold spare drive on hand so that when one of those drives fails you can instantly replace it. The cold spare drive should be the same capacity as the others. If you don’t do this, when one of the drives fails you run the risk of LOSING ALL OF YOUR DATA as you order and wait for a new drive to come. Yes, the RAID can survive a single disk failing, but if another drive fails while you are waiting to replace it then you will lose all of the data.
In fact, even if you get that new drive before another fails, after you put that drive into the RAID it has to go through an extensive process to incorporate that drive into the system. It is going to take some time (probably days, maybe weeks or longer depending on the amount of storage in the RAID) and it is very demanding on the other drives in the RAID so the chances that another will fail during this process goes up. If your RAID tells you a drive has failed you take care of it immediately!
Since all drives will fail, I recommend replacing them after 3 years of use to minimize the possibility that all of them fail at the same time. To do this you buy a new drive that has the same or more capacity and then take one drive out of the system and replace it at a time. Wait for the system to get all the way through the rebuilding process, and then replace another. This could take a very long time to get through replacing all of the drives in something like an 8 bay RAID, but it will lower your risk of losing your data.
RAID Configuration
Smart people that came up with the concept of RAID many years ago also came up with multiple ways to configure RAID. They called each way to configure it a RAID level. I am not going to go through all of the RAID levels here, you can find lots of information about that elsewhere. Instead I am going to just recommend that photographers use RAID level 5 if they care most about capacity, speed, and cost. If a photographer cares more about reliability, then go with RAID level 6.
With RAID level 5 the RAID system can survive the failure of a single drive. You could continue using the RAID just as if nothing happened when one of the drives crashes completely. You don’t lose anything. Fabulous, but as mentioned earlier you DO NOT WANT TO DO THIS! Soon as a drive fails it is red alert to get it replaced as quickly as you possibly can. This is so important it is worth repeating here. If you lose a second drive before you get it replaced then you will lose all of your data. Every single bit of it. There are recovery services, but you can expect to pay massive amounts of money for that.
With RAID level 6 the RAID system can survive the failure of two drives before you lose all of your data. You can breathe a little easier here because the chances you are going to lose 3 drives from a RAID system before you get them replaced is much smaller. The trade-off is capacity. With RAID 6 you are telling the RAID to use two disks worth of capacity for keeping your data safe and that is storage that won’t be available to you. RAID 5 for more storage, RAID 6 for less chance of losing anything.
That said, it can be difficult to even figure out what you are choosing as you configure your RAID the first time you plug it in. In trying to make the products more consumer friendly most of them provide some kind of management software that walks you through configuring your RAID the first time you plug it into your computer and since most people don’t know what RAID levels are they don’t present it that way. You have to dig through that management software to find it. But in general you will probably see something along the lines of single disk protection vs. two disk protection and you are really deciding between RAID 5 or RAID 6 in doing that.
With the drives in the RAID and after you have told the software how you want it configured, the device is going to spend some time doing a process called “array initialization”. This can take some time depending on the RAID and how much storage you have inside it. A lot of them will let you use the RAID while this process is going on, but it will function more slowly and I recommend you don’t use it until it has completed.
Special Considerations for Mac
There are some special considerations for Mac computers with DAS RAID systems that you should be aware of. Greg Benz has a very helpful article that you need to check out on the topic.
What RAID System Should Photographers Buy?
Photographers should look into direct attached storage (DAS) RAID systems like those from Drobo, Promise, or LaCie who all provide good options. Don’t go less than 4 drives in the RAID.
Now for the truly difficult question to answer. Difficult because there are massive fanboys that will fight to the death that the product they are using is the BEST! I talk to a lot of photographers about their storage needs. I hear from photographers who have hit both that first and second storage well very regularly. It isn’t hard to convince them to consider a RAID system for the photo storage needs, and the next question is which RAID system to invest in.
Let’s talk about the one that is nearly a household name for photographers – Drobo. I think the biggest reason Drobo is so popular among photographers is the tremendous job they have done marketing their products and their proprietary configuration they call BeyondRAID.
This BeyondRAID configuration has pros and cons. A really big pro is the simple way it is configured and how it can automatically use any number of disks of any capacity. You can mix and match and Drobo will just deal with it. If that sounds good to you, this is the Drobo I recommend if you have a USB-C connection on your computer (all modern Macs and PCs).
A con for Drobo is that BeyondRAID is proprietary. Not following the standards means less technical help outside of Drobo customer service and I have had many photographers share horror stories about their experiences there. Weeks on and off the phone trying to work through complete data loss with the entire Drobo device suddenly failing. Like overnight where it was working fine one day and the next day the entire thing was just dead. Even after replacing the Drobo device itself and putting the same disks back into the new device, the data was gone.
I have also heard from a lot of photographers who are MASSIVE Drobo fans. They love how simple they are to use and how fast they perform. They have never had a single problem with them over many years. I am sure I will get comments on this very post from photographers who couldn’t be happier with their Drobo.
I am not saying that buying a Drobo is a mistake, but they are not for me personally. Just not reliable enough as a device to me even though any device is going to be subject to failure. I recommend Promise or LaCie for direct attached storage RAID. You can start off small with 12TB of data with these devices coming with disks in them and then replace the drives as you need more storage.
Be careful as you are shopping for a RAID system to note if the price includes hard drives or not. The hardware device itself is called an “enclosure” and with some of them you can buy just the enclosure without any drives so that you can choose which drives go in there. Others don’t offer any options but to buy an enclosure plus the drives at once (probably to make sure there are some quality disks in there for fewer customer support calls). I don’t have a preference either way, but just watch that as you are comparing things so that you aren’t thinking one is much less expensive than another because it was only the enclosure with no drives.
What Kind of Hard Drive Should Photographers Put In RAID?
Not all hard drives are created equal, but these days I don’t think there is one manufacturer that has a huge advantage in quality or reliability over another. Some RAID devices don’t let you put your own drives in at all, requiring you to buy drive units from the manufacturer, which can be fine because you will know you are getting high quality, and probably tested, drives. Not a big enough deal I would go out and search for that as a deciding factor, but something to note.
I would suggest buying a brand that is well recognized like Western Digital, Seagate, HGST (now owned by WD) or the like. Be weary of stories from your buddy bout a drive that failed on them in some spectacular fashion because all of them have stories like that to go along with hundreds to thousands of stories where they just worked for a long time. Far more important to be ready to deal with a drive failure than the brand of the drive you bought.
The best resource I can point you to when deciding which disks to buy for your RAID is the BackBlaze Hard Drive Reliability reports they produce. You can find them here. The thing that is valuable there is identifying a particular make/model of hard drive that by their experience with large numbers of them have shown more of a statistical likelihood to die early than others of the same capacity. I wish other massive consumers of hard drives like Google, Microsoft, and others would provide similar information so that we could all avoid buying the occasional model of drive that just had something wrong about them that makes them less reliable, but this is the only one I know of.
The one thing you should look for, and it may be really hard to find the information on the drive you are looking to buy (you certainly can’t search Amazon by this), you want Perpendicular Magnetic Recording (PMR) hard drives vs. Shingled Magnetic Recording (SMR). Check out the incredible Hard Drive Buying Guide from BackBlaze for more information, but they point out specifically there that SMR with RAID 6 would be extremely problematic.
Enterprise vs Consumer Hard Drives
I also like that BackBlaze investigates the value of drives the manufacturer labels as “enterprise” in some fashion vs. those market by the manufacturer as “consumer” (see the “Enterprise versus Consumer Hard Drive” section in this post). To sum up their conclusion, the “enterprise” drives were statistically better as far as reliability goes, but not by enough to account for the significant difference in price for consumers.
It is important to note there is a dramatic difference in warranty. Enterprise drives usually get 5 years of warranty while consumer drives have warranties that have shrunk all the way down to 2 years. So the enterprise drives are supposed to be slightly more reliable and they are warrantied for longer.
To me as a hobbyist looking to do RAID for as little investment as I can, it isn’t worth paying more for the “enterprise” class drives and I am going to choose the less expensive option. You’ll have to decide for yourself if you want to pay more to slightly increase the chances of getting more time out of a disk before it fails and maybe get a replacement for free off warranty. Just remember, it WILL fail.
NAS vs Desktop Hard Drives
There is also a difference between drives marketed as “NAS” which you might remember stands for network attached storage vs. those that are for desktop usage. Rob Andrews over at nasompares.com has an article What Is The Difference Between NAS Hard-Drives And Standard Hard-Drives? Is It All A Big Con? where he makes a compelling argument for buying drives designed for NAS. Like the Western Digital Red NAS, Seagate IronWolf NAS, or HGST Desktar NAS drives.
I would consider this more than I would the consumer vs. enterprise drives because I have had multiple storage engineers tell me that this is a REALLY big deal. They swear that you need to buy the NAS drives vs desktop. Again, I personally don’t think it is worth the extra money for me so long as I can find a PMR drive and I am going to go with the less expensive option here, but I wouldn’t fault you at all for deciding you want to buy disks that are designed to operate in a NAS.
Does RAID For Photographers Need to Be Backed Up?
Yes, photographers absolutely need to backup their RAID system. The built in redundancy of a RAID system is not enough to mean you don’t need to backup your photos..
Now let’s talk about backup. I have heard the argument constantly that if a photographer has a RAID system for their photos they don’t need any kind of backup. This is simply not true. The 3-2-1 backup system means you need 3 copies of the photos on 2 different mediums, one off site. The photo that is on your RAID, even though it is technically written to more than one drive, should be considered as a single copy of your photo.
Sure, you aren’t going to lose the photo if one (maybe two if you are RAID 6) hard drives fails in your RAID, but you can still lose the entire RAID system if more drives fail or the device itself fails. You might be able to recover the RAID either by replacing the device or by using a professional recovery service, but you want to have another local copy to work with while doing that and something off site.
The best way to do this would be two RAID systems where the data is being replicated, but that is probably cost prohibitive even for the most successful professional photographer. An alternative is to use a large external drive to copy off your most recent photos and then additional large external drives for the older photos that don’t fit there. Now these aren’t intended to be used actively with your editing software, that is a nightmare there, but for the purposes of backup this is a low cost option that can work pretty well to have copy number 2.
Finally, the offsite portion. This is probably the most challenging part of backup to solve for with the storage sizes we are talking about here. The BackBlaze service I like so much is going to work with a DAS RAID just like it works with an external hard drive, but it is going to take a very long time to backup 20TB+ of data and may not be even possible with the bandwidth and data caps you may have on your Internet connection.
Most photographers solve this problem with a very manual process where they copy the data over to yet more external drives and storing them at the house of a friend or family member, or maybe in a safe deposit box. The challenge for me is that this is such a manual process it is something I wouldn’t be likely to do and the problem where sitting hard drives can also break. Backup of this kind of storage capacity is just tough for an individual or small business. Hopefully we can get better options with online backup and Internet providers providing higher speed and larger data caps in the future to make this less difficult.
Where to Find Greg Benz
I want to add that I love Greg’s blog at gregbenzphotography.com. He posts very regularly and offers free instruction on advanced techniques. Like his 1/8/2019 post about deconvolution sharpening and how it is easier to do with his really good extension for Photoshop called Lumenzia. Really good stuff. I learn a lot from Greg.
Connect With the Show!
I would love to connect with you through our listener Facebook Group Instagram where the show’s account is @phototacopodcast, on Twitter where the show is @PhotoTaco, or you can drop me an email at phototacopodcast@gmail.com. No question is too basic or to complicated for the show. If I don’t know the answer to the question, I’ll see about bringing an expert guest, on the show to go through it.
Photo Taco is part of the Master Photography Podcast Network and you can find everything about the network at masterphotographypodcast.com. Together we want to help you master your photography!
Podcast: Download (Duration: 1:12:05 — 49.8MB) | Embed
Comments
Pingback: Help With Drive Space and Backups For Photographers - Photo Taco Podcast
Pingback: Photographer's Guide to Buying 2022 Mac Studio - Photo Taco Podcast