What and Why of Lens Filters
Every photographer, no matter the genre of photography they enjoy and do the most, should have a neutral density (ND) and circular polarizing (CPL) filter for the camera lenses. Photographers should skip the ultra-violet (UV) filter and may want to skip the graduated neutral density (GND) filter.
Read on or listen to the podcast to hear us work our way through those different types of lens filters, when to use them, and give a recommendation on the best value brand of lens filters here in 2019.
Why Should Photographers Use Lens Filters?
Before we get into the filters themselves, let’s help out photographers who may not have any lens filters yet with why they might want to consider getting a lens filter. After all, in this day and age so much can be done with the technology we have, many may wonder if a physical lens filter is actually needed. With the incredible sensors in our cameras and the post processing software, why would a photographer need to consider adding some lens filters to their bag?
Photography is all about the management of light. In shooting outdoors, once you have your aperture closed down nice and small, and your ISO is all the way down, you have no other way to manage things if you still have too much light for what you are trying to do. Filters are an incredibly important tool in the capturing phase of photography.
Screw-On vs. Square Lens Filters
Before going into the different types of lens filters, let’s discuss the two ways lens filters can be put on your lens.
- Screw-On Filters: The most common way photographers put a filter on their lens is screwing them on the front of the lens. On the end of every lens there are screw threads so that round filters can be screwed onto them.
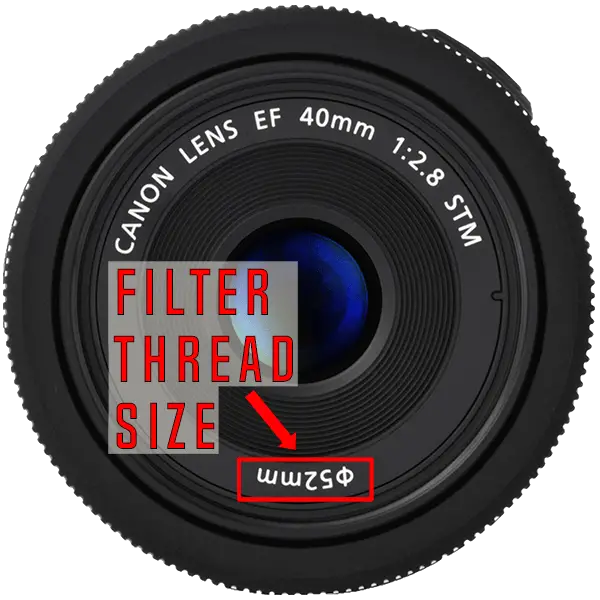
If you have a couple of lenses you will have already noticed that not every lens has the same size opening. Screw-on lens filters come in different sizes, called thread size. Photographers have to make sure they buy the thread size of the filter that matches the thread size of their lens (or step-down rings that are recommended at the bottom of the post).
The thread size is often labeled on a lens next to a circle with a line through it. If that is not on your lens you will have to look up the filter threat size in your owner’s manual or a quick google search will often get you the results pretty quickly.
I recommend photographers use screw-on filters. Screw-on filters are usually less expensive and can be attached to a lens more quickly than square filters. - Square Filters: Square filters are held onto your lens using a lens “holder” that usually comes with the filter, or more likely a set of filters. The holder usually (but not always) attaches via the same threads as a screw-on filter. If you want to buy square filters then you need to make sure the holder matches the thread size of your lens (or again buy the step-down rings).
Other than how they are attached to your lens they work exactly the same way as screw-on filters with one exception. There is an advantage to square filters in that sometimes they aren’t actually square. Sometimes they are more rectangular and you get the flexibility to move the filter up and down in the holder so that it is positioned exactly where you want the filter to be.
This is only an advantage with square filters for a graduated neutral density (GND) filter type. With a rectangular filter you can move it up and down until it matches the lighting in your composition. Move it up and down so that the brighter sky is being darkened like you want right up to the horizon and the foreground is not.
I don’t recommend square filters because they tend to be more expensive, a little harder to use, and the only area they have an advantage is a type of filter I also don’t recommend (GND). More on that last point later.
Neutral Density (ND) Filter
ND filters are like sunglasses for your camera. Photographers can try to compensate for too much light by increasing their shutter speed and/or stopping down (increasing the number) their aperture. Those techniques will work fine in many situations but there are times when a photographer may need the flexibility to eliminate light without do either of those things.
Like sunglasses do for your eyes, ND filters block a certain amount of light from going through them into your lens. ND filters are sold with a “stop” rating, which means they block the amount of light indicated by those stops. A common 3 stop, sometimes labeled “3x”, ND filter blocks 3 stops of light from going into the lens.
Beginner aside: If you don’t know what a “stop” of light is, it is the amount of light you block by increasing your shutter speed three steps (or clicks) or stopping down (increasing the number) the aperture 3 steps on most cameras. You can also see the difference by increasing or decreasing the “exposure” slider in Lightroom. If you set the exposure slider to -3.0 you can see what putting a 3-stop ND filter on your lens is going to do.
With an ND filter in your bag you have more flexibility when you are shooting to deal with light that is too bright. The two most common use cases for an ND filter:
- Mid-Day Long Exposure: Trying to get a longer exposure during the day. Say you want to get that quintessential shot of a waterfall where the water just becomes this awesome smear of motion in the image. You may want to have the shutter open for 30 seconds to achieve a certain effect, but that’s just TOO MUCH light, even with your aperture closed down pretty small, it’s just too bright – so you need “sunglasses” for your lens. You need an ND filter.
- Mid-Day Wide Aperture: The other situation where I use my ND filter a TON is in portraiture. Photographers spend big money on lenses that will open up the aperture to f/1.8 or f/1.4. The bokeh that these great lenses creates is just so pretty when shooting them wide open. The blessing and the curse of these wide apertures is the huge amount of light that comes into the camera. If you want to shoot an outdoor portrait at f/1.8 or f/2, you will want to have an ND filter close at hand.
Every photographer needs the flexibility of having a couple different ND filters available. Look at the end of the post for recommendations on the best value brand to consider here in 2019.
Variable Neutral Density (VND) Filter
Let’s also define what a “variable ND filter” is as photographers are going to run into that term as they search for ND filters. A variable ND filter is one where you can control how much light it is going to be stopped from entering your lens. You can vary the “stopping power” of a variable ND filter.
After you screw a variable ND filter on your lens the outside of the filter can be rotated. When you rotate it in one direction the amount of light it blocks increases. When you rotate it in the other direction the amount of light it blocks decreases. A “normal” ND filter doesn’t rotate after you mount it to the lens. It is clearly labeled and sold as a filter that blocks a certain amount of light from passing through it and doesn’t change.
We love to recommend options to photographers that give them flexibility so you may think you want a variable ND filter because you can do more with it. However, I do not recommend variable ND filters due to the negative impact they can have on your photos. Some are better than others but I have yet to use one where there wasn’t something strange in the resulting image that is really tough to compensate for.
Photographers are better off buying a couple of regular ND filters, say a 3 stop and a 6 stop, than a variable ND filter.
Circular Polarizing (CPL) Filter
Brent Bergherm and I did a Master Photography Podcast in September 2019 where we gave ten tips for creating images that include fall colors. One of those tips was using a polarizing filter to get some better colors. Here is why it is photographers should consider having a polarizing filter in their bag.
Circular Polarizing (CPL) Filters help to control light that has been redirected by moisture. Most often that light is associated from the sky, or on a body of water. CPL filters work by having a rotating front element that the photographer spins until they see that reflections are being stopped.
It’s REALLY obvious in the viewfinder or on your LCD screen when the filter is at the correct angle. The sky gets much deeper blue, the white clouds take on a super-3D look, and greens really pop. Fall photography is usually all about getting that vivid pop of color. Using a CPL to improve the quality of color captured onto your sensor will give you the best color to work with in post-production.
Ultra-Violet (UV) Filters – DON’T BUY THEM!
Advice has been given over and over for photographers to buy UV filters. Back in the days of film, it was meaningful because some film had problems with ultraviolet light. Today, with digital cameras, UV filers don’t do anything to improve image quality.
I have also heard advice given today to use a UV filter as a way to protect a lens. I have seen it in writing, heard it in podcasts, and seen it in videos aimed at helping photographers get started. The advice usually goes something like “if you don’t have a cheap UV filter protecting your lens, stop what you are doing and order one now”.
Please, please, please, don’t do this. If you buy an inexpensive UV filter you are more likely to have your lens damaged than protected. The threads can bind up making it really difficult to remove the filter without breaking the lens.
Save your money. There is no reason to put a UV filter on your lens.
Graduated Neutral Density (GND) Filters – DON’T BUY THEM!
Graduated neutral density (GND) filters basically have the darker glass on one half, and clear glass on the other half. They are intended to basically create two different exposures in one shot for scenes where there is far more light in one half of the scene than the other half. Think of a scene like an ocean where there is a specific horizon line and the other half is going to be far brighter than the bottom half.
Before digital sensors and post-processing software, this was one of the only options a photographer had to properly expose such a scene. Today, many photographers post-process their images in editing programs like Lightroom, or Photoshop, or Luminar, etc. There are much more detailed and accurate tools inside of those programs to tweak a specific part of an image than a GND can ever do.
Many photographers love working with GND filters, because their enjoyment from photography is garnered in the capturing process, rather than sitting at a computer after the fact. For these photographers, GND filters make sense. However, if you are going to edit your photos on your computer it really doesn’t make sense to use a GND.
If you LOVE the tactile process of setting everything up in the field and don’t intend to process your photos, then by all means – use them! Photographers should do whatever is going to help them create the images they envision. However, it’s fair to say that anyone who is even moderately competent at post-processing images on a computer, would be better off to pass on GNDs.
Best Value Lens Filters In 2019
Now that we have described a few filter types and why photographers should consider investing in them, let’s talk about the brands we can recommend as having the best value here in 2019. Before we recommend a specific brand or two, let’s talk about the testing Mark has done with lens filters.
Lens Filter Testing
Mark spent over 3 months testing every filter he could get his hands on. He put every one of them through the paces to determine which filter system he was going to invest in. He didn’t want to take the word of a sales guy who was just going to point me toward the most expensive thing, or the filter that had the highest commission. He wanted to see it for himself.
Going into this testing Mark expected that a specific brand to win the competition just based on the massive amount of media attention given to them. They were also on the expensive side of things and cost often relates directly to quality in nearly everything. After doing the testing, he was extremely surprised to find that the brand he preferred was not the most expensive.
Why Photographers Should Avoid “Cheap” Filters
A search on Amazon with the keywords of “ND filter” or “Polarizing filter” and photographers can easily find filters available for under $15. I use the word “cheap” on purpose with these filters. If you have been listening to me here on Photo Taco or on the Master Photography podcast, you know that cheap has a specific meaning to me. Cheap is the word I use to describe gear that doesn’t cost much but also won’t function or last long. Cheap gear is gear you will be replacing quickly and that is true with filters in this sub-$15 price range.
Like already mentioned, cheap filters often get stuck on lenses and can be a massive problem to remove them. Photographers can damage the lens trying to get them off. A big problem you want to avoid, but even worse is the negative impact on the quality of your images.
One of the big differences between high quality lenses and kit lenses has to do with the glass inside them. Lens manufacturers invest a lot of time and money in engineering the glass elements in the lenses to best bring the light into your sensor. When you put a cheap lens on the front of your lens you can undo a lot of that. It can cause really terrible color tinting and other problems like chromatic aberration and significant vignetting to happen.
Recommended Lens Filter Brand 2019
After 3 months of hands-on testing, the best lens filters come from Breakthrough Filters. They use nanotechnology to create amazing filters. They have incredible construction quality. The metal rings are crafted so much better than most. As a company, they are absolutely passionate about providing the BEST quality filters at really competitive prices.
As an example, a few years back, their 10-stop ND had a slight imperfection to it that the other filters in their lineup didn’t have. They could have quietly fixed them, and kept selling them. Instead, they reached out and said “hey, we have made an improvement, and you should have nothing but the best, so send yours back, and we’ll replace it for free.” That’s absolutely incredible! They have a 25-year warranty on their filters, and they beyond passionate about customer satisfaction and incomparable image making.
The X2 version of Breakthrough filters are less expensive but they aren’t any different from those manufactured by value brands like Tiffen and Hoya. They all use film applied to glass to make the filter. In fact, the film applied to glass on nearly every brand of filter is essentially exactly the same regardless of the brand.
The X4 filters from Breakthrough are different. The X4 version is their proprietary nano tech filter. A technology worth paying for. Here are the filters we recommend:
Breakthrough Photography 82mm X4 6-Stop ND Filter ($180)
Breakthrough Photography 82mm X4 3-Stop ND Filter ($170)
Breakthrough Photography X4 CPL 82mm Circular Polarizer Filter ($160)
Save Money on Lens Filters With Step-Down Rings
One more thing to share and then we will close up the show. A final tip about lens filters that is often shared but worth repeating. Hopefully it is now obvious that you need to invest in a good quality filter so let’s share an incredible way to save money.
You are likely to have different sizes of lenses in your bag. Not only do they have different focal lengths (that is the mm scale like 50mm, 24-70mm, 70-200mm, etc) but they have different physical dimensions. Each lens has a specific measurement of the thread size for screwing a filter on the front of it and the filter manufacturers create the filters to match those sizes.
Instead of buying a filter per filter thread size in the lenses you have, buy a filter with a large thread size and then use step-down rings to adapt that larger thread size down to the size you need on a specific lens.
Like everything in photography, you can spend a lot of money on step-down rings. This is something you shouldn’t need to spend a ton of money on, though you may want to avoid the very least expensive here again because you don’t want to get these stuck on your lens.
Mark recommends the Magnetic filter system from Breakthrough! That system has just one filter size. Then, for about $12 you order the various magnetic holders for your different lenses. So you would get say a 67mm and a 77mm and an 82mm holder, but just one 3-stop ND filter. That magnetic system is AWESOME, and makes it so fast and easy to swap out filters, you definitely can’t beat it!
The problem is that they are backordered at the Breakthrough website and on Amazon or B&H. So, the step-down rings Jeff recommends are from K&F Concept, their 18pc filter ring adapter kit ($21).
Reminders
- Photo Taco Facebook group, ask to join and write “Jeff Harmon” as the name of the host.
- Follow the show on Instagram @phototacopodast or Jeff’s personal account @harmonjeff
- Follow the show on Twitter @phototaco or Jeff’s personal account @harmon_jeff
- Send email suggestions on show topics to phototacopodcast@gmail.com
- Check out the other podcasts on the Master Photography Network over at masterphotographypodcast.com
- Mark’s Youtube: http://bit.ly/MCMPhoto
- Mark’s Website: www.markcmorris.net
- Mark’s Iceland Workshops: https://www.markcmorris.net/photography-dream-tours
Podcast: Download (Duration: 1:13:03 — 50.2MB) | Embed
Subscribe: Spotify | TuneIn | RSS
Comments
Great podcast! Filters have been on my list for sometime and the Breakthroughs seem like a great option. Do you have an opinion on square filters? I guess I was thinking that was the solution for the size issue vs. the step down rings. Breakthough has the squares as well. I would also assume you can’t use your lens hood if you are sizing up for a larger round filter, correct?
I just saw your thoughts on square filters in the show notes. I didn’t remember that from the podcast, maybe I missed it. I should have read the show notes before commenting.
In your discussion of UV filters you briefly mentioned that they are a hold-over from the film days. I recently picked up a film camera. I was wondering what the recommendation was regarding UV or other filters that may be useful when shooting film.
Thanks for the excellent podcasts.
@Tony,
Thanks so much for listening to the show! I recommend the Breakthrough 82mm X4 UV filter for getting the protection you can actually benefit from when shooting film. If your lens thread size is smaller than 82mm use step up rings to adapt.
I started listening to your podcast and enjoy it very much! I just listened to this episode and want to say that although I agree with most of what you said there are things that may not be 100% true. First, yes UV filters are a waste for digital sensors but there are times that you may want a good UV/glass filter on the front of the lens to “protect” it. I saw photographer Joe Dimaggio speak on the B&H YouTube channel how he had a lens ruined by a spark which was probably a one in a million shot. But he did say how he thought before then it was stupid to use an inexpensive piece of glass in front of an expensive lens; that incident changed his mind ONLY for the times he is concerned for the safety of his front element. I also have had a scenario where I was shooting on a beach and the mist of the water/sand got all over the lens; it was much easier to take the UV filter off and clean it and not worry about the front element. I do not use a UV filter on the front of my lens 99.9% of the time and I like the idea to protect the lens for the times if/when it is needed. Just my opinion but having a good UV/glass filter for the times that could be a little rough on the front element is a good idea – spending whatever money on a filter is probably a lot cheaper than repairing or buying an expensive lens.
Also, I find it a little hard to believe that the only filter company worth anything is Breakthrough Technology. Saying to buy a $160 ND or polarizer is the best value out there seems not that logical. They may be the best filters but how about the other manufacturers? How bad are they compared to Breakthrough Technology filters. I think the comparison of how much worse or not another filter compared to them would have been a good thing.
Just putting it here about magnetic filter holders; Xume makes them as well. I’m glad you mentioned step down rings! I did exactly as you said with a 82mm filter and bought step down rings with Xume magnetic holders. I haven’t used them yet but it should work out well. I have had other photographers suggest that it was stupid to do this but I personally don’t think we should keep polarizers or ND filters on all of our lenses all of the time.
Thanks for a great podcast!!
@Vinny, thanks so much for listening! I still think the front element on our lenses is up for a lot more abuse that we think and that any money spent on a UV filter is wasted money. But that’s just me and the most important thing is if a photographer does decide to do that to make sure it is a good one.
Breakthrough isn’t the only vendor who makes a decent filter of course. The others aren’t all garbage either. The trouble is there isn’t some quantifiable number or qualitative way to assess things as you have suggested. As we tried to point out in the episode, most of the competition is sourcing the film that does that actual filtering from the same place so the difference between nearly all of them is the quality of the glass that film is applied to. The less expensive filters use lower quality glass and now you have reduced your optics to whatever that quality of glass is with the filter regardless of how nice the glass in the lens may be.
If you have filters from other brands that you are happy with, that’s great! The most important thing is to keep shooting and creating photos. I haven’t done an exhaustive comparison head to head, but that is why I invited Mark to join me because he has and the Breakthrough filters were easily the most impressive to him. They weren’t even the most expensive filters he tested but they were the best he tested and it wasn’t close.
I totally agree, $160 for an ND is a hard pill for this hobbyist photographer to swallow. I look at every possible way to save myself money and get the results I want (hence my not wanting to spend any money on UV) but I have been convinced in this case that the $160 investment is totally worthwhile. It is why I called them best value and not least expensive. Can photographers be really happy with other brands, of course! It is just our opinion that the best value filters available here in 2019 are those from Breakthrough.
Pingback: Lens Filter Talk with Matt Bishop - Master Photography Podcast
Hi I’ve started listening to your podcast over the past couple of months and enjoy your IT approach to photography. I’ve actually held off on purchasing a ND filter in my 19 years of shooting recreationally as I found I got a similar effect from the Enfuse plug in when I did exposure stacking. Based on this podcast, purchased a 3, 6 and 10 stop Breakthrough Phitography ND filter based on your recommendation. There was a good price from Woot.com which is owned by Amazon that I was tipped off to from the Fred Miranda forums. Breakthrough allowed me to register on their website, but two of the filters the 3 and 6 had a rough exterior, while the 10 was smooth. All came in shrink wrap sealed boxes and a holographic sticker seal. I asked Breakthrough why the finish was different in these filters, and they were concerned that the rough ones were defective. However, they would not honor that 25-year warranty because it was not purchased from an authorized retailer which they define as their website, B&H, Adorama, and main Amazon. While I get that the reasons they may want to do this (see all the fake B+W filters out there), this is such a disappointment to me that a sealed box can’t get a warranty. So word to the wise, be very careful where you purchase a Breakthrough Photography filter, if it’s not from one of the 4 authorized retailers they will NOT honor that touted 25-year warranty. Keep up the good work with the podcast.
Pingback: MY BELOVED CAMERAS » Blog Archive » Gift Guide of Camera Geeks 2019