The best budget Mac for photo editing is the 2019 Mac Mini for about $900 and the best budget PC is the Dell Inspiron 3670 for about $650. Add the ViewSonic VA2719-2K-SMHD 27 Inch display for about $220 and a 4TB hard drive for another $100.
So you are a photographer on a tight budget in need of a computer to run Lightroom and Photoshop. Let’s start off our discussion by saying that you shouldn’t expect any of these recommendations to be the fastest way to run Lightroom and Photoshop. Not even close really. That will take more financial investment and I have recommendations for those with a bigger budgets in my Mac Mini, MacBook Pro, iMac, and PC buying guides for photographers.
You are here because you are looking to get a computer that can run Lightroom and Photoshop and have a very tight budget. Maybe you are like me and started into photography not very long ago only to find the computer you have is just not really working as you are trying to learn post-processing.
Whatever your reason for being here, in this post I am going to give you some advice on the very least expensive Mac and PC options that should do… well … ok. Good enough that you can certainly get some post-processing of your photos done, but if you get into advanced editing like compositing or handling raw files that are 50+ megapixels you are likely to be really frustrated with these options (as configured here) pretty quickly.
Budget Mac For Photography: 2018 Mac Mini
Honestly it is tough to put the words “budget” and “Mac” together in the same sentence. The least expensive Mac you can buy in 2019 is the 2018 Mac Mini with the lowest configuration choices across the board. The good news is you actually get a decent machine for photo editing at about $800.
Wait, I said $900 above, was that a mistake? No, I am going to recommend that you spend an additional $100 and buy a memory kit from OWC to increase your RAM from 8GB to 16GB for half of what Apple would charge you. Choose the lowest tier Mac Mini and read on for details about the compromises made with regard to performance when you spend so little. Seriously, $900 is “little” for a computer for photographers unless you go PC.
2018 Mac Mini Processor For Budget Photography Computer
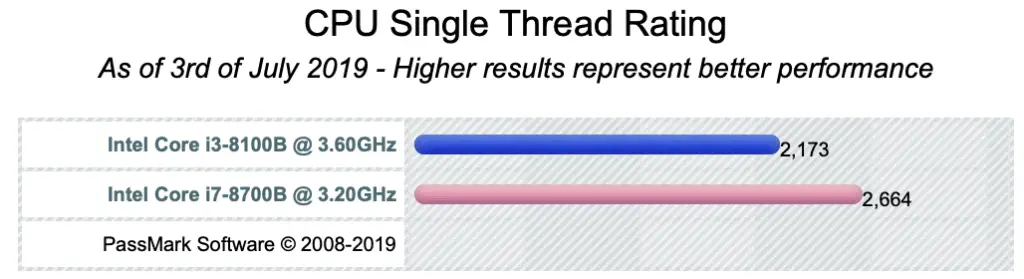
You are going to leave the processor at the lowest option with the 3.6GHz quad-core 8th-generation Intel Core i3. Is it worth it to pay the $300 to upgrade to the 3.2GHz 6-core 8th-generation Intel Core i7? Yes, about 22% more performance for that $300, but you can’t start playing this upgrade game if you want to stay in the budget category.
The Core i3 processor is going to work. Lightroom and Photoshop will launch and you will be able to edit and adjust your photos. Just don’t expect miracles and you absolutely don’t want to hook this budget Mac Mini up to a 4K monitor. The video built into the CPU just won’t do well with that. More on a recommended monitor later.
2018 Mac Mini Memory For Budget Photography Computer
It’s too bad you can’t order your Mac Mini with no memory. Apple charges a significant premium for memory over what you can buy yourself for the same thing. To minimize your costs then you want to get the lowest amount of memory you can, which is 8GB 2666MHz DDR4.
8GB of RAM is not too terrible for a photography computer. For sure you wouldn’t want to go any lower. 16GB is probably the sweet spot with the best performance for what can be a pretty modest investment either from Apple or buy upgrading it yourself (see below). You can get the Mac Mini with 32 or even 64GB of memory here in 20198, but it comes at a steep price and the increase in performance isn’t nearly as significant. Check out my How Much Memory Does Lightroom Need article for more information.
My experience has been that the memory is handled a little better on the Mac than it is on Windows, so being constrained to 8GB on a Mac is slightly better than it is in a PC. Still, macOS is only slightly better, and with 8GB of memory things can get pretty slow for at least the following activities (in some cases you may see out of memory errors):
- Adding a lot of adjustment brushes, gradient filters, radial filters to a single photo in Lightroom
- Using a lot (more than 10) of layers in Photoshop
- Using some of the more advanced filters in Photoshop like Adobe Camera Raw, Liquify, Shake Reduction, and the Select and Mask Workspace
If it is at all possible to spend an extra $100, I highly recommend photographers double the memory in their Mac Mini from 8GB to 16GB buy buying the OWC 16GB memory kit (even better and more expensive but totally worth the cost are the 32GB and 64GB kits from OWC).
It means a tiny bit of DIY work to open up that Mac Mini after you get it from Apple and replacing the memory chips yourself, but it is not too bad even if you have NEVER done anything like this before. OWC also has a good video showing you exactly how to do that.
If you really think you can’t DIY, then I highly recommend spending the $200 to upgrade to 16GB of RAM. That will put you at about $1,000 for you budget Mac Mini but as a photographer I promise it will make a big difference.
2018 Mac Mini Storage For Budget Photography Computer
The lowest storage option Apple offers in the 2018 Mac Mini is 128GB SSD, which is actually very good as far as performance goes. The size of the storage is pretty small, but it is really fast and realistically you aren’t going to be putting your photos on the internal SSD on the Mac Mini even if you spend a little more to go to 256GB or 512GB. Not giving up a lot by saving money here and sticking with the lowest option.
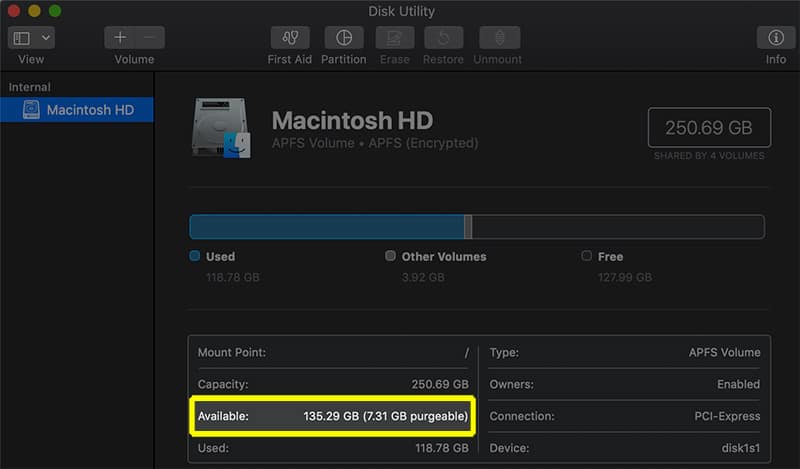
That said, if you want to use a lot of other programs on your computer, or keep a lot of documents, music, and videos on your main drive, 128GB is going to get used up REALLY fast. The installation of macOS, a browser or two, Lightroom, and Photoshop and you are going to be right there at about 100GB of that drive used up. It can be done, and done very well, but just make sure you go into this understanding that 128GB is a little tight and may be looking to get rid of things on your drive pretty regularly.
The great news is that there are several super speedy options to add storage to your 2018 Mac Mini. My favorite is the SanDisk Extreme Portable External SSD drives. The 500GB version runs about $170 (on sale for $90 as I write this), the 1TB version about $350 (on sale for $160 as I write this), and the 2TB version is $700 (on sale for $330 as I write this). You connect these external drives through the Thunderbolt 3 connections of the Mac Mini and get some insane speeds. Far cheaper disk storage than what Apple charges for internal SSD.
Check out the testing I have done to see how storing your photos on an external SSD vs an external spinning drive speeds up Lightroom Classic by as much as 50% in this article on Performance of External Drives with Lightroom Classic
Another incredible option is the Samsung T5 portable SSD drives. 500GB version runs $130, 1TB version about $200, and the 2TB version about $480. Super fast performance here, just not in a box that is quite as resilient as the SanDisk drives and since the Mac Mini isn’t as likely to be moving around with you I don’t hesitate at all in recommending the Samsung drives here to save you a little money.
If any of those options are too pricey for your budget, and $500 for 2TB is quite a chuck of change, I recommend the Western Digital My Passport drives. You can buy a much larger 4TB drive for about $100 that won’t be quite as fast as the external SSD drives but are still fast enough to get the job done for sure.
2018 Mac Mini Ethernet For Budget Photography Computer
Your final decision is what Ethernet card to put in your 2018 Mac Mini on a budget. The lowest choice is not a bad one at all for photographers. The network speed supported by a hard wired connection is going to be faster than anything you are used to over WiFi anywhere. Not much of a compromise here in sticking with the lowest option.
That said, if someday you want to connect a RAID system to your computer through the network, having the faster Ethernet connection will matter to you at that point. If you are just starting on your journey with photography I wouldn’t worry about this choice now and recommend you stick with the lowest option. Plus, you can always add a faster Ethernet port to your Mac Mini through the Thunderbolt connection.
2018 Mac Mini Monitor For Budget Photography Computer
If you don’t already have a good monitor for photo editing (see specs below) then you are going to need one to go with that 2018 Mac Mini. Since Apple doesn’t offer anything for the budget photographer here you can buy any monitor you can find a good price on. You want to make sure the monitor has the following:
- 27″ or larger
- IPS display technology
- DisplayPort connection
- 2560×1440 (WQHD or 1440p*) or 2560×1600 (WQXGA) resolution.
*Do NOT go with 1080p or 4K
If I was buying that budget monitor today, I would go with the ViewSonic VA2719-2K-SMHD 27 Inch IPS 2K 1440p for about $220 as a REALLY good option for photographers. A slightly upgraded pick that is larger and has better color reproduction for about $280 is the ViewSonic VX3211-2K-MHD 32 Inch IPS WQHD 1440p Monitor with 99% sRGB.
ViewSonic has made high quality monitors for quite some time but I also like the quality I have seen and heard about (from readers/listeners) for LG, Asus, BenQ, Acer, Dell, and HP as well. Anything you find with those important specifications above will be great.
Other Mac Options For Budget Photography Computers?
There are other Mac computers that will be great for photography, but none of them are good options for the budget category. Check out the downsides to the other options:
- MacBook starts out at $1,300 and has CPU that would be about 45% worse on performance for about $400 more.
- MacBook Air starts at $1,200 and is a little closer to the 2018 Mac Mini with a CPU but is still about 30% worse and costs about $300 more.
- MacBook Pro starts at $1,300 and if a laptop is what you really think you need then this is where you should go. It comes with a CPU that is within about 5% of the CPU performance of the 2018 Mac Mini for many of the tasks in Lightroom and Photoshop. However, you will have to pay $1,500 to get to 16GB of memory and this would be the 13″ MacBook Pro so you will still need to add the storage and the monitor taking to you something more like $1,900. Mobility comes as a pretty significant cost, sure you need that?
- iMac starts out at $1,100 and has the same CPU as the lowest tier MacBook Pro so it comes within about 5% of the performance of the 2018 Mac Mini. The problem is the display is a tiny 21.5″ and only supports full HD, which is not enough for photography. The hard drive is really slow spinning magnetic drive, so you would really need to pay $200 to get to a 256GB SSD. You also can’t upgrade the memory yourself on the lower tier iMac (only the mid and upper tier) so you have to pay another $200 to get to 16GB of memory. Really talking about $1,500. Then you would still need to pay for storage and another monitor taking you to about $1,900.
What About Hackintosh For Budget Photography Computer?
Stay away from Hackintosh. That’s my simple advice. I have done a Hackintosh. I have custom built my PCs for photo editing for many years and I am no stranger to all kinds of system installation and setups including macOS, Windows, Linux, Sun, HP-UX, and AIX. I can tell you that Hackintosh is only worth it if you are willing to have nursing it and working through issues be constant. A pet project that is ALWAYS needing you (no matter what that YouTuber is telling you).
There is a lot of free “support” out there for Hackintosh. If you run into an issue it is most likely not something new to the world and there will be a very technical guide that walks a person through how to address it. If that sounds like fun to you, then go for it. You can certainly run macOS for (slightly) less money on the budget end than buying a computer from Apple. I should say you will get a little more hardware for your money but really you will probably spend about the same amount and then with some of the inefficiencies you may not end up with any more actual performance. Just because you can doesn’t mean you should.
Seriously, don’t do it. You have been warned. If Apple computers are too much for you, get a PC and use Windows. In the budget end there are more choices and Windows 10 is really very good. I know, I just don’t get it, you will die before going to Windows. Fine, get the 2018 Mac Mini and get going on learning your post-processing!
Budget PC For Photography: Dell Inspiron 3670
There are less expensive PCs for sure than the Dell Inspiron 3670, but just as we talked about at the very beginning of this article if you spend less than $500 on your PC I am pretty confident that you will find yourself unhappy with how it performs with post-processing software pretty quickly.
Unlike the Mac options, you have a lot more choices on the PC side of things. That can be good and bad. It doesn’t have to be a Dell. In fact the model I am recommending here is likely to be obsolete and not offered by Dell pretty quickly. Prices fluctuate a lot between manufacturers and it is very possible that as you read this you have another choice in mind from another manufacturer.
My recommendation as I looked through the big box options in July 2019 is the highest tier of the Dell Inspiron 3670. Doesn’t have to be that model though so let’s walk through the specs and outline what you should look for in a budget PC here in July 2019 and then you can use this information as a guide shopping the options.
PC Processor For Budget Photography Computer
We will start with the processor because it is the most important part of your PC for photography. Not by a huge margin because the memory and the speed of your hard drive can become a bottleneck pretty quickly, but I have become convinced here in 2019 that processor is where you start and spend your money first for a photography computer.
Here in 2019, I recommend you buy Intel processors for a photography computer. Don’t get me wrong, I am SO GLAD AMD is still in the game and really taking it to Intel with the latest Ryzen processors. Competition is good for all of us and I hear the winds of change coming here to where AMD may become the better option for budget PCs shortly.
Today though, Intel processors are where photographers want to be. Mostly this is because the core count isn’t as important as the clock speed for both Lightroom and Photoshop. AMD is aiming to compete/beat Intel with the cores (and now the cache) and not the clock speed. Photographers are best off with Intel – for now. When I update this article in 2020 I am expecting this to be pretty different.
In the Intel line of processors, photographers should stay away from the Core M and Celeron. They are fine for smaller workloads like web browsing and office documents, not for running Lightroom and Photoshop. For a budget photography computer the sweet spot is probably Core i3, but there is certainly better performance and worth a little extra money to go to the Core i5 (or on up to Core-i7 and Core-i9 but these will be too expensive).
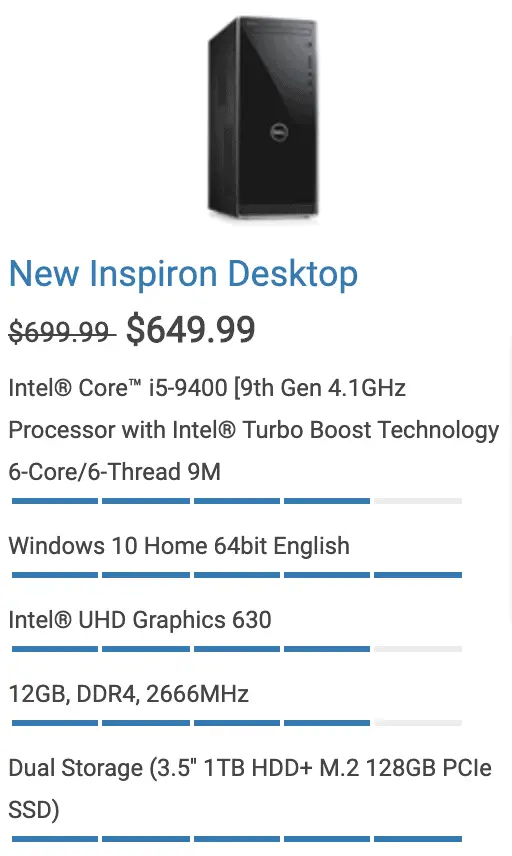
The Dell Inspiron 3670 has a 9th generation Intel Core i5-9400 4.1GHz processor, which is about 8% better in performance than the processor in the 2018 Mac Mini being recommended in this article. Again, you don’t have to go with the Dell here, but make sure whatever computer you are looking at has a good processor so that it will do well with post-processing software like Lightroom and Photoshop.
PC Memory For Budget Photography Computer
Next up is memory and if you read the Mac recommendation above it is going to be the same here. The more memory you can afford the better! Less than 8GB is not worth buying and you should keep saving if you can’t afford something with more memory.
8GB is ok but not great, even for a budget computer. Especially running Windows, the management of the memory is just not quite as good as macOS and 8GB on a PC is not really the same as 8GB on a Mac.
16GB of memory is the sweet spot for photographers where the prices are still pretty reasonable and the performance difference from 8 to 16 is very noticeable even for basic photo editing in Lightroom. 32GB is even better of course because that is more memory and you can keep going higher. Check out my How Much Memory Does Lightroom Need article for more information.
The problem is budget computers don’t usually have 16GB of memory. On the PC side this is an advantage. Nearly every PC gives you the ability to upgrade the memory yourself, and you can do it trivially. So you can start out with 8GB and when there is a little extra money available buy an pretty inexpensive upgrade kit to get better performance.
Before suggesting some memory kits, I do have to warn you that there are some PCs that don’t allow you to upgrade the memory. Some PCs laptops make it pretty tough these days, but in general still pretty true. Like Apple, most PC manufacturers charge a little bit of a premium for memory, just not as large a scale as Apple. Still, with budget in mind, you will probably want to buy the smallest amount of memory from the manufacturer that you can and then upgrade it yourself.
I have used memory from Crucial, G.Skill, Kingston, and Corsair so there are a lot of options to choose from. Shop around for the best price at the time you are ordering your computer and see if you can save a little by upgrading the memory yourself. For example, you can get the 16GB (2x8GB) kit from Crucial for about $60 or the 32GB (2x16GB) kit for about $130. NOTE: 32GB is where the Dell Inspiron 3670 maxes out, so you need to consult the technical specs of the computer to see where things max out for the PC you are looking at – though most will probably support 32GB.
PC Storage For Photography Computer
The storage will be one of the primary differences between a PC that is $500 or less and one that is going to work better for photography. This is why I am recommending the highest configured Inspiron 3670 that runs about $650 at the time of this article. With that configuration you get an m.2 connected 128GB PCIe SSD drive AND a slower 1TB hard drive.
You want to look for and SSD in your PC. It doesn’t have to be connected via the m.2 connector (though that is really nice and adds some performance) but you don’t want storage that says it is 3.5″, 7200 rpm (or worse like 5400 rpm). That is you don’t want to see those words in the description unless it is a second drive in the computer like is the case with the highest tier of the Dell Inspiron 3670.
Even better if that SSD is 256GB as again I will state here that 128GB is going to get pretty tight where you are likely to run out of room extremely fast. Just installing Windows, a browser, and Lightroom and Photoshop you will be pretty close to using up about 80% of that drive. So tight in fact that it might be hard to apply Windows 10 updates without moving some things off the drive.
Just like I recommended with the Mac Mini, photographers are going to need to add some storage to a budget PC. Even though this Dell comes with 128GB SSD and a 1TB drive, that isn’t going to be enough if you really get into photography for very long.
I can recommend the same SanDisk, Samsung, and WD external drives I linked to above with the Mac Mini recommendation for storage, but with a PC you have another option. You can add storage internally. Just like upgrading the memory, it is really easy to do. You save yourself a little bit more money by upgrading the internal drive to something like the HGST HGST Ultrastar 7K4000 that runs about $80 but the biggest advantage is the speed as it doesn’t have to go over a USB connection.
PC Graphics For Budget Photography Computer
Just like Apple has done, most budget PCs don’t come with discrete graphics cards anymore. Most of them use the graphics that is built into the CPU and in fact the Dell Inspiron 3670 I am recommending happens to have exactly the same Intel UHD Graphics 630.
The Intel graphics are not fully ideal for photographers, you are likely to see a little bit more performance out of both Lightroom and Photoshop with a discrete graphics card from AMD or NVIDIA, but not so much it is even worth getting into here with the budget category. Graphics cards add a lot of cost to the computer and as of this article neither Lightroom nor Photoshop really utilize the capabilities of a GPU very well. Yes, GPU acceleration is “supported” in both programs, but only barely.
I didn’t even include the topic in the Mac section because the only option to add GPU to the 2018 Mac Mini is through a really expensive and unreliable eGPU. That isn’t the case here with the PC as again this is something you could add yourself later if you got a budget to do that or if Adobe really changes things in Lightroom and Photoshop where this becomes a bigger deal.
Just to have this guide be pretty complete, if you buy my recommendation of the Inspiron 3670 then you can add this EVGA GeForce GTX 1060 card for about $230. Again, I don’t think it is worth the expense right now as the performance gain is going to be pretty minimal, but if you can stretch the budget to add it then it will make the computer do better for photography.
PC Monitor For Budget Photography Computer
My recommendation here is exactly the same as it was for the Mac Mini above. I’ll repeat the links here just so you don’t have scroll back up. Take a look at the specs above with the Mac monitor recommendation and find the best deal you can as the name brand here isn’t very important.
If I was buying that budget monitor today, I would go with the ViewSonic VA2719-2K-SMHD 27 Inch IPS 2K 1440p for about $220 as a REALLY good option for photographers. A slightly upgraded pick that is larger and has better color reproduction for about $280 is the ViewSonic VX3211-2K-MHD 32 Inch IPS WQHD 1440p Monitor with 99% sRGB.
Other PC Options For Budget Photography Computer
If you hate Dell machines, maybe you had a bad experience with one at some point, here are a couple of other options to look at:
- HP Pavilion 590-p0035t has pretty well the same specs as the Dell Inspiron 3670 at the same price but was out of stock as I wrote this article and the tower, has a smaller case (which isn’t as good with heat dissipation), and a slightly slower CPU (only about 2% though, not huge).
- Acer Aspire TC-865-DH11 is close to the same specs with a little twist. The same processor as the HP above and a slow hard drive (and no m.2 ports) but 16GB of Optane memory built in! The processor and the drive mean this one wasn’t my pick, but not a bad option.
What About Building Your Own Budget Photography Computer
I have built my computers for many years. I was doing that before I got into photography. I love building computers. I like the quality I can make sure is built into the computer when I build it myself. Just don’t expect to save massive amounts of money building your own computer – especially in the budget market.
Yes, you can probably build one for slightly less than a big box computer (see link below), but the economies of scale mean the big box guys can get the stuff far cheaper and they are making sure the cost of their computers on the budget end are competitive with building your own. Cost is far less a reason to build your own budget computer here in 2019.
If you want to build your computer so that you learn about it (which is way easier than you think it is) or to get higher quality components than you can from the big box brands, then go for it. Just don’t expect it is going to be a whole lot less expensive than the $650 to $750 a big box PC costs. If your budget is something more like $2,000 then you can really build something incredible and there is more opportunity to get more for your money with a custom build.
If you are interested in taking a look, I ran through PCPartPicker to see how I would build a machine similar in spec to the Inspiron 3670. The price comes to about $710. Not cheaper, but there are advantages with better upgrade options. There is also the costs of labor to put it together and the time it takes to do some burn in testing and make sure the components are all good.
https://pcpartpicker.com/list/3GfwNQ

Comments
Thank you very much for this article, it has been very helpful. I will certainly follow your advice but I am uncertain about the screen I will buy and compatibility. I am perfectly fine with 2k but you recommend a ‘DisplayPort’ connection. Is that the same as HDMI? Because I don’t see a port on the Mac Mini that Apple call “DisplayPort’.
Many thanks.
Hey there Michael. HDMI is not the same as DisplayPort. You are right, the Mac Mini doesn’t have a port labeled DisplayPort, it is the Thunderbolt 3 port that you would use to connect from the Mac Mini to the monitor via a Thunderbolt to DisplayPort cable. I use this one: https://amzn.to/34YBUes
Hi Jeff. Great article. I am curious if you have a comment on the speed of your theoretical builds here, or have a comment in general on the speed of a Mac vs. PC? It seems like there’s actually not too much difference in hardware…
I have experience with both Windows and Mac but have typically always done my photo editing on Mac, but I’m not necessarily married to that. I am considering the Mac Mini for not just cost effectiveness but customization; as it seems the Mini has the most customization in the Mac line right now, in terms of a total system (unless of course you go to something like the Pro). Plus I like the sleek design. I’m pretty familiar with taking apart Mac’s, at least the older generations, so my thought is Mini with best possible processor, base RAM and storage, and adding 32-64GB of aftermarket memory and a big external SSD. Is it even worth it to go Mac at that point, is the Mini processor all that good or is it out of date? I’m currently running a 2012 Macbook Pro, and even though it is still kicking it is SLOW with photos. And blending a few hundred layers in Photoshop (for example a star trail composite)? Forget about it. Might as well set the import and walk away for an hour and cross your fingers it doesn’t crash.
Anyway, appreciate your comments. Thanks in advance.
@Jeff,
So glad you found the article helpful! Given the same hardware my experience using and testing on both Mac and PC has convinced me that neither has a significant advantage over the other. Personal preference and being comfortable is the biggest reason to choose one over the other.
That said, when it comes to budget hardware and wanting to upgrade things yourself there is no question PC has a big advantage. It isn’t for everyone but most desktop PCs have far more ability to be upgraded. If you want to increase internal SSD storage and add a discrete video card this is the way to go.
Thanks for the feedback. Any suggestions on a good starting PC platform for photo that has future-upgradability? I’m looking for something with a smaller form factor, and I don’t so much care about graphics (as long as it can drive a nice big display :)). I haven’t shopped around for a new PC in quite some time. Most of my experience in the past few years has been through work-supplied laptops.
Cheers!
@Jeff,
There is value in having a larger form factor as they dissipate heat much better and heat is the enemy of performance. Smaller form factor devices tend to thermally throttle the CPU and you end up getting less performance. It is one of the reasons I highly recommend a desktop computer over a laptop. That said, the Dell desktop computers are still pretty small. Here is a really good machine that you could easily expand up to 64GB of RAM for a very reasonable cost:
https://www.dell.com/en-us/shop/desktop-computers/xps-desktop/spd/xps-8930-se-desktop/xdvmstcs051s?view=configurations&configurationid=ad1aa84e-37ae-4240-b219-052d02a00975
If you really want to get the smallest form factor then there is the Intel NUC you should check out:
https://amzn.to/2WT3CsF
Jeff,
Article was very helpful. Ended up getting a Mac mini recently and followed your advice with the monitor. Only difference was that we went with the 24″ version of it, believe its the VX2478. We’re having trouble getting the right settings for the color and clarity to match up. Is there specific settings you have found that work best or is this monitor not as similar to the one you recommended as it appears? Thanks in advance for the feedback.
What color and clarity are you trying to match? Are you using a screen calibration tool?
Previous screen was an iMac 4k. It was never calibrated but seemed to be OK in regular settings. I would say that’s somewhat what I’m going for. The standard settings with this screen seemed to be warmer colors and are vastly different when I upload pics compared to the previous screen. I do not currently have a calibration tool. Is there one you recommend or any particular settings or preset modes that you’ve found to be good? Thanks!
You can’t really compare screen to screen, especially when you have different brands of monitors. Most monitors are setup to look really flashy when they come out of the box, not to be color accurate or simulate the brightness of paper when printing that photographers look for. This is what monitor calibrators help you with.
You are comparing a 4K display on an iMac to a 2K display that you have now, so the clarity may not seem quite the same as you have half the resolution to work with, but Lightroom will work so much better at that resolution. When you go in 1:1 or 2:1 in Lightroom the clarity you need should easily be there to do really good adjustments with sharpening and noise reduction.
Oh, and as far as screen calibrators go, my recommendation is the 1Display Studio from XRite (used to be ColorMunki from Xrite but the 1DisplayStudio is now the same price).
https://amzn.to/3e2p04X