Water Droplet Refraction Photography
I am sure you have seen photos featuring water droplet refraction, but you have to check out some of the images Don has on his website over at http://www.donkom.ca/category/macro-water/ under the Macro Water menu. There are a number of images there where Don has done an incredible job of creating images that emphasize the beauty of nature using water droplets. We are going to walk through some examples and talk about how photographers can create stunning images similar to these.
Macro Photography Is Like Juggling Eggs
Don Komarechka is one of the world’s best macro photographers. If you are completely new to macro photography be sure to check out Getting Started In Macro Photography. Don likes to say that macro photography can be a little like juggling eggs blind folded. The number of moving parts to make macro photography work means that it doesn’t take much to have everything come crashing down and when you take off that blind fold then all you see is a mess and you don’t really know what the problem was.
Effectively, water droplet photography boils down to making a lens out of the water droplets in you scene. The more spherical the droplet is, the better lens it becomes. Whatever is behind the water droplet will show up in the droplet. You become an artist on two fields. You have to create something beautiful to photograph and then you have to be the photographer to document it after you have sculpted your art.
I am sure most photographers have seen this kind of photography before, but to see a few examples you need to visit Don’s website at http://www.donkom.ca/category/macro-water/. I have picked a couple of favorites of mine from his images on his website and we are going to walk through the setup and process of creating each. Hopefully we inspire a few photographers to give this a try.
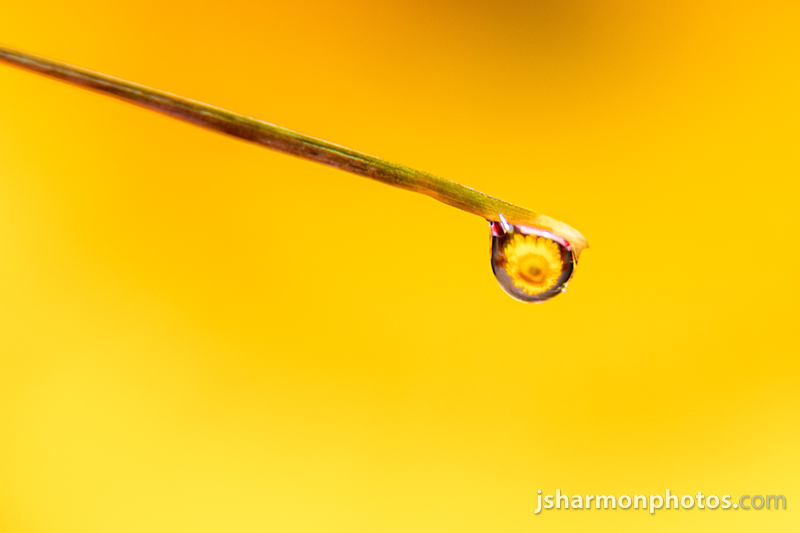
Jewels of Summer
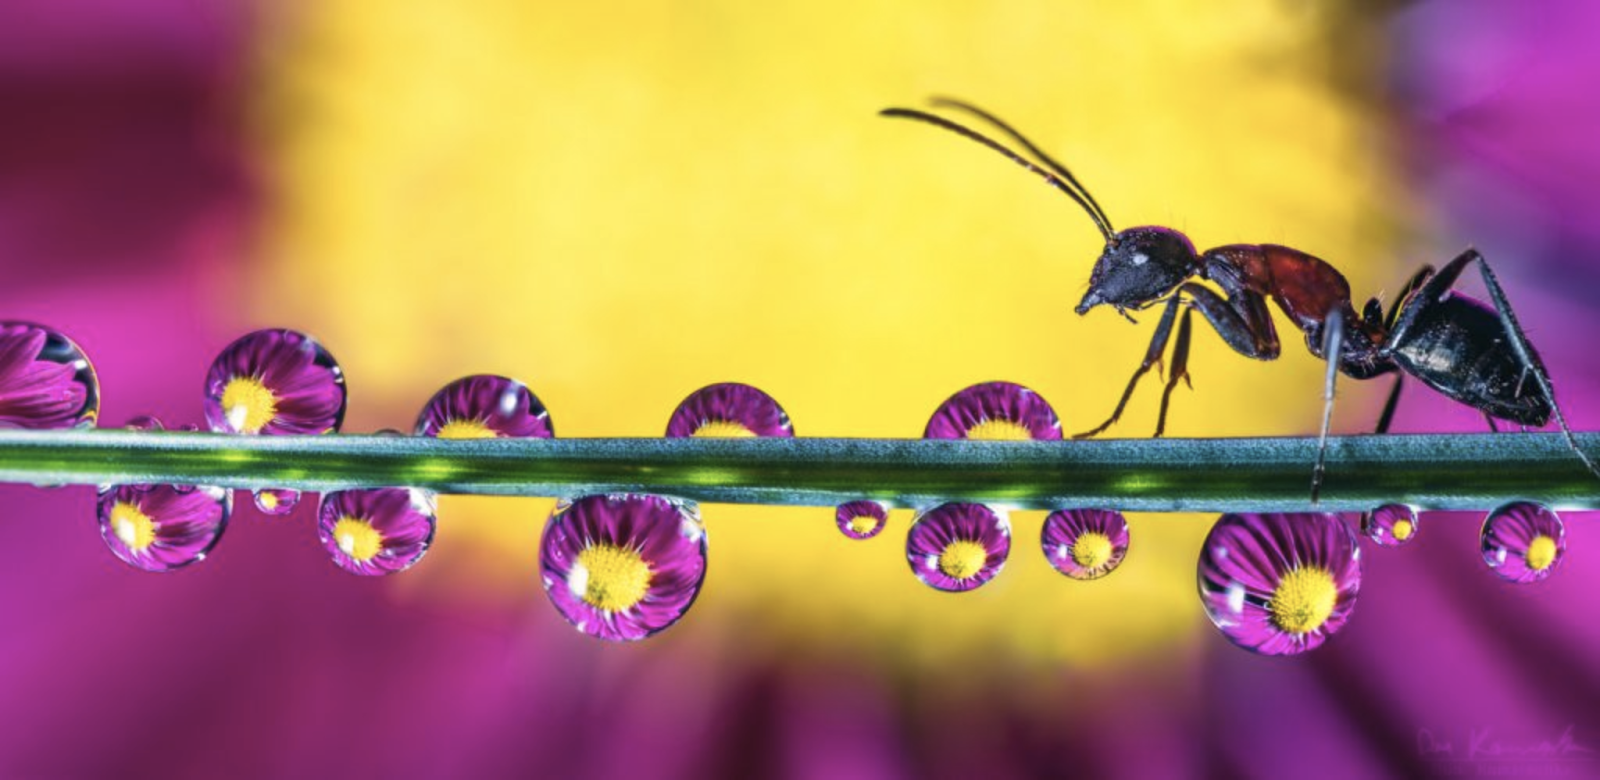
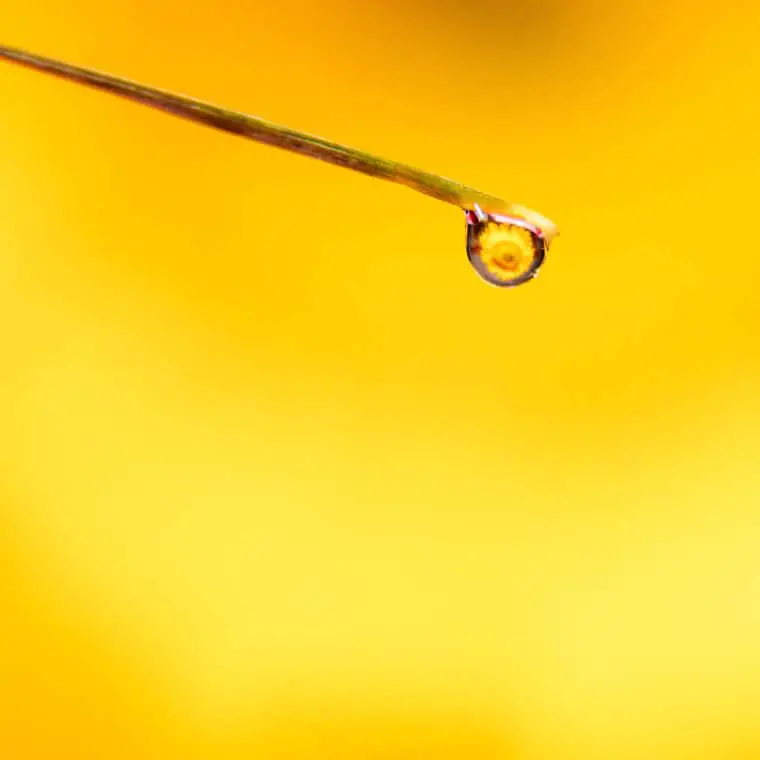
Let’s leave the ant out of the equation here as we get started into dissecting what it took to create this photo. That is by far the hardest part of this and we are going to ignore that part for this episode. The easiest part is getting a blade of grass. After all, they are everywhere! This is a very specific blade of grass, one called blue fescue.
Blue fescue grass is a bluegrass that has a powder coating on the grass that is tremendously helpful in making water gather in the spheres like are seen here in the image just by using a spray bottle that has a decent capability of shooting a mist. Not everything provides the same water tension conditions to produce these beautifully spherical water droplets and that is exactly what you need to have in order to create the best water droplet refraction photos. Most plants when sprayed with water will only get kind of a sheen or puddle of water.
This was done outside. One of the very few that are done outside, most are done in a studio or on a tabletop where the environment can be better controlled (wind and sun for example). A dollar store spray bottle and some other pieces of gear that are very inexpensive (see below) in a fairly small space and you are good to go. For this image Don’s wife wasn’t thrilled about having ants in the house so he had to go outdoors for this particular image.
You put a flower in the background just a few inches behind the water droplets and you can show off the beauty of nature very differently than the landscape photos you see so many of today. There is a certain amount of alignment you have to practice with to get it right. Can’t be too far left, right, up, or down. The placement in the background is really important for success. It is kind of hard to do that on a tripod, so all of these images were taken hand-holding the camera.
Hidden World
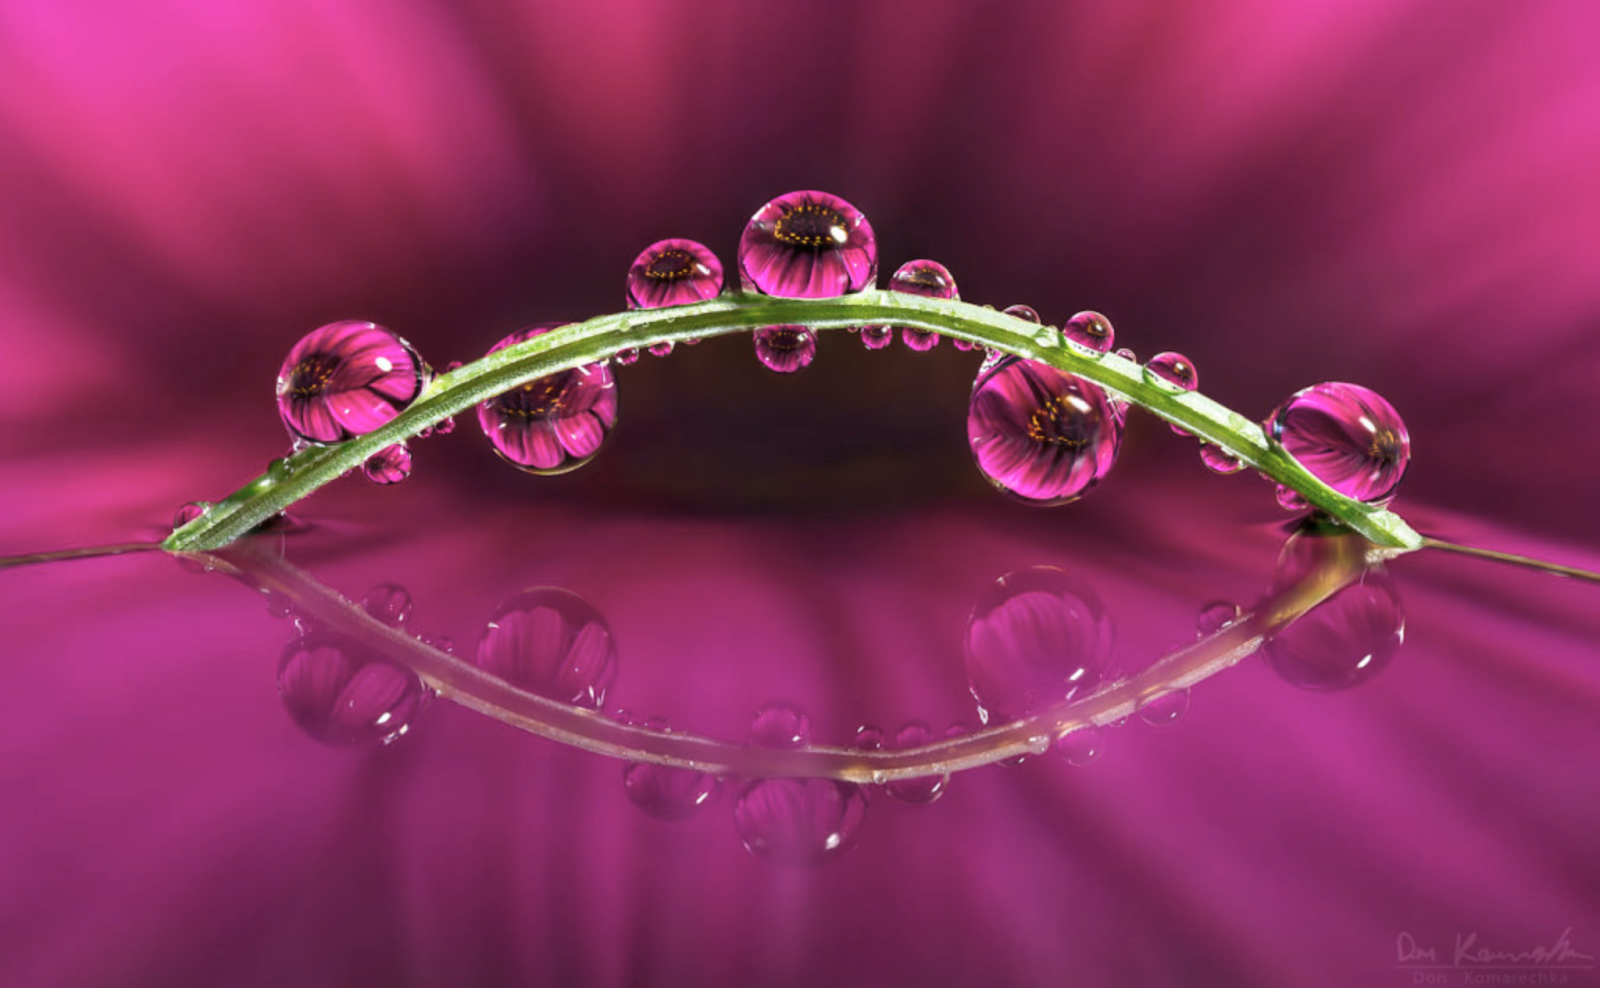
Same kind of blue fescue grass blade here in this image, but to get a different result than the previous image Don wanted to play around with both the refraction in the water droplets and a reflection in a pool of water.

This was done in an inexpensive plastic bowl of water, again the dollar store probably has something that would work really well. The blade of grass was held in place using “third hand tools” (see below) that were below the water so that only the blade of grass was bent above it.
There were a couple of eureka “fail” moments Don learned about as he created this image. The flower in the background has no water on it, he wanted it to be as clean a reflection as he could get and when there were water droplets on the flower behind it they were seen in the reflection. This meant he had to move the flower in the background away from the grass in the bowl of water while he used the spray bottle to produce a mist until the water droplets formed on the grass and then he moved the flower back into position as quickly and carefully as possible so as not to disrupt the droplets.
Now back to the idea of angle. To get it here the flower had to be submerged half-way under the water in the bowl with the grass. As I figured out that needed to happen I then was faced with the water level rising in the bowl due to the displacement of the flower coming into the bowl. It would rise so much that it would destroy the water droplets on the blade of grass. Don had to have the water level too low, get the flower into the bowl, then trickle water into the bowl until it came up to the perfect level to begin taking frames.
Glowstick
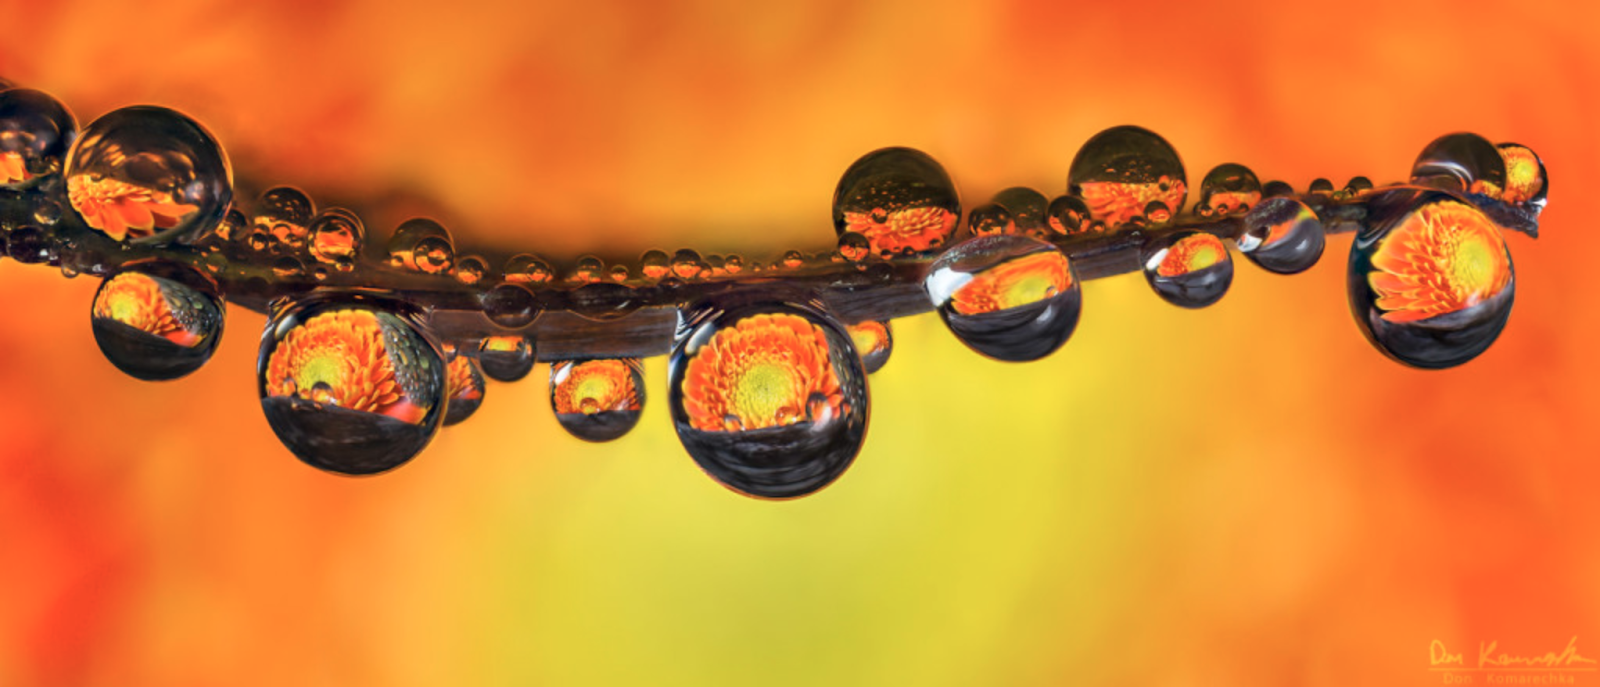
One of the important elements to producing incredible water droplet refraction images is lighting. If you can get the lighting to be exclusively on the background and not on the water droplets you will get more pleasing results. It is tough to do, there isn’t a lot of space with macro photography, and a few inexpensive pieces of equipment (see below) can really help.
Instead of a blade of grass, this is a eucalyptus leaf. Eucalyptus leaves have a similar powdery substance coating them to the blue fescue grass that is pretty important to creating such spherical water droplets. Not every blade of blue fescue grass and every eucalyptus leaf produce the water droplets like these. It is just far more likely you will find one that does. Don gets quite a few of them and one of the first things he experiments with is spraying mist over them to see which of the collection he has to work with seems to produce the best droplets. It really is experimentation right from the beginning.
Experiment! Fail! Experiment!
The first image above took Don, a very experienced macro photographer, half a day to create. The second image took him three to four hours to produce. Lots of experimental tinkering just to figure out how to get things setup to produce the image he had envisioned. Some of the most important advice you should take away from this is that you shouldn’t be afraid to try things. Experiment. Change things. Fail often.
So many photographers today don’t try much themselves. They find a YouTube video or podcast episode that walks them through how an image was created and they just replicate it step-by-step. If it works they are happy and if it doesn’t they give up.
Don’t give up. You can produce images like these. After recording this episode with Don I spent about three hours giving the technique a try and was able to create this image.
No, the image isn’t close to the same quality that Don produces. However, you should take comfort that you can do this because this is my first ever attempt at any sort of macro photography ever!
This isn’t the right blade of grass that Don recommended. This is without any of the gear linked to below. I didn’t even use a macro lens, it was my Tamron 24-70mm f/2.8 with (dumb – meaning no electrical contacts) extension tubes. I used a tripod for a mobile phone I had laying around to hold the blade of grass still, taped the sunflower we had in a vase to a chair that was the right height behind it, and then used a cheap spray bottle we had laying around to produce a mist of water. Oh, and the lights were a couple of constant LED lights I use for portraits.
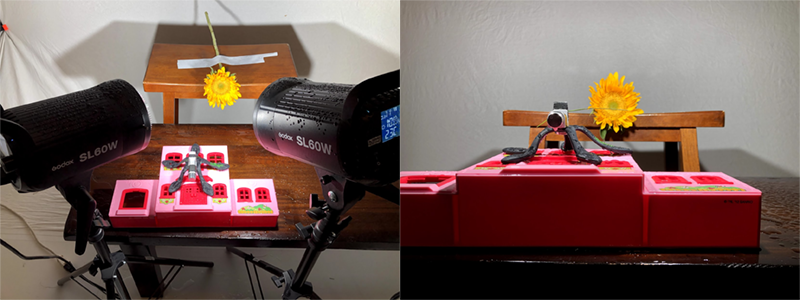
Three hours of trying things, failing to produce the image I wanted, and changing one thing at a time until I got close to what I wanted with this image. An image I am pretty excited about even though it isn’t at the same level Don produces. You don’t have to spend a ton of money
Setting Things Up For Water Droplet Photography
You don’t need a large workspace for water droplet macro photography. A two foot by two foot space is plenty of room. Using a kitchen table for an afternoon will work really well, just remember you are going to really soak the area as you mist water on the grass or leaf until you get good water droplets.
Seriously, it takes a lot of misting water to do this. Far more than you expect. If you use a spray bottle from the dollar store, expect to have to mist nearly the entire spray bottle before you will get droplets similar to those in these photos. You may be tempted to try using stronger spray from the bottle but it doesn’t work. You need to reproduce the natural conditions where dew forms on vegetation and that means using the mist. A lot of mist. A whole lot of mist!
If you want to sculpt droplets rather than mist the water then you can sculpt them onto the vegetation if you would like to do that. Don has tried everything to place water droplets where he wants them and the most effective thing is a hypodermic needle. See that in the equipment below.
Equipment For Water Droplet Photography
This is the equipment Don recommends photographers use to create images similar to his.
- Hypodermic Needle: Syringe Blunt Tip Needle and Cap Set ($7)
- NiteCore SRT7GT Flashlight ($90)
- NiteCore micro-USB charging 18650 battery ($20)
- Crab clamps ($16)
- Manfrotto Pixi Tripod ($20)
- Third hand tool ($8)
- Spray bottle – get it at your local Dollar Store
Technique For Water Droplet Photography
Now that we have provided information on the equipment that is needed, let’s talk about the technique. One of the things you have to go into this experiment expecting is an depth of field much shallower than you are likely to be accustomed to unless you have experience doing macro work.
No matter the sensor size in your camera or the focal length of the lens you are using, the depth of field is going to be so shallow it will be hard to get the droplet and the image of the flower behind it to both be in focus at the same time. It can be done, some of Don’s favorite images are single shots.
Usually, with all macro work, you will have to focus stack a couple of images together. Most of Don’s images were focus stacked, somewhere between two and ten images. The one example from me was a focus stack of two images. Most photographers do focus stacking using Photoshop. If Photoshop scares you check out Taking the Intimidation out of Photoshop episode I recorded with Aaron Nace and take this on as the project you want to do to learn Photoshop.
Beyond the very shallow depth of field, here are the basic steps photographers should practice and use to create images with water droplet refraction.
- Camera settings:
- Simplify to start. Aperture priority mode
- f/8 to f/11
- ISO: higher than you would expect, don’t worry about going to 800 to 1,600 here because macro is very forgiving for noise
- Continuous drive mode as fast as you can get your camera to take frames
- Add light
- You want to light the background and not the water droplets if you can
- Constant lighting works best, flash can work if it is all you have
- Focus is different for macro
- Put your lens on manual focus. Autofocus will usually work against you here and cause more problems than it solves
- Move the focus ring to the furthest away from infinity as you can get it
- Move the entire camera forward and backward as you hold down the shutter button taking as many frames as fast your camera is capable of doing. Don, as an experienced photographer has about 100:1 keeper ratio (throws away 100 photos for every one he uses).
- Doesn’t take a lot of movement. Just pulling forward the hand that is holding up the end of the lens is enough to make this go. Definitely takes some practice. Practice this technique before you mist the droplets
- Create the droplets
- Fill spray bottle with water
- Mist spray from quite a distance, not just a couple of inches from the grass/leaf
- Mist and mist and mist until water droplets form
- Focus stacking – check out the video below from Don
Water Droplet Photography Workshops With Don
I hope Don and I have been able to provide some help and inspired photographers to give water droplet refraction photography a try. If there are any listening who would like to have hands-on help from Don you can do that checking out his workshops or contact him directly through the contact info on his site to find out about individual or unlisted training opportunities.
Reminders
- Photo Taco Facebook group, ask to join and write “Jeff Harmon” as the name of the host.
- Follow the show on Instagram @phototacopodast or Jeff’s personal account @harmonjeff
- Follow the show on Twitter @phototaco or Jeff’s personal account @harmon_jeff
- Send email suggestions on show topics to phototacopodcast@gmail.com
- Check out the other podcasts on the Master Photography Network over at masterphotographypodcast.com
- Find Don over at http://www.donkom.ca/
Podcast: Download (Duration: 39:42 — 19.2MB) | Embed
Comments
Which extension tubes did Don recommend. I didn’t see them in the gear list in the notes.
Kenko is probably still the best bet – these are the ones I use. I compared them to the 1st-party tubes as an experiment and the Kenko set is every bit as good at a fraction of the price. 🙂
Hi Don, I’m not able to click on the link for the extension tubes you use. Do you mind reposting it?
Fantastic
Love listening to this podcast tonight on my way back home. Great tips and inspiring captures. Macro is so much fun and Don’s art is so amazing!