Note: If you just want to skip straight to the results go to 43:19 in the episode!
One of the questions I have had asked hundreds of times over the past few years is how photographers should setup their catalog and photos using external drives. Does it matter if the external drive is an SSD, or are spinning drives good to use? If you have both external SSD and external spinning drives, where should the catalog be and where should the photos be?
Most recently there was this question:
Hi, can you please point me to a podcast episode or a link that talks about setting up Lightroom with an external hard drive? I’m not sure where to put items (catalog, cache, backup of catalog/images, originals from import) between my internal vs. external drives for the most optimized use of Lightroom (and opening up into Photoshop).
Laura Boswell – Photo Taco Facebook Group
I could have taken an educated guess based on what I knew about hardware and Lightroom Classic, but as you have come to expect with Photo Taco, I needed to test it. I couldn’t just do a little test here either, I wanted to do THE definitive test so that I could really make sure to answer the question with complete confidence in my answer. I spent over 50 hours since that question was posted in the Facebook group between setting up, executing the test, and compiling the results.
I am going to go through the details of all three of those things (setting up, executing, results). I think most of you listening are probably interested in the gory details, but if not you can skip forward about 20 minutes into this episode and just get to my recommendation on the best way to configure Lightroom Classic to use external storage.
Episode Sponsors
Phlearn – I get contacted very regularly by marketing departments from various photography products who want to partner with the show and I turn most of them away because I just don’t believe in the product enough for a sponsorship.
When Phlearn reached out I was really excited because my friend Aaron Nace and the folks over at Plearn.com produce video training for Photoshop that I can’t recommend strongly enough. It is incredible. Aaron has forgotten more Photoshop than I have ever learned. A huge portion of what I know about Photoshop has come from video training over at Phlearn.com.
Aaron is truly a Photoshop master, but even more important, he is a really good teacher. I have rubbed shoulders with a lot of people who know Photoshop really well but they usually don’t know how to teach others very well. It doesn’t matter the topic; retouching, coloring, compositing, or using camera raw for editing your photos. Aaron knows it, he knows how to teach it, and make it fun!
Included in a year’s subscription to Phlearn.com is instant access to over 150 in-depth video tutorials and they are not done there because they are releasing two new PRO tutorials every month. Priced at $99.95 per year, the annual subscription is an absolute steal and listeners of Photo Taco get an even better deal with 20% off that first year by using coupon code phototaco20 at checkout.
I love Phlearn.com and I know you will too. If you have been afraid of Photoshop this is the solution! Head over to Phlearn.com and use coupon code phototaco20 to get 20%. I want to thank Phlearn.com for helping to make this episode possible.
Create Photography Retreat – I am so excited to be presenting at the Create Photography Retreat again in 2020. It is being held in beautiful Greenville South Carolina October 15-17 when all of the fall colors will be breathtaking. Come join me and others from the Master Photography Podcast network in interactive, hands-on sessions and make some serious progress towards mastering your photography.
Brian just recently published the agenda for the retreat that provides more information about what you can expect this year. If you use the link above you can get 10% the cost of your ticket. If you see this between 2/17 through midnight MST 2/23 you can get $75 off the ticket by using coupon code Jeff75. I would love to see you there!
Testing Requirements
The first thing to share about the setup for the testing was that I had to get through a few failures before I arrived at the actual configuration that led to meaningful results. Of the 60+ hours spent on this testing, at least 20 hours were failures. My first challenge with this testing, how to monitor the hardware. There are four core requirements I have for hardware monitoring:
- Didn’t use a lot of hardware resources. Of course monitoring the hardware usage means you have to allocate some portion of the computer resources to do the monitoring, but I needed something that had such a small footprint while running it has a negligible impact on the results.
- Works on both Mac and PC. I am convinced that there isn’t a dramatic advantage to either platform here in 2020 and you should really use whichever you prefer. It still bothers me when someone posts in our Facebook group that they want to invest in a new computer and they prefer Windows and the people turn the post into a fight between PC and Mac. It’s unproductive and doesn’t help the person who asked the question. Use whatever platform you are most comfortable with! Anyway, I want to do the testing on both just in case there is a difference and/or validate my assertion that it doesn’t matter here in 2020.
- Record metrics for about an hour. Nearly all of the solutions I looked at for doing the hardware monitoring wouldn’t do this. They either provided only real time information, or at most about 5 minutes worth of history. I knew some of the testing I was going to do here would need more time than that.
- Record metrics to a file or database. I actually kind of started out looking at some visual tools thinking maybe I could just watch them as I was doing the testing and sort of mentally get some averages and max numbers, but it quickly became apparent that wasn’t going to work. I needed solutions that would record those metrics so that I could get averages and maximums.
My solution for these four core requirements is using Performance Monitor on PC and iStatsMenus on Mac to gather the metrics. Not super thrilled with it being two different tools, but they both can be configured to gather metrics every 2 seconds for an hour with very little impact on hardware.
What Lightroom Features Would Be Impacted By Storage Performance?
With my tools ready to go, it was time to do some testing. Now I had to figure out exactly what features in Lightroom I was going to test. My experience with Lightroom tells me that there are only a few features where the speed of the storage is a factor. I decided to test four main features in Lightroom where I expected the speed of the storage to be a factor:
- Import. Importing raw files. Couldn’t be just a few raw files, I needed a good number of them. I also didn’t want to use just one type of raw file. From my own cameras and the cameras I have rented, I have raw files from the Sony A7R3, the Fuji XT-3, and Canon 80D. I wanted to use all three so that I could see if the type of raw file makes things different when we compare storage performance. I used 200 raws from Sony, 200 raws from Fuji, and 300 raws from Canon. I actually didn’t intend to use different numbers of those raw files, I really wish I had done 300 of each. I made a mistake when I got the Canon raw files and I didn’t realize until it was too late I had done that. So, 700 raw files in total used for all of these tests.
- Develop Module Scrolling. This is going into the develop module, starting at the first raw file, hitting the right arrow key to move to the next raw file and waiting until the histogram in the upper right refreshed before hitting the right arrow again. Originally, I thought I would hit that right arrow as fast as I could until I saw the Loading message in the lower middle of the photo, but as I started into testing I realized that didn’t happen very often with any of the raws or the storage setup but that histogram refreshing was a really good way to know that Lightroom had actually finished loading the raw file. Oh, and this all had to be done before any previews were built to make sure I was asking Lightroom to pull the information from the raw photos.
- Building 1:1 Previews. After scrolling through all of the raw photos in the Develop module, I would select them all, go into the Library module, and then ask Lightroom to build the 1:1 previews for all 700 raw files.
- Building Smart Previews. The final test is building smart previews for all 700 raw files. Same thing here, as the 1:1 Previews, with all of them selected I would just ask Lightroom to build the smart previews for all 700 raw files.
Why I Didn’t Test Export
You who are familiar with Lightroom may have expected that the Export function in Lightroom would have been in my list. After all, there are a lot of writes happening to a hard drive as part of that process, so wouldn’t there be a lot of potential that the write speeds of the disk would impact that function? Yes, I do expect the read and write performance of disks to impact export, but not as a major factor.
I have done a lot of testing of Export previously and though I don’t have exact numbers I am really confident that by far the most important hardware component that affects Export is CPU. Check out an blog post called Lightroom Classic CPU performance: Intel Core X-10000 vs AMD Threadripper 3rd Gen from my friends over at Puget Systems who have done a ton of testing on the Export functions of Lightroom using far more hardware options than I have available. I decided to keep Export out of this round of testing – for now.
Why I Recorded Full Screen Videos Of The Tests
Before going into the hardware configurations I decided to test, I wanted to talk quickly here about one of the things I did in the testing I hadn’t planned on needing or wanting. In the course of doing a few of the initial tests I was watching those status bars Lightroom will show you in the upper left of the screen when you ask it to do a task that is going to take a while. The upper left corner where the Lightroom log is shown, there is a drop down menu there and when you do Import or building previews that drop down menu includes a visual display of what portion of those tasks are done.
I was watching those so that I could know how long I had before the tests would need to end and I could stop the performance monitoring when an idea came to me. If I did a screen record of all this testing I could tell when Lightroom was done with the 200 Sony raw files, the 200 Fuji raw files, and the 300 Canon raw files by watching those stats bars reach 200, 400, and 700. Then I could play back those videos and I could get exact times for how long things took instead of relying on me starting and stopping a stopwatch accurately. This had been a problem since some of these tests were longer than 30 minutes and I would struggle to sit there waiting.
The problem was every screen recording tool I tried out used a pretty decent amount of CPU, RAM, GPU, and even the storage. So, I set out to my friends on Facebook and Twitter to see if anyone had a bright idea. That is when my good friend and host of the Behind the Shot podcast, Steve Brazill, suggested I should look at NDI. I don’t want to go into details about NDI here but it is a really cool way to send your entire screen over a network connection to another computer or dedicated recording device and capture your screen with next to no impact on the hardware of the computer being recorded!
It is a beautiful solution. I could now get exact times, down to 1/30 of a second and if I missed the exact moment when a test ended it didn’t matter. I could also get the exact times it took for each type of raw file because the video would have the exact frame in video when the 200th, 400th, and 700th photo was done. Another bonus was I could create a video that compared the tests visually – something I would like to do but we will see if I ever find the time.
Storage Configurations To Test
I already have a lot of variables in my test. Mac and PC. Sony, Fuji, Canon raw files. However, I don’t really have the variables for answering the question. Remember, the thing that Laura wanted to know, and her question represented hundreds others who have asked me the exact same question, was if it made a difference in Lightroom performance to use an external SSD or the older external magnetic spinning hard drive. She asked about Catalog, Cache, and Photos for the storage, but after doing some initial testing I determined that the location of the Catalog and Photos were the big factors here, the cache wasn’t playing a large role. So here are the different configurations for storage I tested:
- Catalog on internal SSD and photos on external SSD
- Catalog on internal SSD and photos on external spinning
- Catalog on external SSD and photos on external spinning
- Catalog on external spinning and photos on external SSD
- Catalog and photos on the same external spinning
- Catalog and photos on the same external SSD
These six combinations represented the most common combinations of hard drives I think most of you listeners would have to consider.
Hardware Used In The Testing
The hardware I am using won’t be the same as the hardware you have in Lightroom. The good thing is in this case the CPU/GPU/RAM of your computer isn’t as important to these results as the speed of the disk. With this test we are going to keep everything else exactly the same and test things to find out if the speed of the storage used on the same hardware makes a difference in these four Lightroom functions.
Storage Used In The Test
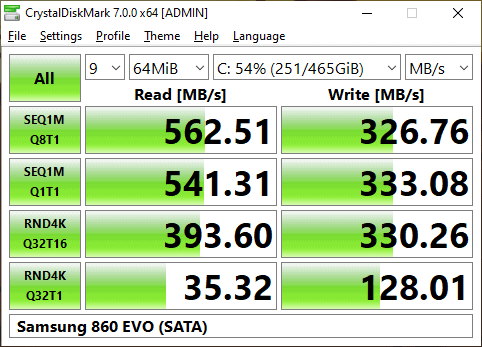
Internal M.2 connected SSD: Sure wish I had an M.2 connected SSD to include in this testing. Realistically though, not sure it would have changed the results as much as you would hope. Read on for more details.- Internal SATA connected SSD: Samsung 860 EVO ($80 500GB, $150 1TB, $280 2TB)
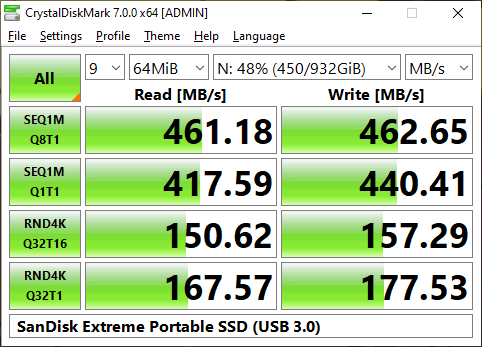
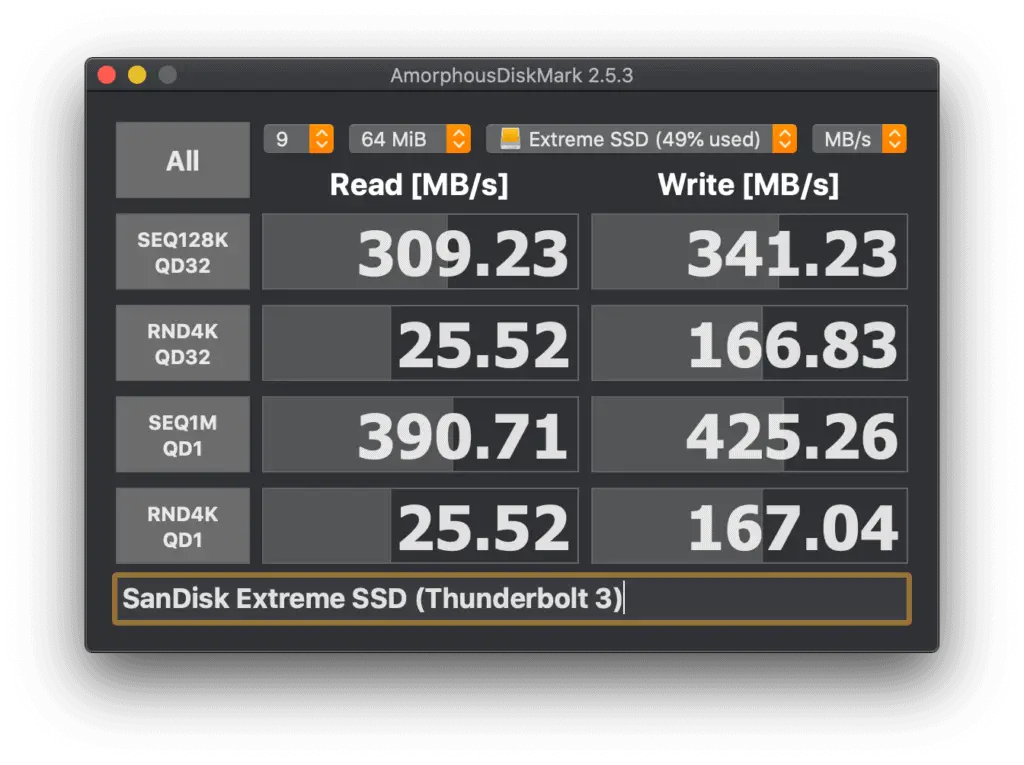
- External USB 3.0 connected SSD: SanDisk Extreme Portable SSD ($90 500GB, $160 1TB, $300 2TB)
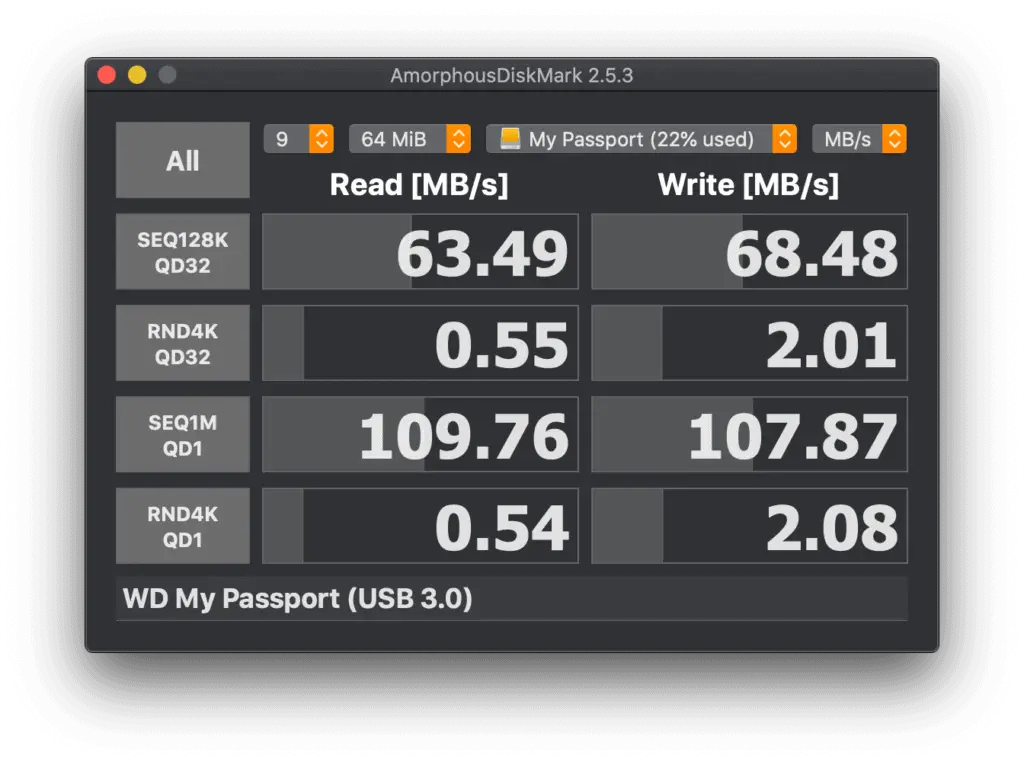
- External USB 3.0 connected spinning: WD MyPassport USB 3.0 ($50 1TB, $70 2TB, $100 4TB)
I don’t have the raw data ready to share just yet, but I can tell you that through the testing I was really surprised to see that the max read and write speeds didn’t take full advantage of the speed available (see final observation point under the Import results below). Even if I did test much faster storage like an m.2 connected SSD the numbers tell me that it isn’t likely to have made a difference as an external SSD connected via USB 3.0 offers more speed than Lightroom uses during these four functions.
Computers Used In The Test
Even though the specs of the computers shouldn’t really matter for these tests as the computer remained constant and it was only the speed of the storage that was different, everyone will want to know what the specs were for the computers used in the testing.
- 2018 15” MacBook Pro
- CPU: 2.2 GHz 6 core Intel Core i7 processor
- RAM: 16GB of memory
- GPU: Intel UHD 630 Graphics plus access to Radeon Pro 555x GPU if macOS Catalina decided to use that graphics. I let Catalina decide on its own if it should switch to the Radeon card, you can do that in the Energy Saver settings. By default the Mac has the energy saving option enabled to use the Intel GPU built into the processor instead of powering up the energy hungry discrete graphics card. Just so you know, MacOS Catalina stuck with the Intel GPU when it had a choice and I did run a couple of quick tests with the Radeon card forced to be on just to see if that impacted the test and it did not.
- OS Version: MacOS Catalina
- 2014 custom built Windows PC
- CPU: Intel 4 core Core i7 4770K CPU running at 4.3 Ghz
- RAM: 32GB of memory
- GPU: NVIDIA GeForce GTX 1060 GPU
- OS Version: Windows 10 Pro the 1903 release.
Windows Results Only – For Now
Bad news. I only have the Windows results to share right now. I am really excited about the screen capture method for nailing down exact times on these tests. NDI is going to be the perfect solution there and I am using OBS to record the screen on another computer. I think it is the perfect solution for how I want to do this but there was a bit of a learning curve and I discovered too late in the process that recording to mkv video files isn’t a good way to look at the video frame by frame. Neither is having OBS immediately transcode the mkv into an mp4.
I tried all kinds of video players to see if I could find one that would let me use either the mkv or the mp4 video formats to get the frame by frame details I need, but it seems those formats are either not supported or the makeup of the format is not conducive to frame by frame movement. I am not an expert on video codecs and video formats, but something to do with the indexing of the video container.
The QuickTime mov format is one that is supported really well by Premiere Pro and a number of other video players/editors, but I am really familiar with Premiere Pro and that is where I wanted to do this frame by frame analysis. I discovered that I could record to .mov using OBS and have this work exactly like I wanted only after I had already done the recordings for Mac and had started into the recordings for Windows. I changed up the settings in OBS to produce .mov files that worked great but I only did that for the Windows tests thus far.
I am going to try transcoding the mp4 to mov files and see if I can make those tests work better but it just wasn’t ready in time and I really wanted to get some of this information out. Rest assured, the Mac results were not significantly different. I have some more data crunching I want to do so I’ll get that done and update this information at some point.
Results!
Finally we can get to the results now. Let’s go in the order of the tests.
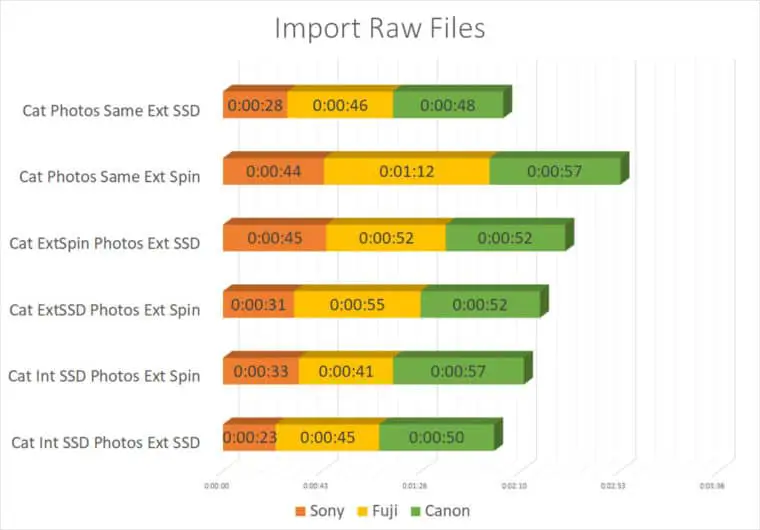
Import

Observations:
- Fastest: Catalog on the internal SSD and photos on the external SSD. 1 min 58 seconds
- Second: Catalog and photos on external SSD. 2 mins 2 seconds (3% slower)
- Third: Catalog internal SSD and photos external spinning: 2 mins 11 seconds (11% slower)
- Fourth: Catalog external SSD and photos external spinning: 2 mins 18 seconds (17% slower)
- Fifth: Catalog external spinning and photos external SSD: 2 mins 29 seconds (26% slower)
- Slowest: Catalog and photos on external spinning: 2 mins 53 seconds (47% slower)
- Average time across all of the tests to import a single photo for Sony raw 0.18 seconds, Fuji raw 0.27 seconds, Canon raw 0.18 seconds. Fuji raw files took 33% longer to import despite being smaller in file size than Sony raw files. Sony raw files average 42MB in size, Fuji raw 31MB in size, and Canon raw 23MB in size.
- I don’t have this metric for all of the tests yet, still working on extracting the data, but across all of the Import tests the maximum read speed was only 45MB/s (Cat Int SSD Photos Ext Spin) even though 540MB/s was available. On average, across all of the tests the average read speed was a lowly 9.5MB/s. If I limit that data to only the average read speeds for the tests where the photos were on the SSD that number is still a very low 12.5MB/s. The maxim write speed (Cat ExtSSD Photos Ext Spin) happened with with the catalog on SSD at 79.8MB/S. On average the write speed across all tests was 19.3MB/s. On average the write speeds with the catalog on the SSD was the highest at 21.5MB/s. Better use of the performance with the catalog writing to an SSD drive but still well below the 430MB/s available. This data tells me that using an SSD drive, even one connected via USB 3.0, offers more speed than Lightroom actually uses for Import.
Develop Scrolling
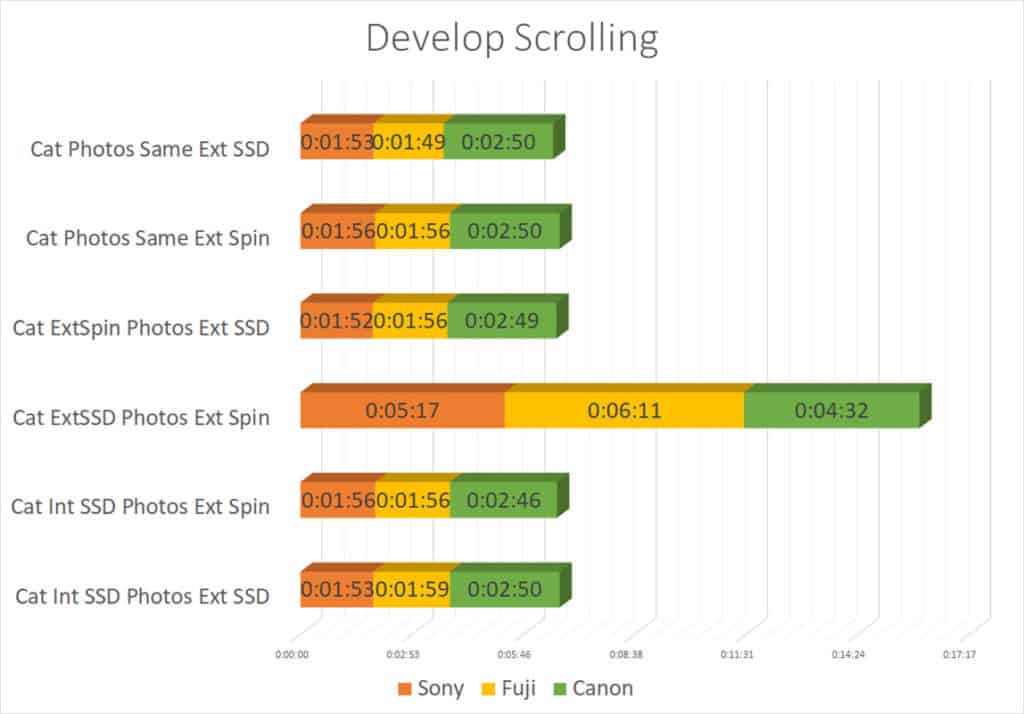
- Fastest: 5 way tie. 6m32s. Far faster than I expected. Doesn’t look as though the performance of the storage has much of an impact with scrolling through the Develop module. Not at all what I expected.
- Slowest: Cat ExtSSD Photos Ext Spin. 16m (59% slower). Something wrong with this data. Too much of an outlier and I don’t think it is accurate. Really should throw this test out and re-test this specific configuration, which I will do at some point. I may have had the spinning drive connected to a USB 2.0 port.
- Averages time across all of the tests (excluding the bad one) to scroll to a new photo and have the histogram refresh was 0.57 for Sony raw, 0.58 seconds for Fuji raw, 0.56 seconds for Canon raw. No difference between them given the margin for error (human eye watching for and reacting to a histogram update).
- Interesting again with this test that the size of the raw files weren’t a factor. I really expected that the performance of the storage would have an impact, and then because Sony raw files are larger (42MB) it would be much slower to scroll through Sony raw files in the Develop module than the smaller Fuji (31MB) and Canon (23MB) raw files. That wasn’t the case.
1:1 Previews
- Fastest: Cat Photos Same Ext SSD. 27m10s. A long time for building previews. Not a good idea to do this for all of your photos. Use the Embedded Preview workflow then cull in Library and only build these 1:1 previews for those that survive.
- Slowest: Cat ExtSSD Photos Ext Spin. 33m9s (18% slower). There is a performance penalty when you have your photos on an external spinning hard drive
- Average time across all tests was 3.48 seconds to build a 1:1 preview for a Sony raw file, 3.55 seconds for a Fuji raw files, and 1.53 seconds for a Canon raw file. Lightroom Classic (v9.2) can build 1:1 previews for Canon (80D) raw files nearly 60% faster than Sony (A7R3) and Fuji (X-T3)!
- Again, interesting that performance didn’t really correlate to raw file size in the 1:1 previews test. Lightroom Classic built 1:1 previews for the larger Sony (42MB) raw in less time than the smaller Fuji raw files (31MB).
Smart Previews
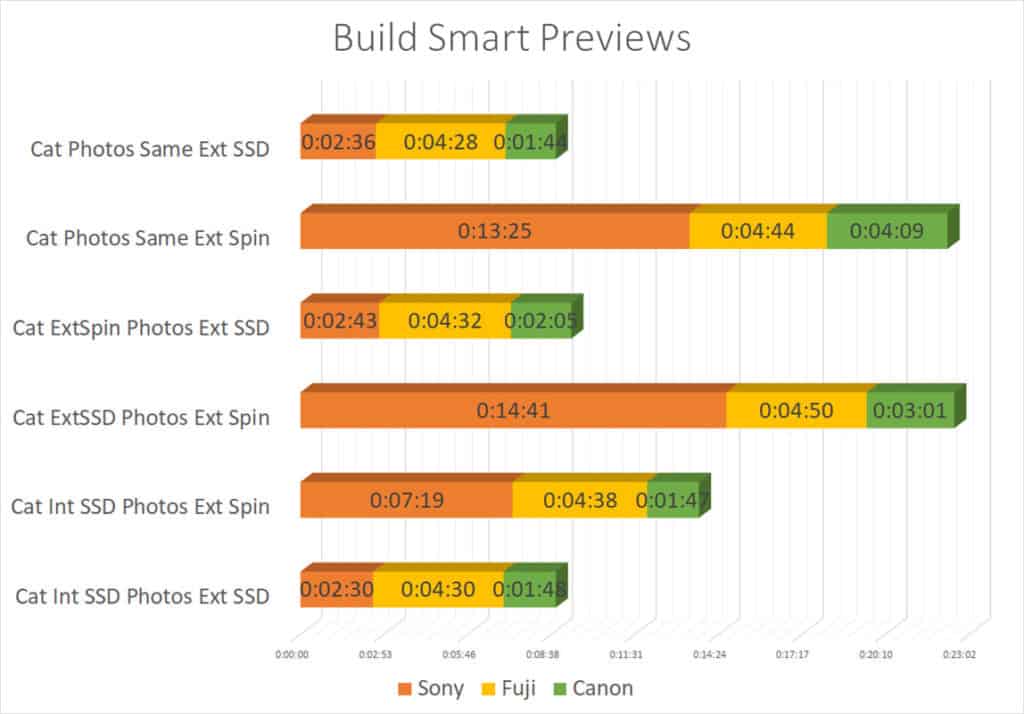
- Fastest: 2 way tie. Cat Photos Same Ext SSD, Cat Int SSD Photos Ext SSD. 8m48s.
- Slowest: 2 way tie. Cat ExtSSD Photos Ext Spin, Cat Photos Same Ext Spin. 22m32s (61% slower). Again, there is a performance penalty for having your photos on a spinning drive vs on an SSD.
- Average time across all tests to have Lightroom Classic build Smart Previews for a Sony raw file was 2.44 seconds, 1.39 seconds for a Fuji raw file, and 0.51 seconds for a Canon raw file. Lightroom Classic (v9.2) was able to build a smart preview for a Canon raw files 63% faster than Fuji, nearly 80% faster than Sony!
- There may finally be a correlation in this test between raw file size and how quickly Lightroom Classic can build Smart Previews. The Canon (23MB) raw files had Smart Previews built faster than the Fuji (31MB) raw files which had Smart Previews built faster than Sony (41MB) raw files. Though I think more testing would have to be done to say this is true.
I was really hoping I could go into depth on each of these and use the metrics I gathered to explain why it was the numbers came out the way they did. Especially important are the numbers on the average and max read/write speeds through the tests. Pulling that detail together was a little more involved than I expected as well. I may not do another episode providing those details, but I will get the numbers pulled and at some point I will offer the data here on the website. I’ll let you know what that is done by mentioning it in a future episode and in the Facebook group.
Putting It All Together
It is really just as you expected. SSD does help make things faster with these things. Here is the performance order of the options based on the position they took in each of the tests:
- Catalog and Photos on the Same Ext SSD (Fastest)
- Catalog on an Internal SSD and Photos on an External SSD
- Catalog on an Internal SSD and Photos on an External Spinning
- Catalog on an External Spinning and Photos on an External SSD
- Catalog on an External SSD and Photos on an External Spinning
- Catalog and Photos on the Same External Spinning (Slowest)
From a purely raw performance perspective, these tests did prove it is best to not use less expensive external spinning hard drives to store your photos. Lightroom will perform better for these functions if you use an SSD for storing your photos. However, Lightroom Classic doesn’t fully utilize the speeds of an SSD drive even at the slower speeds when connected via USB 3.0 vs what you can get from them when connected via Thunderbolt or M.2 (didn’t test M.2 remember).
On average the performance numbers say that Lightroom is about 50% faster when your photos are stored on an SSD drive vs. a spinning drive and for the 700 raw files that I used in my testing that means saving 30 minutes out of 1 hour and 14 minutes. Yes, if you can afford the external SSD drive for storing your photos while you are editing them and then move them to a slower (less expensive) spinning drive when you are done for long term storage it is worth doing that.
However, with external SSD drives being 220% more expensive than external spinning drives it is very reasonable to use an external spinning drive for both your catalog and your photos. Use the Embedded Preview workflow in Lightroom Classic and the downsides of using an external spinning drive will go down tremendously.
What About Photos On An Internal Spinning Drive?
What about photographers who have a computer with both an internal SSD and an internal spinning drive? Should a photographer who is using a spinning drive internally for their photos upgrade that drive to an SD?
This test was specific to how external drives should be used and what types of external drives impact the performance of Lightroom Classic. I didn’t include testing the scenario where the catalog may be on the internal SSD of the computer and photos on an internal spinning drive.
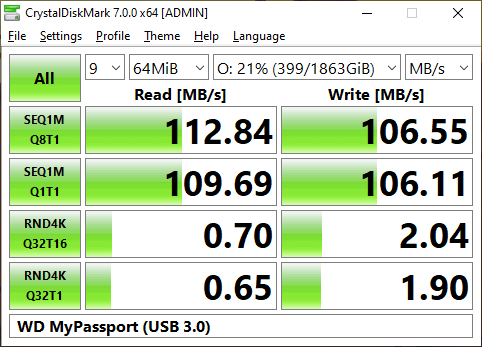
However, a quick test using CrystalDiskMark to see what kinds of speed you get from an internal spinning drive gives me the following numbers:
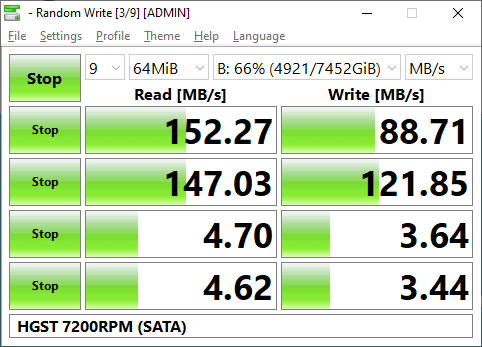
Those numbers are slightly higher than a spinning drive connected via USB 3.0, but significantly lower than the numbers for an SSD drive connected via USB 3.0 or SATA. With the testing showing that Lightroom Classic did indeed perform as much as 50% better for these four functions when the photos were stored on an SSD I imagine the same would mostly hold true (but to a lesser extent) for storing photos on a spinning drive connected internally (SATA).
Stands to reason that adding an internal SSD for the photos would yield something like a 15-20% improvement in performance over an internal spinning drive connected via SATA. Not ground breaking. Maybe not even something you would actually notice honestly. But every lit bit of performance can really add up.
You could consider adding a 500MB internal SSD drive that you use while editing your photos and when you are done moving them off that SSD over to the larger but slower spinning drive where you will store your photos long-term. That would buy you the performance improvement without having to break the bank on a large SSD drive.
Podcast: Download (Duration: 1:06:03 — 45.3MB) | Embed
Subscribe: Spotify | TuneIn | RSS
Comments
You did a Ton of great research, except for one thing which was a comparison of my own setup. I’m a photographer from LA now in Palm Springs. My setup is mbp 2015. Everything is completely new. 16gb. 2tb int drive. I have images and cat. both on the int m.2. No issues at all but i was hoping you would have tested this configuration. Either way your results no matter how detailed and impressive they were comes back to exactly what makes sense. Using better faster drives, going through the shortest throughput will Always give you better results. Oh and one more thing. Improving every aspect of yourself as a photographer, an artist, is far more important than spending so much time, which so many do, trying to save a small fraction of time on the computer.
@Ken, if I had an m.2 connected drive I would have tested it. Just didn’t have that available to me. While I agree that it is far more important to work on the artistic aspects of photography, so many photographers can’t afford the most recent hardware and they need information to inform the decisions they have to make on where to put that investment. That is the service I am providing here in this specific episode. I have plenty of others in Photo Taco and the Master Photography podcast that offer tips and techniques for the artistic aspects.
I am wondering if file sizes is a factor in the tests from the different cameras? I did not see that in your analysis…
@David,
You are right. I mentioned it some in the observations under Import where I was surprised that Fuji raw files were imported 33% slower than Canon and Sony raw files even though Sony raw files were significantly bigger. I think I need to add a section to the post that states it more clearly. Thanks for the suggestion.
Jeff, I’m so amazed by all the work you did. This is really helpful to make decisions about our setup.
Really fan of your podcasts.
Thanks
Pingback: Intel NUC - Inexpensive Photo Editing Computer - Photo Taco Podcast
Pingback: 5 Things Photographers Need In A Computer Monitor - Master Photography Podcast
Pingback: Photography is all about ____? - Master Photography Podcast
Pingback: What Does Apple Silicon Mean For Photographers? - Photo Taco Podcast
Thank you!! I too appreciate your work for my benefit and knowledge. I stumbled onto your site while searching google for best external SSD to edit photos in LR. Now I will follow you and look for more great information.
Thanks again!!
Pingback: Help With Drive Space and Backups For Photographers - Photo Taco Podcast